
Using Mirah with Couples

If the other party in the couple is also in individual therapy and has a client record in your EHR:​

1). Locate the client’s record in Mirah by searching for their name in the search bar.

The screenshot displays the top navigation bar of the Mirah Measurement-Based Care platform, which is used for managing client interactions and tracking clinical progress. The navigation bar includes tabs for Dashboard, Analytics, and Clients, allowing users to switch between different sections of the platform. A search bar labeled 'Search Clients' is prominently located in the center, with a magnifying glass icon to initiate the search. Below the navigation bar, there are filters for Provider, Unit, and Flags, each with dropdown options to refine the view. A checkbox labeled 'Test clients' is available for toggling the inclusion of test data. The interface also shows status tabs for Recently Completed, Awaiting Response, Scheduled, My tasks, and Failed logins, each with a count of items in parentheses, providing quick access to different client management tasks.

2). Manually schedule a session(s) from the Client Detail page by clicking "Schedule Session."

The screenshot displays the client management interface for Kait TEST within the Mirah Measurement-Based Care platform. At the top, there is a navigation bar with options for Dashboard, Analytics, and Clients, along with a search bar labeled 'Search Clients'. The breadcrumb trail indicates the current page is under 'Clients' with a specific focus on 'Kait TEST'. The main section lists several actionable buttons: 'Report' for generating client reports, '[BETA] New Report' and '[INTERNAL] Old Report' for accessing different report versions, 'Measurement Protocol' for setting or reviewing protocols, 'Schedule Session' for arranging client sessions, 'Edit Demographics' for updating client information, and 'Disable Notifications' for managing alert preferences. The 'Schedule Session' button is highlighted with a red arrow, indicating its importance or current focus. On the right side, there is a section for client details including Full Name, Preferred Name, Preferred Pronouns, Date of Birth, Gender Identity, ID Number, Phone Number, Last Session Date, Related Contacts, and Care Team.

3). Select the appropriate time/date and recurrence (note: If a client cancels/reschedules their appointment in your EHR, you will need to do the same in Mirah).

4). Click "Confirm Session" at the bottom of the screen.
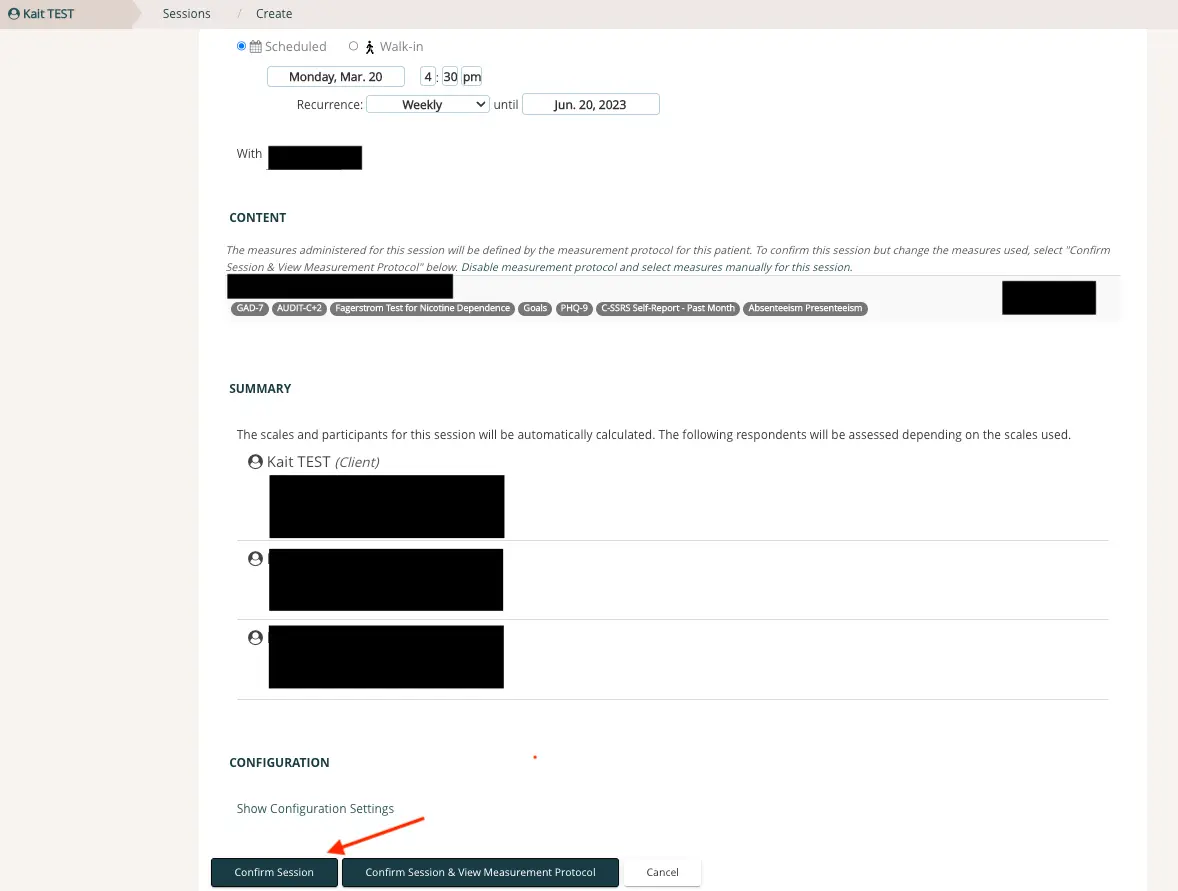
The screenshot displays the session creation page for a client named Kait TEST within the Mirah Measurement-Based Care platform. At the top, there are options to select the session type as either 'Scheduled' or 'Walk-in'. The session is scheduled for Monday, March 20 at 4:30 PM with a recurrence set to 'Weekly' until June 20, 2023. The 'With' field is partially redacted, indicating the session is with another participant whose name is hidden. Under the 'CONTENT' section, it explains that the measures for the session will be defined by the measurement protocol for the patient, with an option to disable the protocol and select measures manually. Listed measures include GAD-7, AUDIT-C+2, Fagerstrom Test for Nicotine Dependence, Goals, PHQ-9, CSSRS Self-Report - Past Month, and Absenteeism Presenteeism. The 'SUMMARY' section indicates that scales and participants will be automatically calculated, listing Kait TEST as the client and two other redacted participants. The 'CONFIGURATION' section offers a link to 'Show Configuration Settings'. At the bottom, there are three buttons: 'Confirm Session' on the left, 'Confirm Session & View Measurement Protocol' in the center, and 'Cancel' on the right.

If the other party does not have a record in your EHR:​

1). From the Clients tab, click "Create New Client."
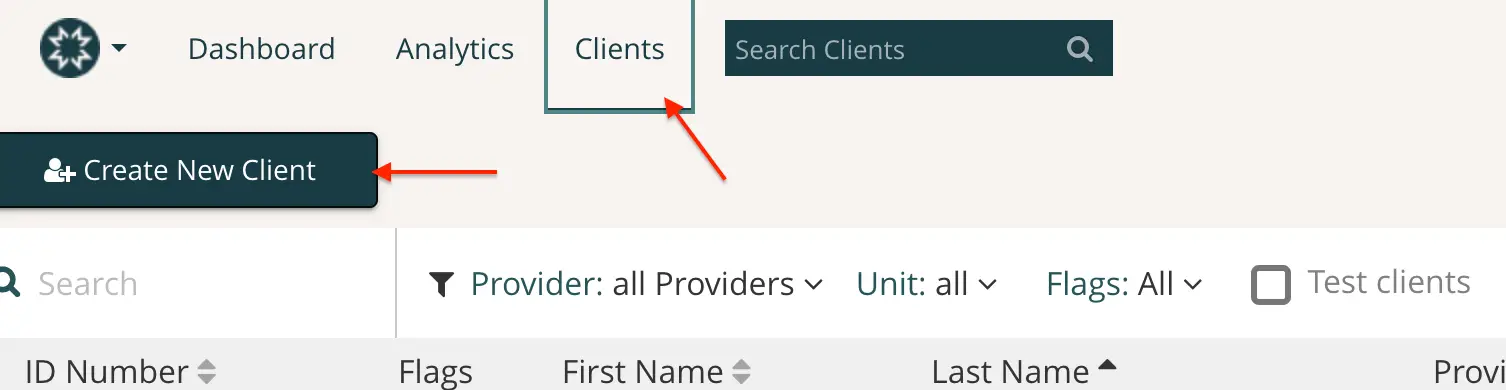
The screenshot displays the 'Clients' section of the Mirah Measurement-Based Care platform, which is part of the user interface for managing client information. At the top, there is a navigation bar with options for 'Dashboard', 'Analytics', and 'Clients', with 'Clients' being highlighted, indicating the current section. To the right of the navigation bar is a search bar labeled 'Search Clients' for finding specific clients. Below the navigation bar, there is a prominent button labeled 'Create New Client' on the left side, which allows users to add a new client to the system. The main area of the screen shows a table with columns for 'ID Number', 'Flags', 'First Name', 'Last Name', and 'Provider', which are used to display and sort client information. Above the table, there are filter options for 'Provider', 'Unit', and 'Flags', with dropdown menus to refine the client list, and a checkbox labeled 'Test clients' to include or exclude test clients from the view.

2). Enter the client’s information, choose yourself as the Primary Clinician, and click “Submit”

To manually schedule a session(s) from the Client Detail page:​

  1. Click "Schedule Session."
  2. Select the appropriate time/date and recurrence (note: If a client cancels/reschedules their appointment in your EHR, you will need to do the same in Mirah).
  3. Click "Confirm Session" at the bottom of the screen.

In addition to your Organization's core protocol, consider using one of the following:

Couples Satisfaction Index -16-items (CSI-16)

Couples Satisfaction Index- 4-items (CSI-4)