
Measure Planning and the Scale Selection Tool

With patients, you may notice that measures part of a protocol aren't being sent out as expected for a specific session. The "Automatic Planning Details" tool can be used to check the status of planned measures for a specific session.

How to Use the Automatic Planning Details Tool​

1). On a patient's record page, scroll down until you see "Past Sessions". Find the appointment you are looking for the measurement details for, and click on the "Details" button.

The screenshot displays the client management interface for Ben Jones within the Mirah Measurement-Based Care platform. At the top, there is a navigation bar with options for Schedule, Analytics, and Clients, along with a search bar to find clients. The client's name, Ben Jones, is prominently displayed with a breadcrumb trail indicating the current page. On the left side, there are several action buttons including [BETA] New Report, [INTERNAL] Old Report, Measurement Protocol, Schedule Session, Edit Demographics, and Disable Notifications, each serving different functions for managing client data and sessions. On the right, client details such as Date of Birth, Sex, Gender Identity, ID Number, Email, Phone Number, and Last 4 SSN are listed, though no specific data is shown. There are options to Add a related person and Edit related people, with Hugh Barrigan MD listed as part of the care team. Below, the Past Sessions section shows a completed session on April 20th at 7:30 am with Ben Jones, including a PHQ-2 assessment and an estimated completion time of 2 minutes. There are buttons for Report, Details, and Edit located below the session details. The Upcoming Sessions section is empty, indicating no scheduled future sessions. A Help button is located at the bottom right corner for user assistance.

2). From the "Details" page, scroll down until you find the "Automatic Planning Details" section.
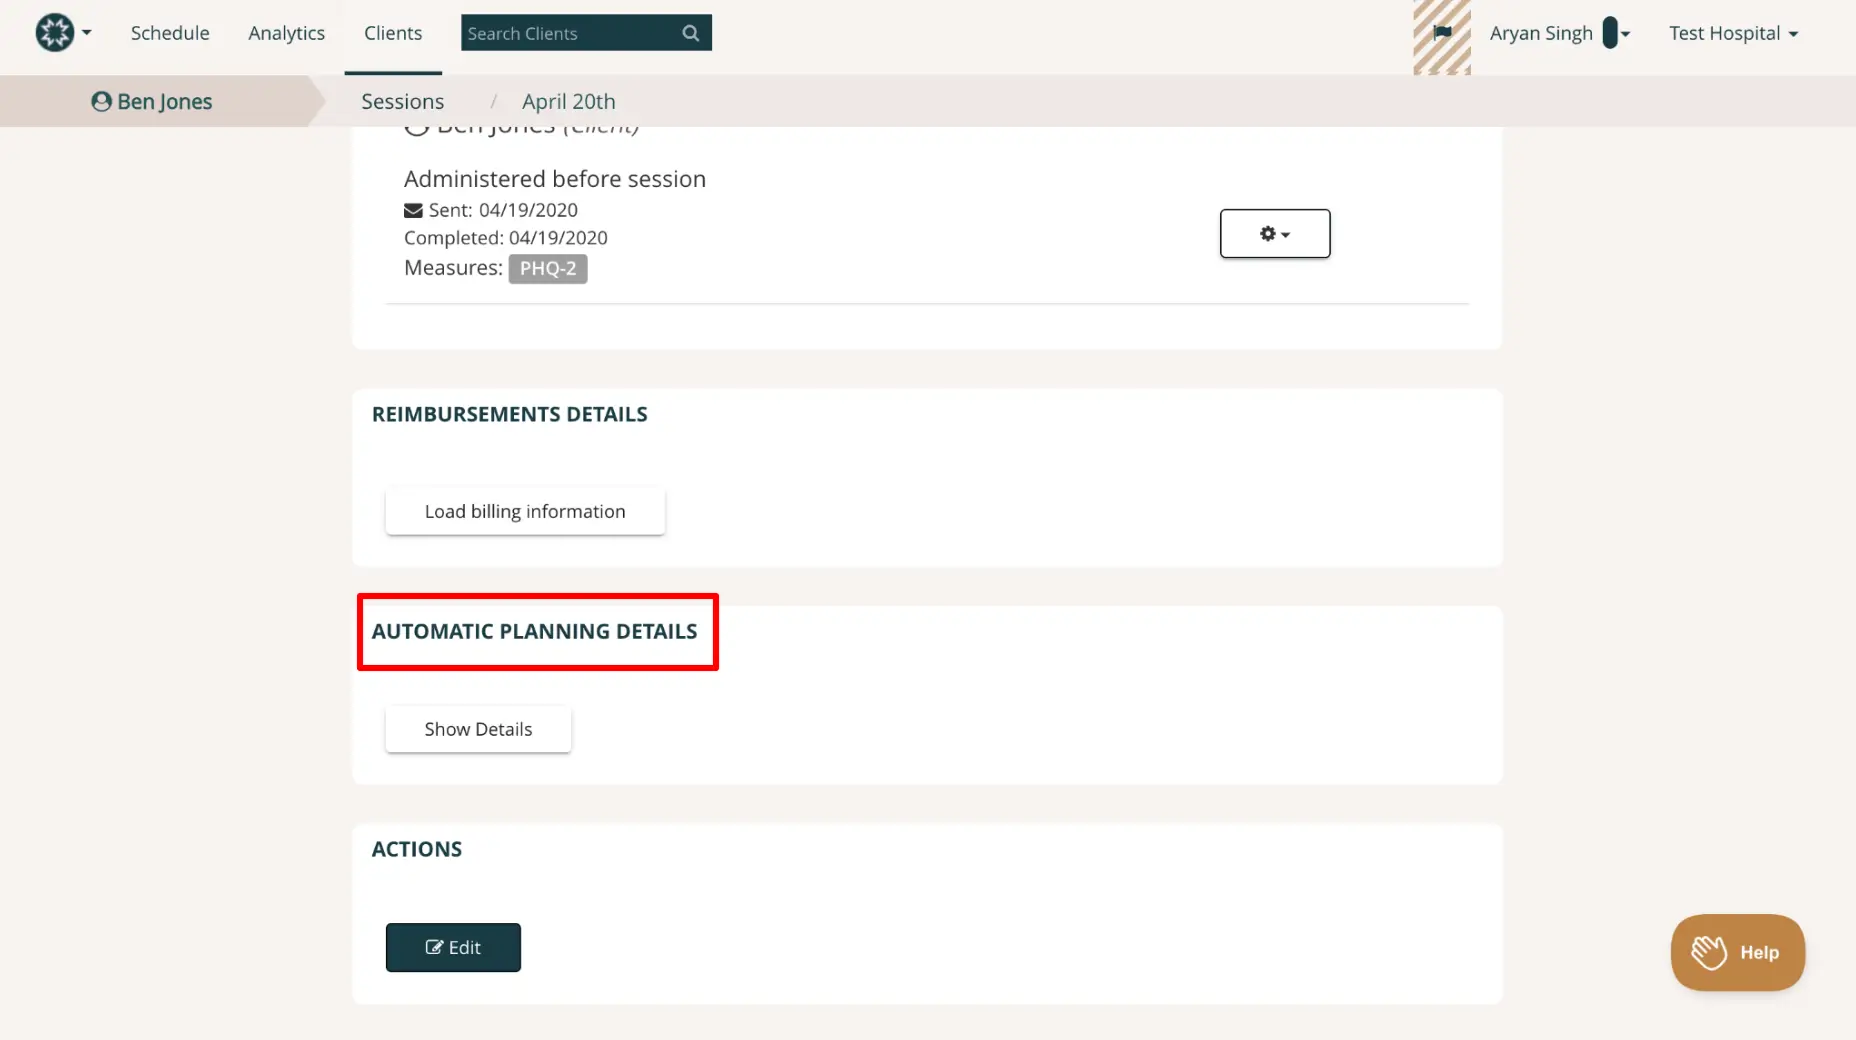
The screenshot displays the 'Sessions' page for a client named Ben Jones, dated April 20th, within the Mirah Measurement-Based Care platform. At the top, there is a breadcrumb navigation showing 'Clients > Sessions > April 20th'. The page includes details about a session administered before the specified date, with information on when it was sent and completed, and the measure used, PHQ-2. Below this, there are sections for 'Reimbursements Details' with a button labeled 'Load billing information', 'Automatic Planning Details' with a button labeled 'Show Details', and 'Actions' with an 'Edit' button. The 'Edit' button is located at the bottom of the page. The user interface also includes a search bar for clients, a navigation menu with options like Schedule, Analytics, and Clients, and a user profile section at the top right corner showing the user as Aryan Singh from Test Hospital. A 'Help' button is located at the bottom right corner of the screen.

3). Click on "Show Details" to see the automatic planning details for this patient's measures. A table will appear displaying the details of each measure.
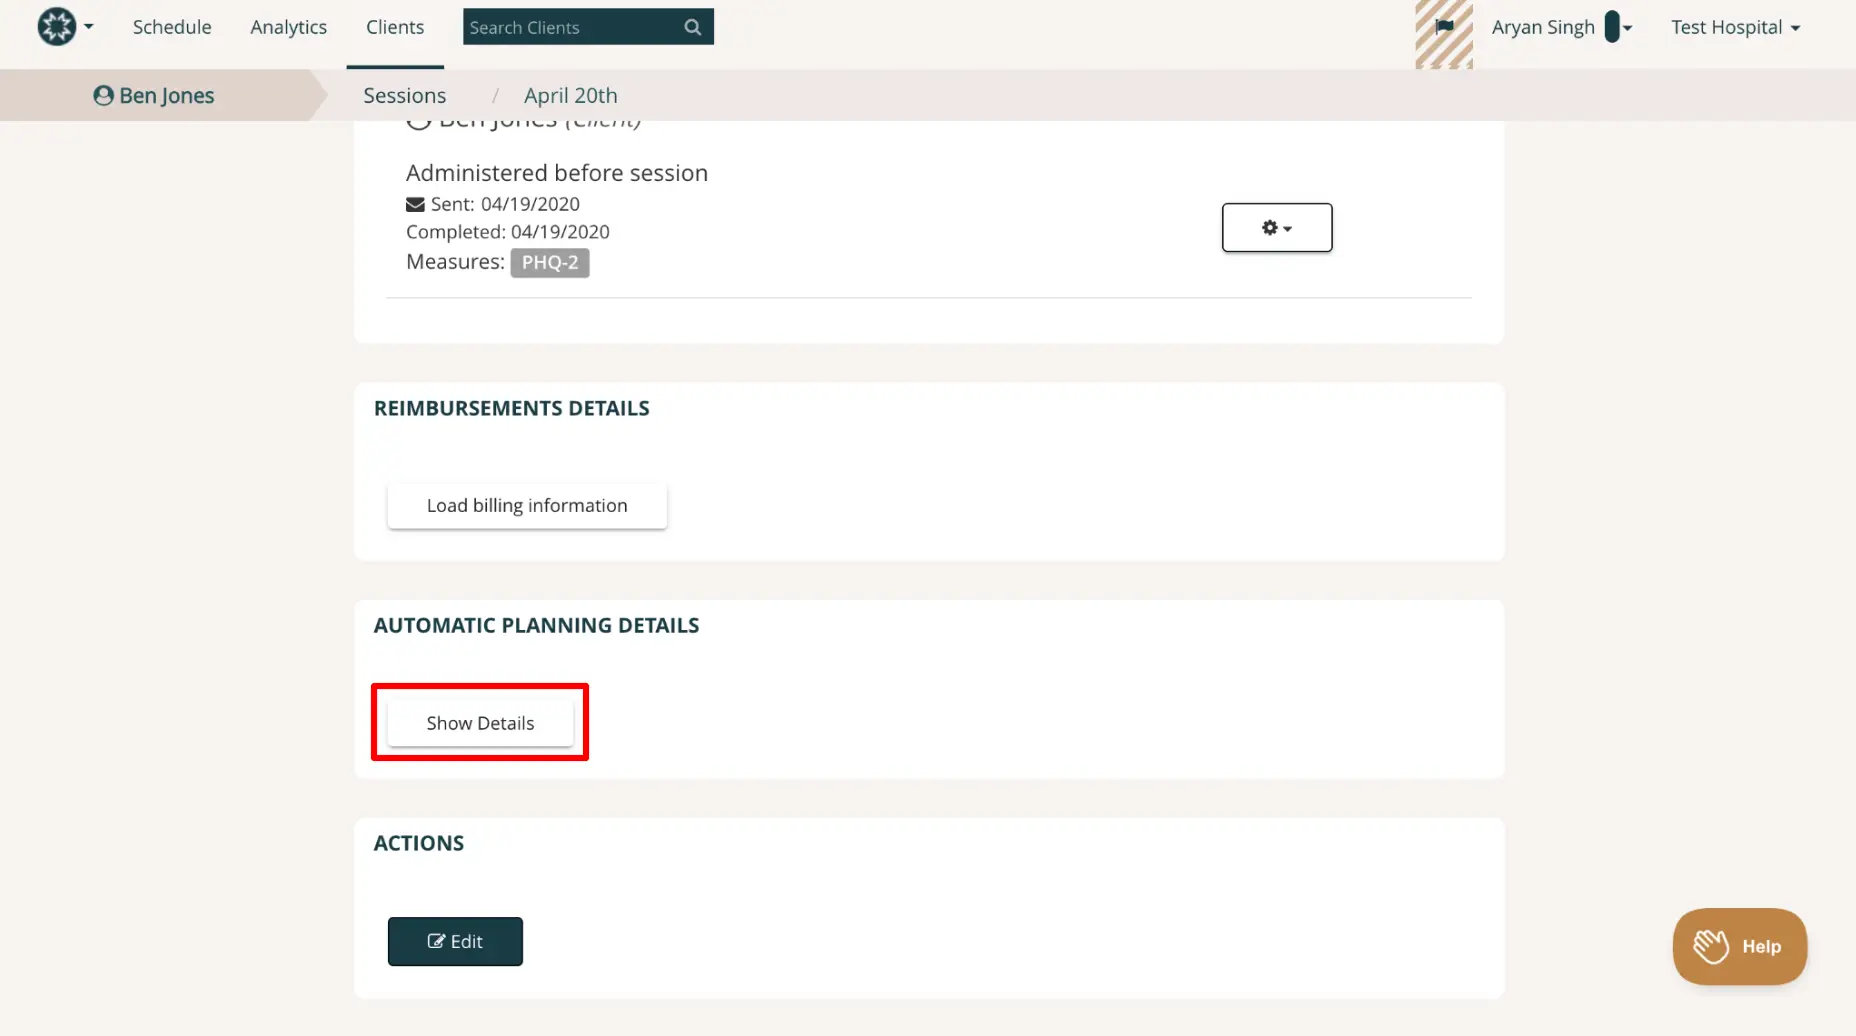
The screenshot displays the Mirah Measurement-Based Care interface, specifically within the Measure Planning and Scale Selection Tool. At the top, there is a navigation bar with options for Schedule, Analytics, and Clients, along with a search bar labeled 'Search Clients'. The breadcrumb trail indicates the user is viewing details for 'Ben Jones' under 'Sessions' on 'April 20th'. The main section shows session details for Ben Jones, including the administration status of a measure before the session, with the measure labeled as 'PHQ-2'. The date sent and completed is noted as 04/19/2020. Below, there are sections for 'Reimbursements Details' with a button labeled 'Load billing information', 'Automatic Planning Details' with a button labeled 'Show Details', and 'Actions' with an 'Edit' button. The 'Show Details' button is highlighted with a red border. The user profile is displayed at the top right, showing 'Aryan Singh' and 'Test Hospital'. A 'Help' button is located at the bottom right corner.

4). The most important fields to note on this table are "Administer" and "Details". "Administer" will display a black check mark if the measure is being administered to the patient for this session. "Details" will state the cadence the measure is setup to be sent.
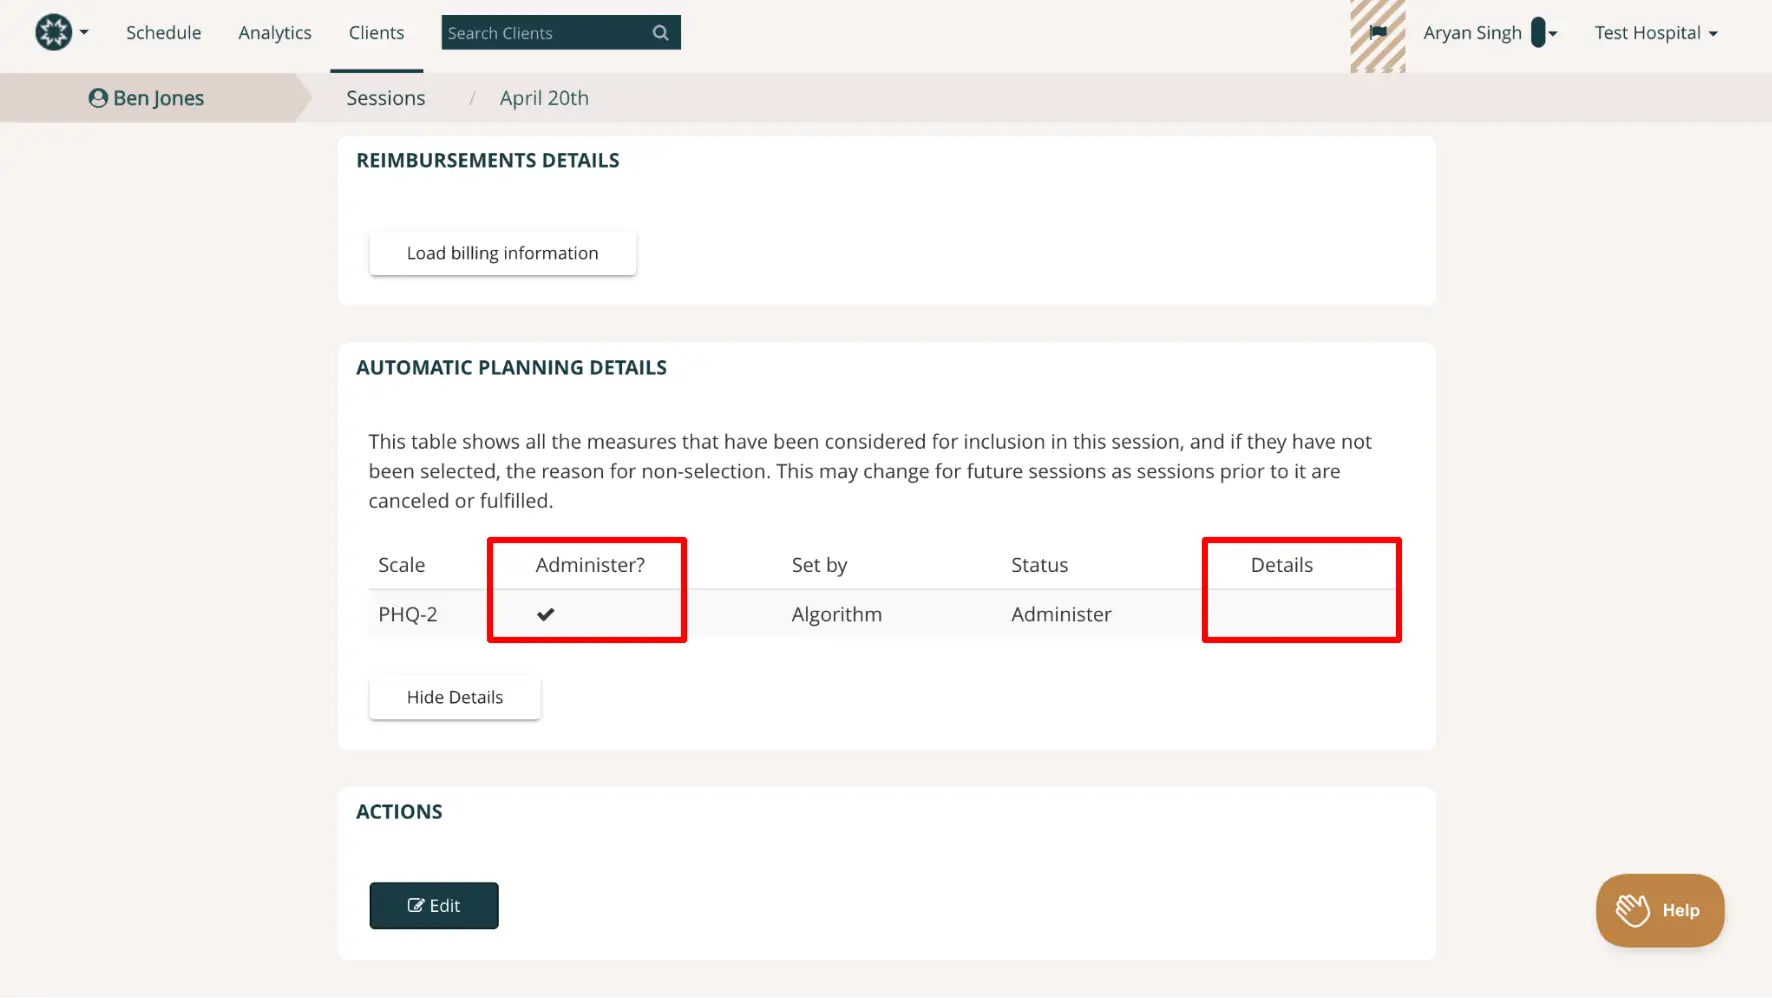
The screenshot displays the Measure Planning and Scale Selection Tool interface within the Mirah Measurement-Based Care platform. At the top, there is a navigation bar with options for Schedule, Analytics, and Clients, along with a search bar labeled 'Search Clients'. The breadcrumb trail indicates the user is viewing details for a session on April 20th for the client Ben Jones. The main content area is divided into sections. The 'Reimbursements Details' section contains a button labeled 'Load billing information'. Below, the 'Automatic Planning Details' section presents a table listing measures considered for the session. The table includes columns for 'Scale', 'Administer?', 'Set by', 'Status', and 'Details'. The row for the PHQ-2 scale shows a checkmark under 'Administer?', 'Algorithm' under 'Set by', and 'Administer' under 'Status'. A 'Hide Details' button is located below the table. The 'Actions' section at the bottom features an 'Edit' button. A 'Help' button is positioned in the bottom right corner of the screen.

If the information in the Automatic Planning Details still doesn't clarify why a measure has or hasn't been sent, please contact support@mirah.com for further assistance.