Patients - Feature Guide
Once a patient’s record has been created, you can edit certain information for that patient on their Patient Details Page.
Patient Demographic Information
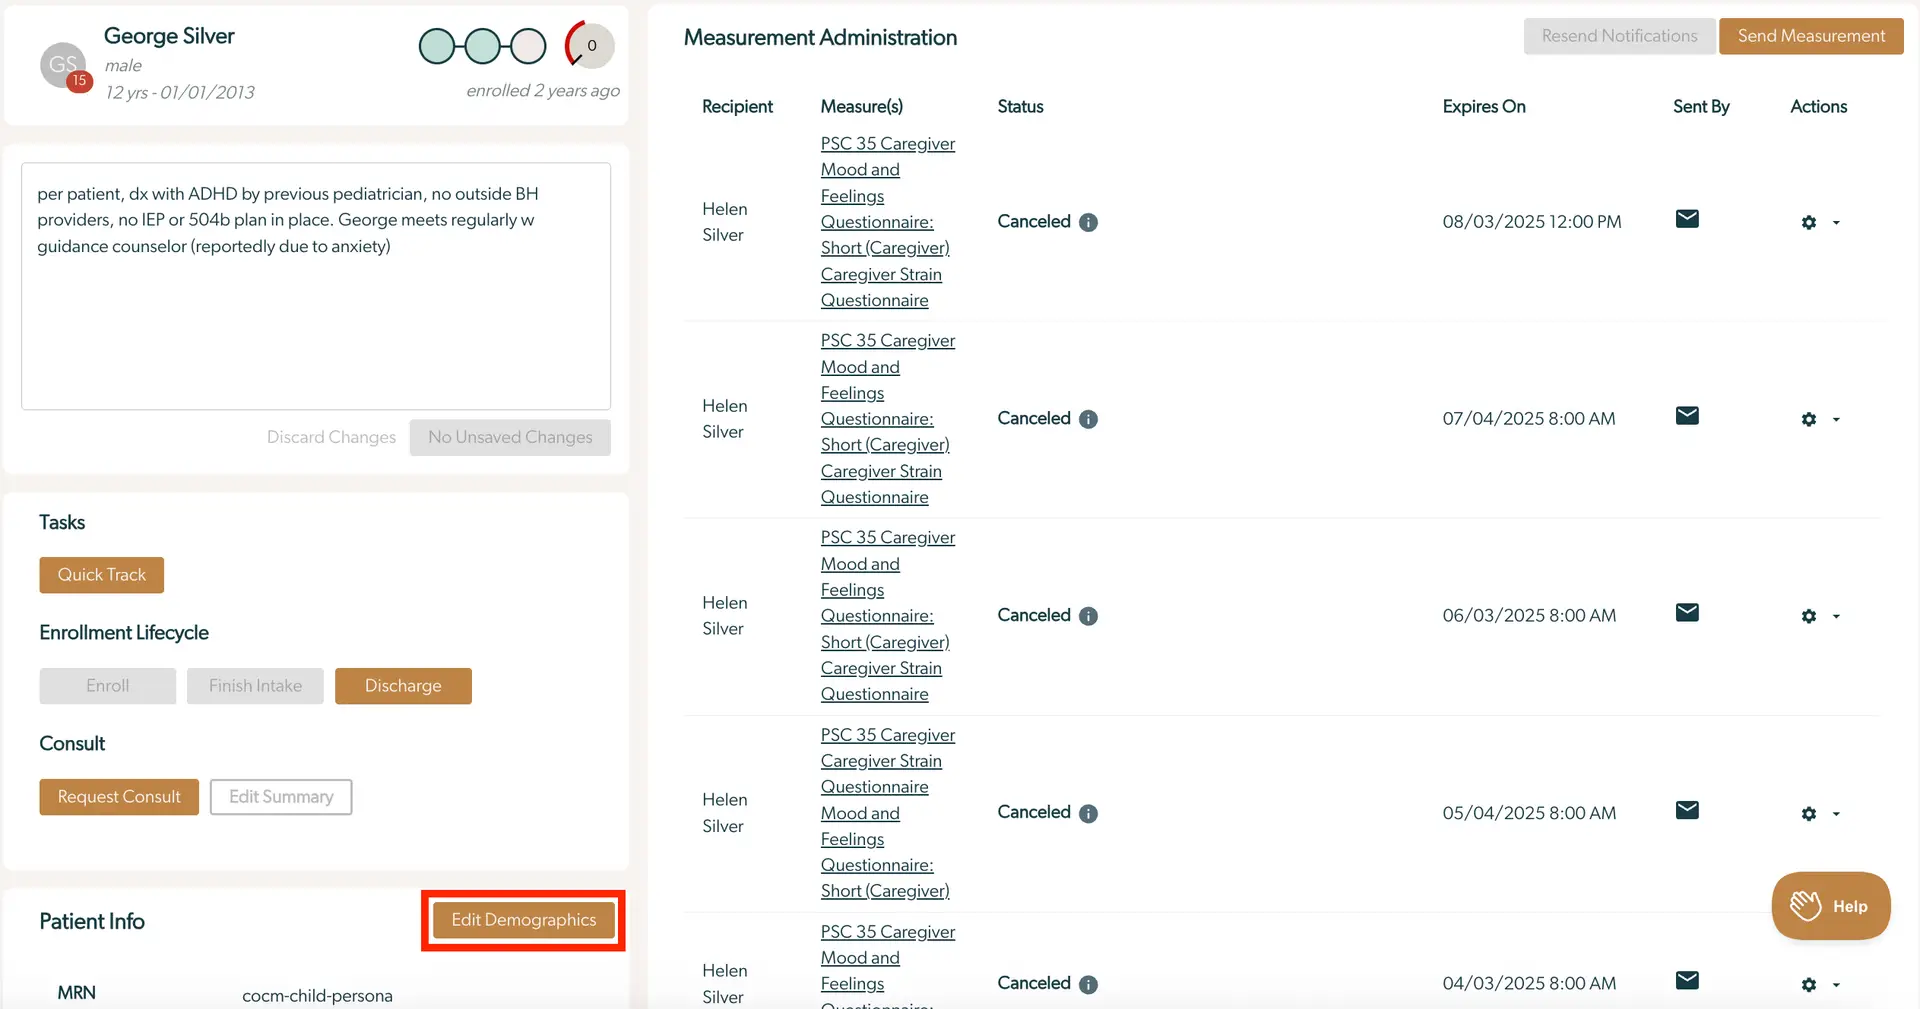
1.) On the patient record, you will see several patient related cards. Under the Patient Info card on the bottom left, click the “Edit Demographics” button
2.) Update the relevant information, then click “Save”
*Note if you are integrated with Mirah: If you update demographic information in the system that differs from your EHR then your integration will overwrite data in Mirah, except for the fields listed in this support article.
Measurement Administration

This section contains a row for each time measures are schedule to be sent out, which usually contains multiple measures. The rows are listed earliest to latest of the most recent 5 invitations. Earlier invitations can be seen by clicking the Right Arrow at the bottom of the section. The following fields exist:
- Recipient: name of who will receive the measure. This can either be the patient or a Related Person/Caregiver
- Measure(s): all the measures sent on that administration. Each measure can be clicked into to see the Feedback Report
- Status: current status of measure. A detailed timeline can be seen by clicking the information icon at the right of any status record. The records can be any of the following statuses:
- Scheduled: Measures will be sent according to their scheduled time.
- Sent: Measures have been sent but not yet completed. The measurement time window is still open.
- Completed: Measure sent to recipient and it was filled out and submitted. Please note that if the recipient opens it and skips questions, it will still say Completed though some of the scores might be invalid.
- Expired: Measures were sent but were not completed before the measurement time window closed. This window is configured by your institute and is usually 1 week.
- Canceled: Provider canceled invitation by clicking "Cancel Measurement" on the Gear Icon menu.
- Expires on: Time and date that measurement will expire/expired. This window is configured by your institute and is usually 1 week.
- Sent by: Displays either a text message, email icon, both or neither to display the measures by which a sent measure was sent to the recipient.
- Actions: Gear icon button with the following options:
- Start Interview: Begin interview if there are any measure that can be administered by interview.
- Send Reminder: Click this if the patient has been sent a measure, has not completed a measure, and could use a text or email reminder to complete it.
- Cancel measure: Option to prevent an invitation from being sent to a patient if the invitation is a mistake.
- View Report: Click to see the Feedback Report
- Download PDF: Download a summary of the measures sent and scores for that administration. More information here.
- Measurement History - The “Measurement History” card shows the history of the measurements the patient and their caregivers have taken.
- The first section, Measurement History, is a summary of the scores on each measurement, with a link to the full report at the bottom.
- The second section, Active Measurement Bundles, shows measurement bundles that have been added for the patient. Clicking the name of any bundle will expand it to show the scales it includes, as well as a button to remove it from the patient. The Add button lets you add new bundles.
Tasks
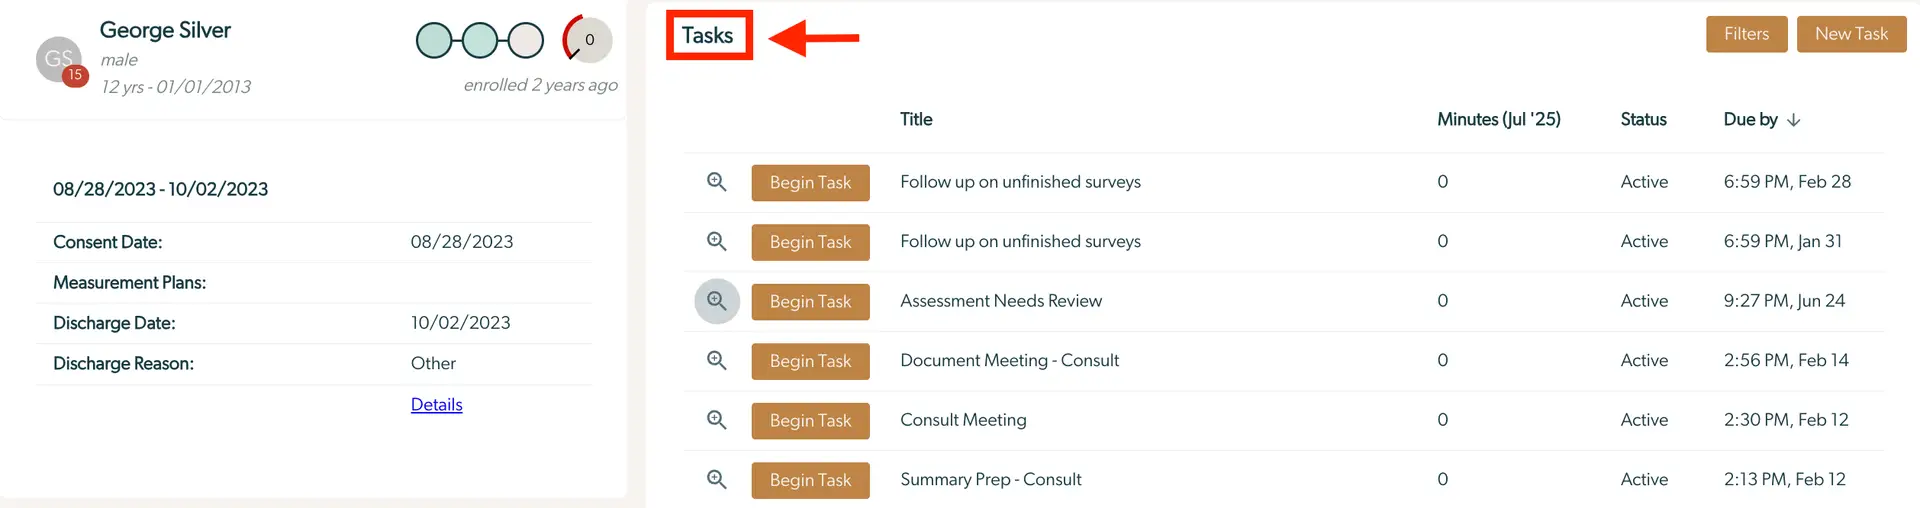
The “Tasks” card shows all tasks related to the patient
1.) You can use the search bar to search for a specific task record
2.) Tasks can be filtered based on Assignment and Status *Note - tasks are automatically filtered on Active tasks
Monthly Summaries
The "Monthly Summaries" card shows a row for every month the patient has been enrolled.
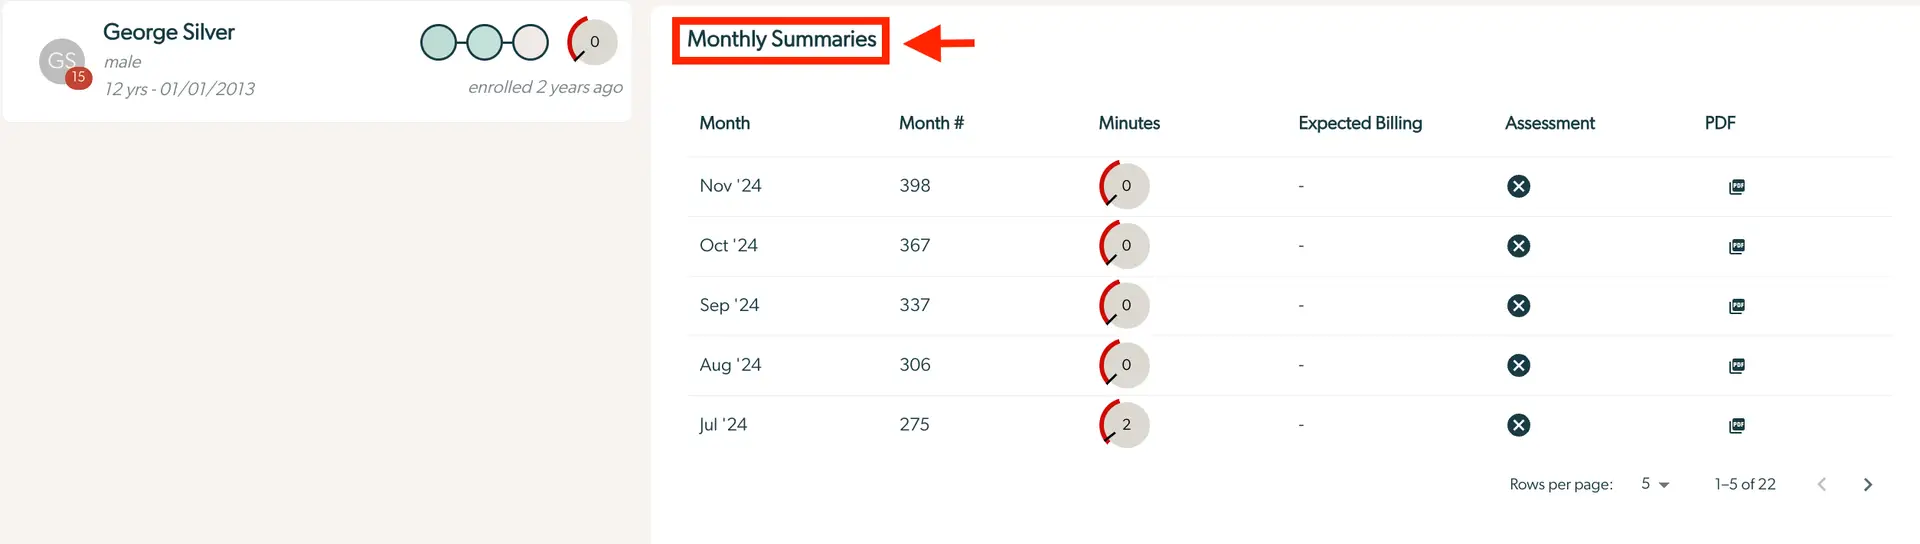
The rows contain the following fields:
- Month: The calendar month, e.g. Feb ‘24
- Month #: The month of enrollment, e.g. 1
- Minutes: How many billable minutes were spent
- Expected Billing: (If the billing module is enabled for your site) what the expected billing for the month was
- PDF: A button which will download the PDF
The pdf download contains everything which happened for a patient in a particular month.
This report can be copied into the EHR to provide full documentation for a Collaborative Care encounter, as well as providing audit evidence for the time spent providing Collaborative Care which can be used to bill services.
More information on this pdf can be found here.
Related People
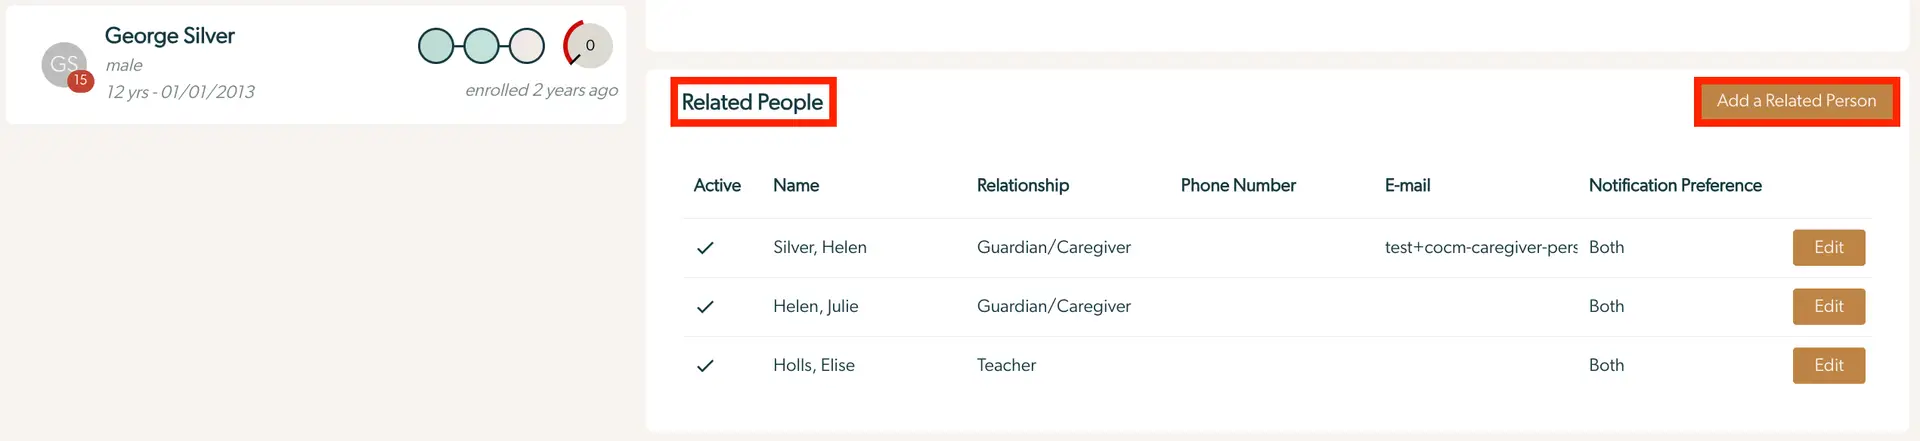
The “Related People” card shows guardians, teachers and other people related to the patient. Many of the scales are sent to these people instead of or in addition to the patient
1.) You can add a new related person by clicking on the “Add a Related Person” button
2.) You can edit an existing related person by clicking on the "Edit" button
Notes
Each patient has a persistent note field for keeping track of any information relevant to their care that isn't captured somewhere else in the app:

You can also leave notes on tasks or as you log time. Clicking the "View Recent Activity" button on the patient's note card will bring up a dialog with all notes, logged time and created tasks for this patient:
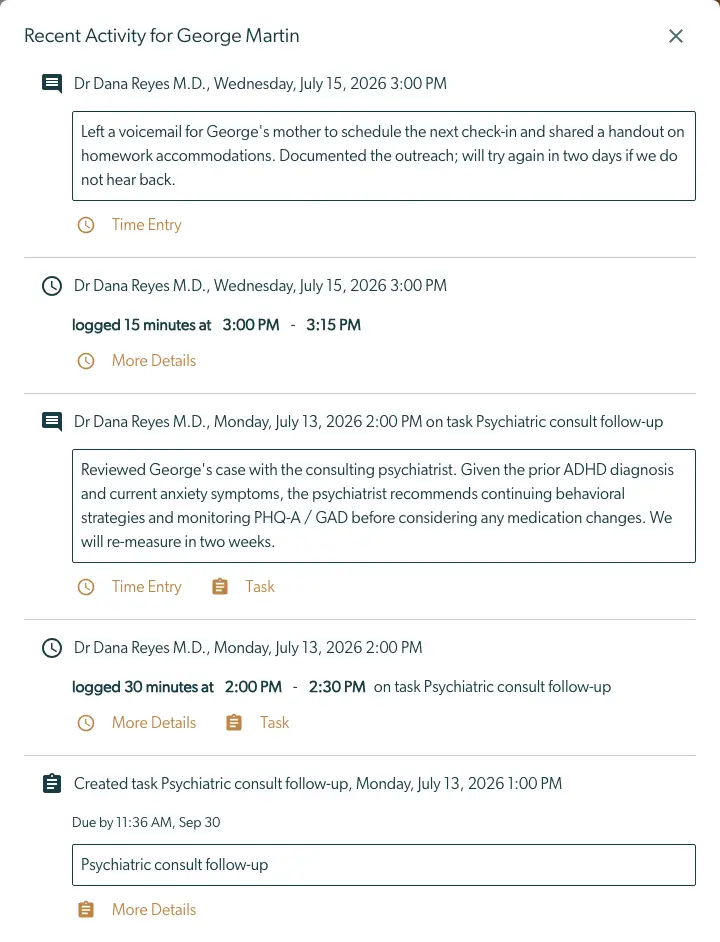
This view includes the following information:
- All notes linked to the patient, whether they were left on task or a time entry.
- All tasks created for the patient
- All time logged for the patient
These are sorted with the most recent event at the top. Tasks and time entries have a "More Details" link that will bring up the dialog for that item. Time entries may also have a "Task" link to view the task, if the time was logged against a particular task. Similarly, notes may have a "Task" or "Time Entry" link (or sometimes both) if note was written for a particular task or time entry.
There is also a button to see "View Logged Time". This will take you to My Time page with a filter set to highlight the patient's time.