Consult - How to run a case consult meeting
Part of effective collaborative care practice is running regular consultation meetings to get expert advice about specific patients. Mirah's case consult feature helps structure these meetings so you can get the most out of them.
Typically, the case consult process consists of the following workflow:
- Requesting a Consult
- Meeting Preparation
- Running a Consult Meeting
- Post Meeting Follow Ups
Requesting a Consult
The most important element of a consult meeting is the list of patients that need to be discussed. To add a patient to the list, you can request a consult from their patient details page:
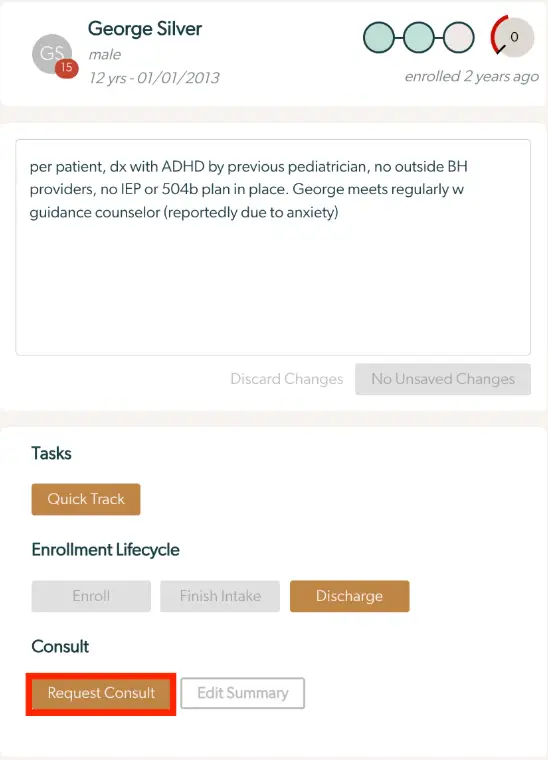
This will bring up the Request Consult dialog, where you can fill in the reason why you want to discuss this patient:

- "Requesting Provider" can be left blank if you're requesting the consult on your own behalf, or you can select another provider if someone has asked you to add this patient to the agenda
- "Request Reason" lets you pick from a list of common reasons for consulting about a patient
- "More details" is an optional field to add more information that isn't captured in the request reason
To see the requested patients, go to the Case Consult page using the link on the left menu:
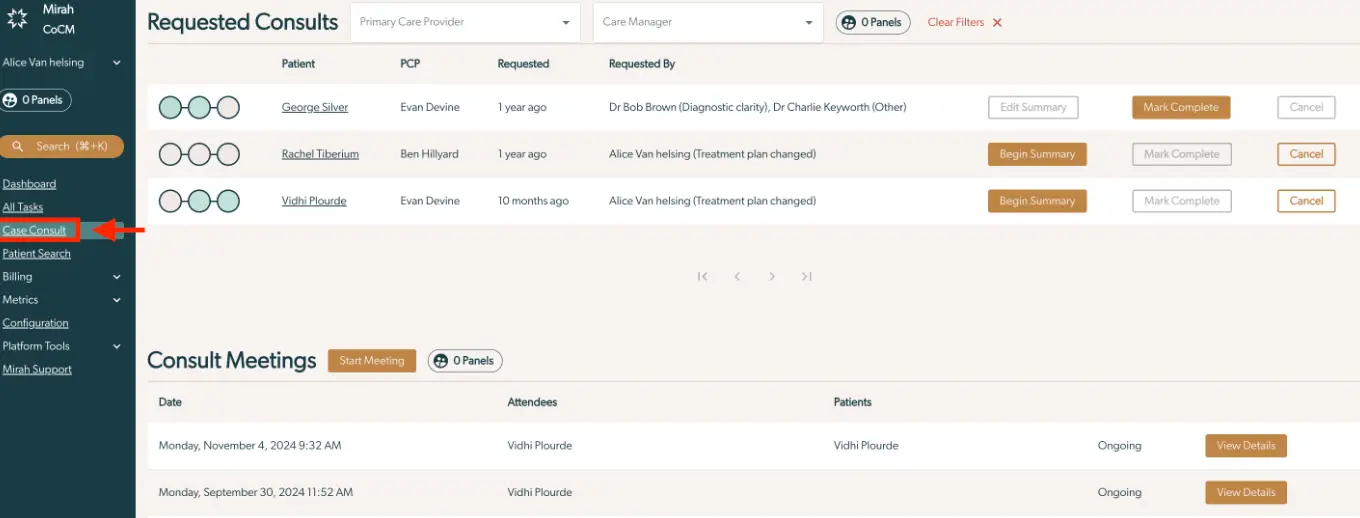
Note that if a patient gets multiple consultation requests, they'll all be listed on one row, as in this example with George Silver.
You can also see a patient's consult information by clicking the "View Consult" button on the Panels page.
Meeting Preparation
In order to keep the consult meeting running smoothly, it's important to have all the relevant information about the patient available. To help with this, you can add additional information to the case consult request using the Begin Summary button. This will be available either in the list of consults on the Case Consult page, or on the patient details page, where it will be disabled unless the patient has an active consult request:


Clicking this button will bring up the Prepare Case Consult Summary dialog. This shows the information that Mirah will display during the consult meeting, along with a form to add more details about the case as necessary.
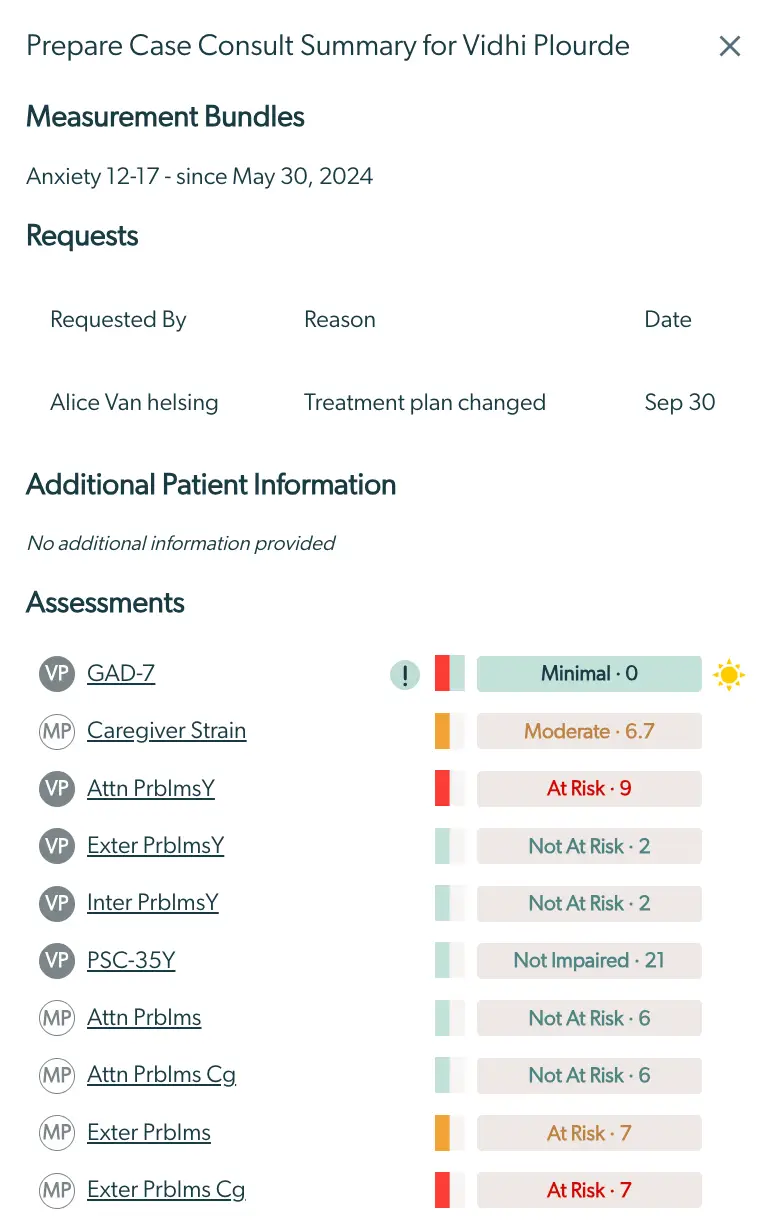
Opening this dialog automatically starts recording time called "Summary Prep - Consult" linked to the patient. This time will keep tracking even if you close the dialog, allowing you to look at the patient or report as needed to collect information.
You should "Save Progress" or "Complete Task" once you have completed tracking time against this patient. If you open Prepare Summary dialog on another patient while tracking time, it will save any time spent so far and start tracking time against the next patient.
Running a Consult Meeting
When it's time to hold the meeting itself, start a new meeting with the Start Meeting button on the case consults page:
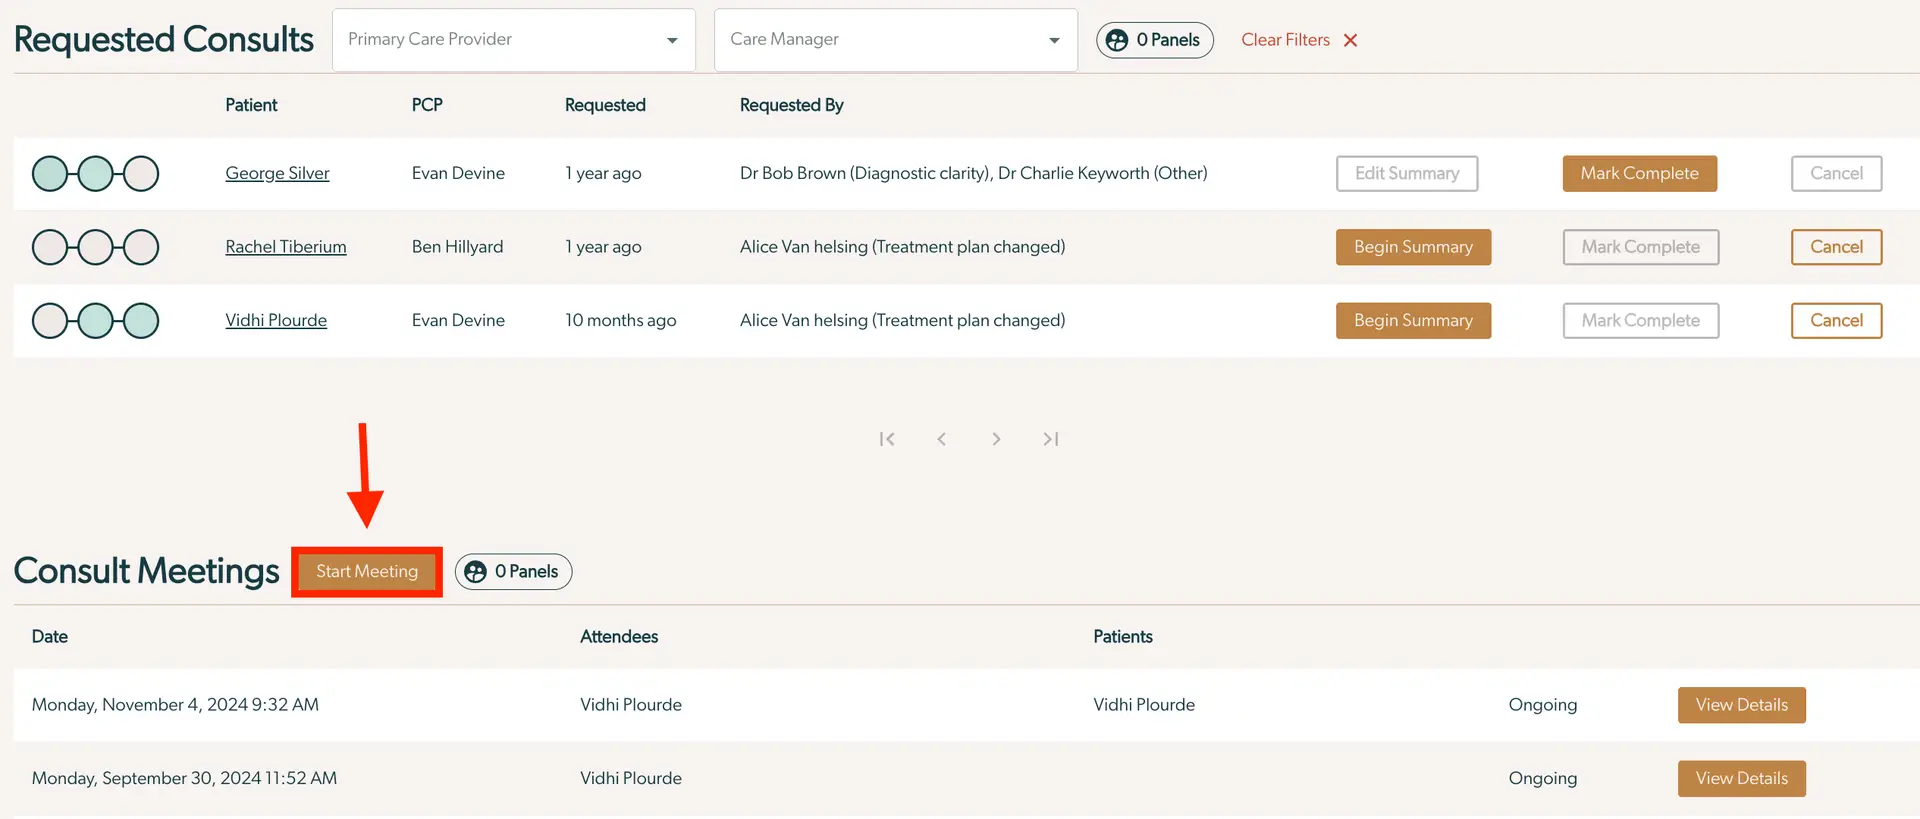
This will bring you to the consult meeting screen, which includes all the patients in the Requested Consults list. The select list at the top of the page lets you record who attended the meeting. To start discussing a patient, use the Begin Consultation button in the table of requested consults:
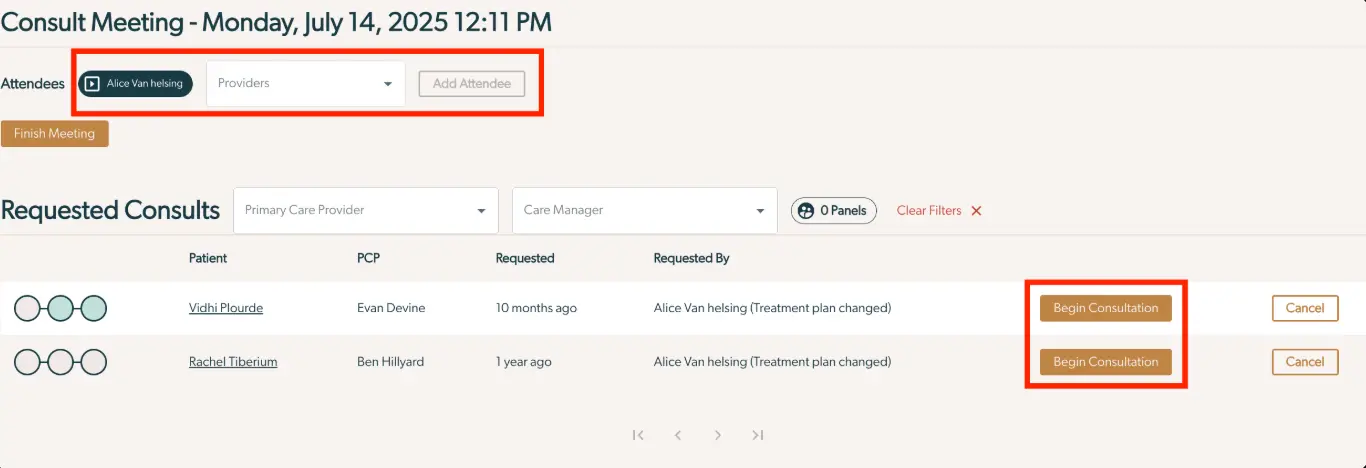
This will bring you to the case consult review page for the patient.
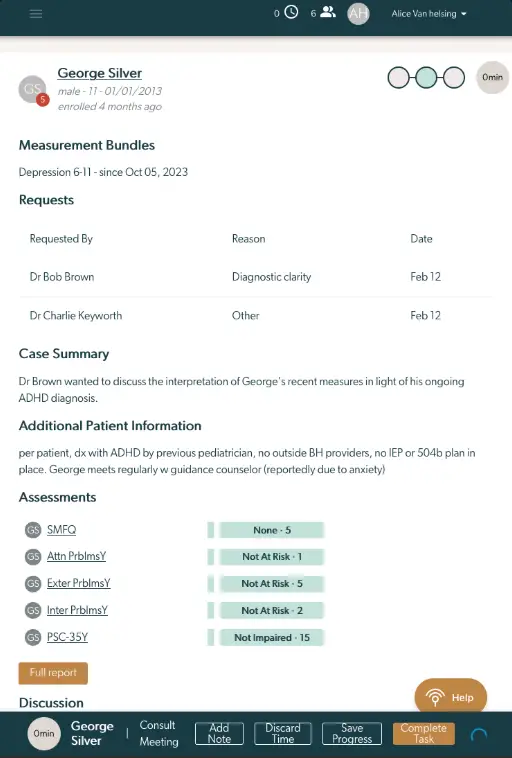
The top of the page shows information about the patient, including the case summary you prepared earlier.
Opening this page also automatically starts tracking a "Consult Meeting" timer.
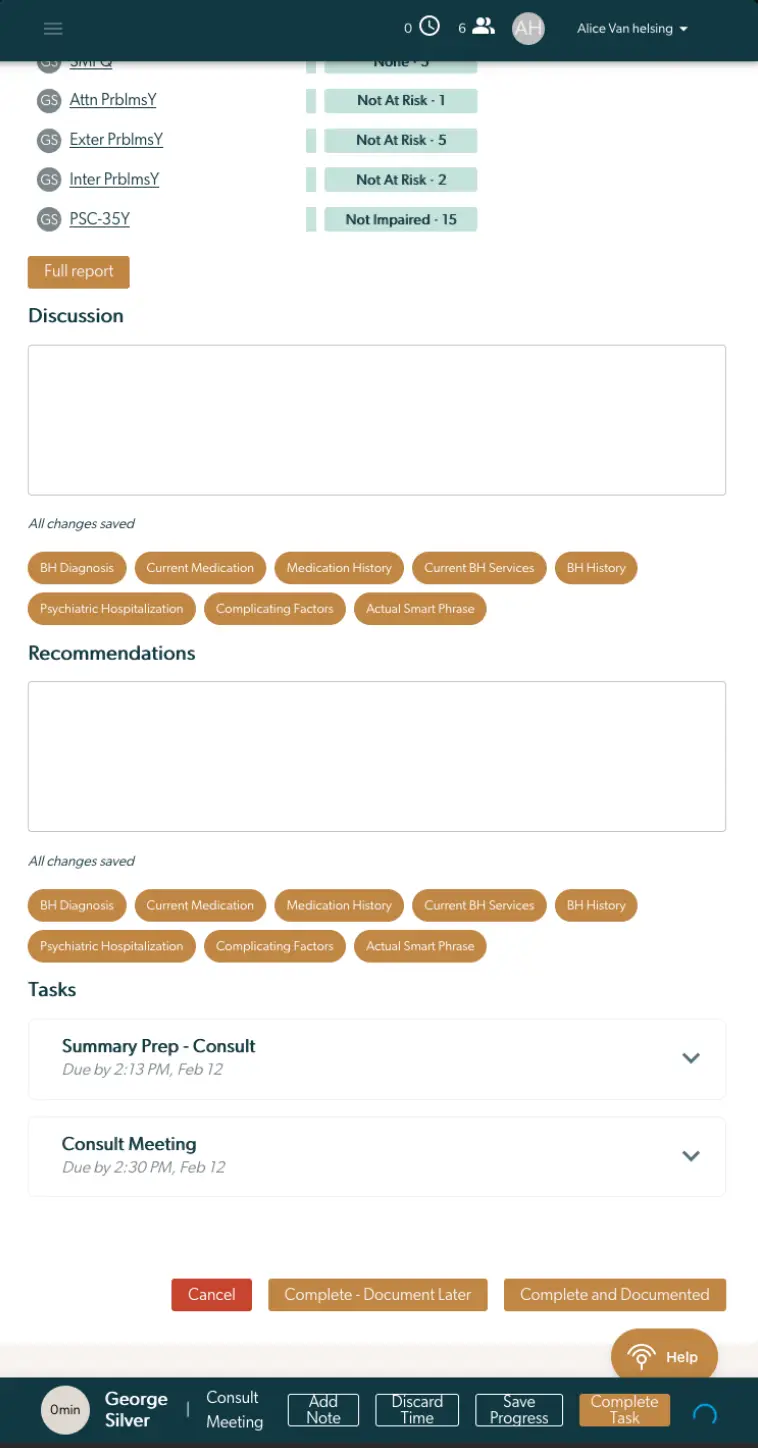
There are two notes field available on the case consult review page, "Discussion" and "Recommendations".
"Discussion" is for a log of everything that was talked about in the meeting, while "Recommendations" is for specific follow up actions that you or other members of the care team should take after the meeting.
In order to help you take notes faster during the conversation, the "Discussion" and "Recommendations" fields have additional functionality built in. Anything you type here is automatically saved once you stop typing. The message below the text box will let you know when your change have been save successfully.
These fields also include "Smart Phrases" that let you automatically insert large amounts of text with a single action. Clicking the button or using tab to step through them and space to activate will insert their text at your current cursor position. See the Smart Phrases support article for more information about how to customize these inputs.

The "Tasks" section shows the tasks that have been automatically created for you during the case consult. You can expand them here to mark them complete or see the logged time. They will also be available on the All Tasks page, or in the tasks section of the patient's details page.

Finally, there are three actions you can take when you're finished discussing a patient:

All three actions will take you back to the consult meeting page, but they differ in how they treat the consult you're reviewing.
- "Cancel" will leave the consult in the Requested Consults list. This is intended to be used when you either selected a patient in error or were unable to finish the consult, and may want to return to the patient in another meeting.
- "Complete - Document Later" will remove the consult from the Requested Consults list, leaving it only in the Discussed Cases list. This is intended to be used when the discussion is complete, but you have follow-up tasks to do, such as documenting any changes in the EHR. This will also create a task to remind you to do this documentation, which will include a link to the case consult.
- "Complete and Documented" will remove the consult from the Requested Consults list, and mark it fully complete. This is intended to be used when you either updated the EHR during the meeting, or there is no follow up documentation required. This will not create a follow up task.
All three buttons will also automatically record the time spent on the Consult Meeting task and stop tracking it.
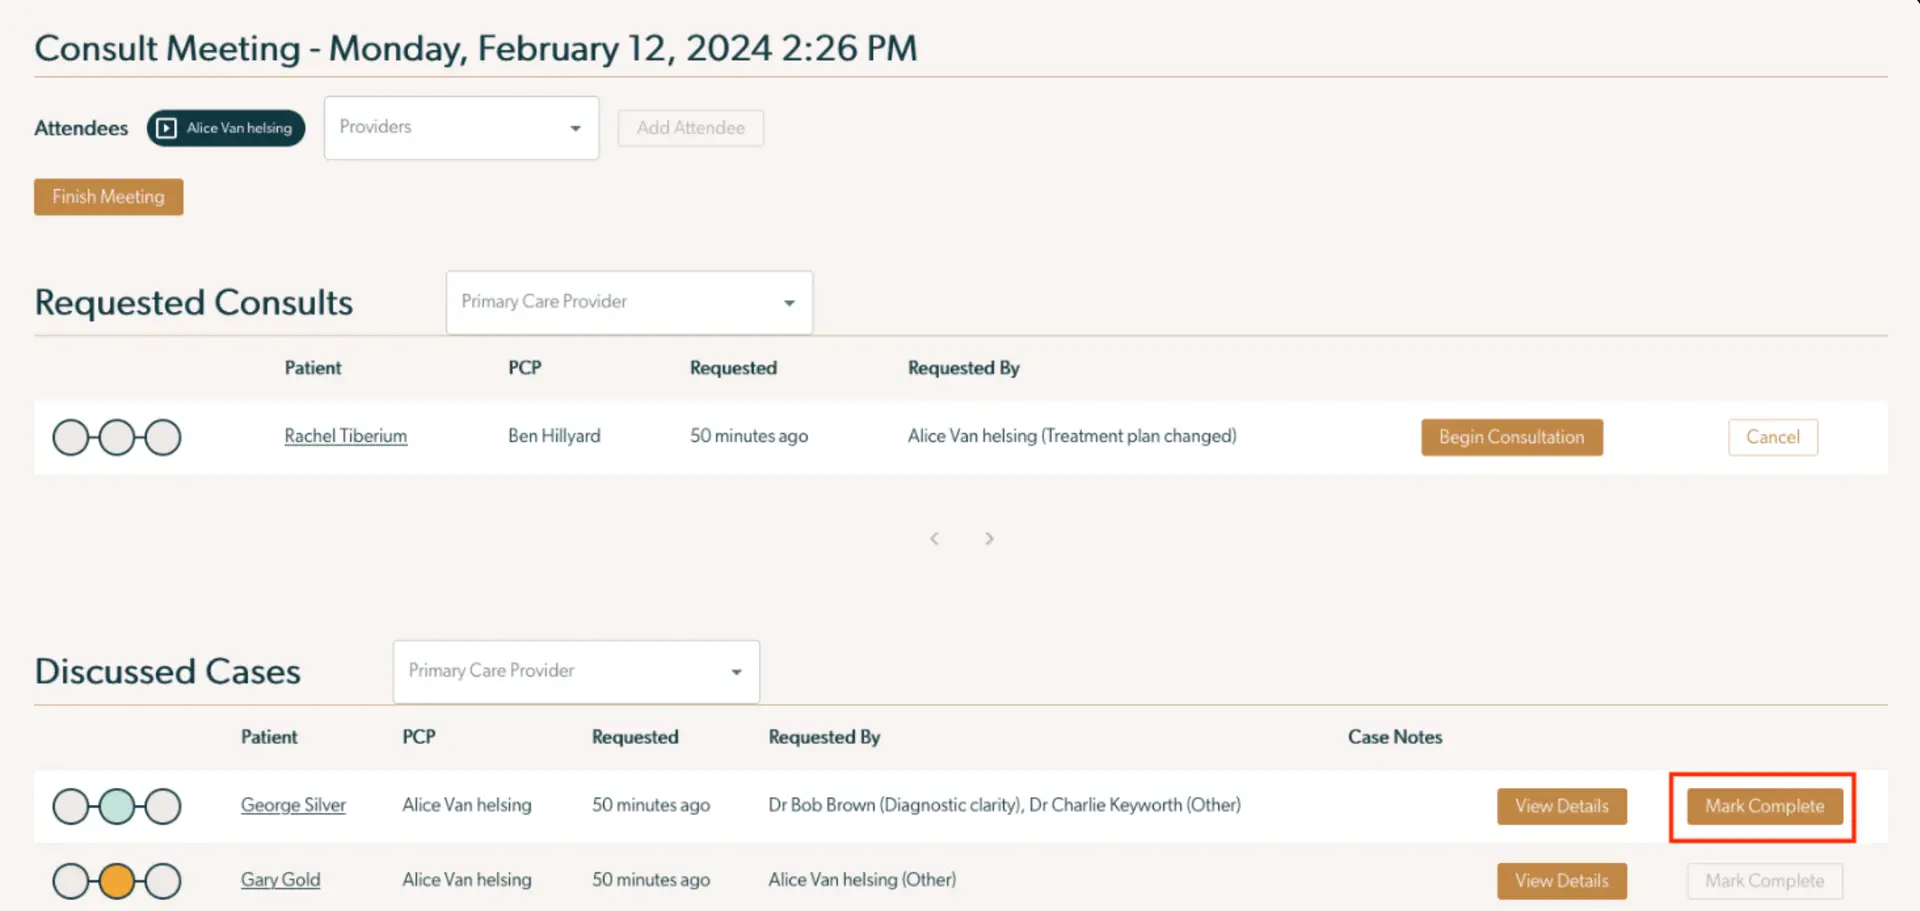
After reviewing a few cases, the consult meeting page might look like this:
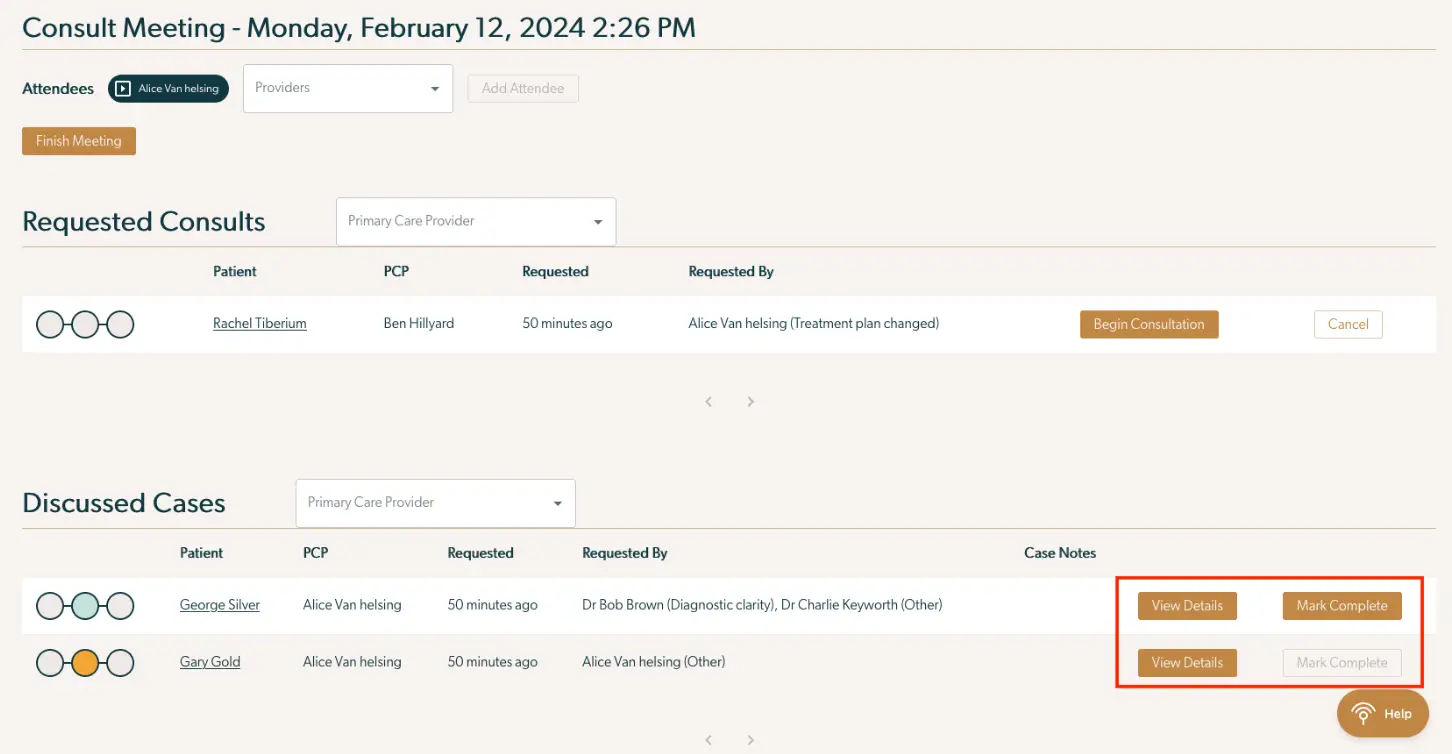
In this case we reviewed George and Gary's cases. George we finished "Complete - Document Later", so his case is still waiting to be marked complete. Gary we finished with "Complete and Documented" so his case can't be modified further. You can use "View Details" to return to the case review screen for either of them, but only on George will you be able to edit the Discussion and Recommendations fields, and only George's case will automatically start tracking time again.
Post Meeting Follow Ups
At the end of the meeting, use the Finish Meeting button to indicate that the meeting is over. This will prevent you from accidentally adding any more cases to it:

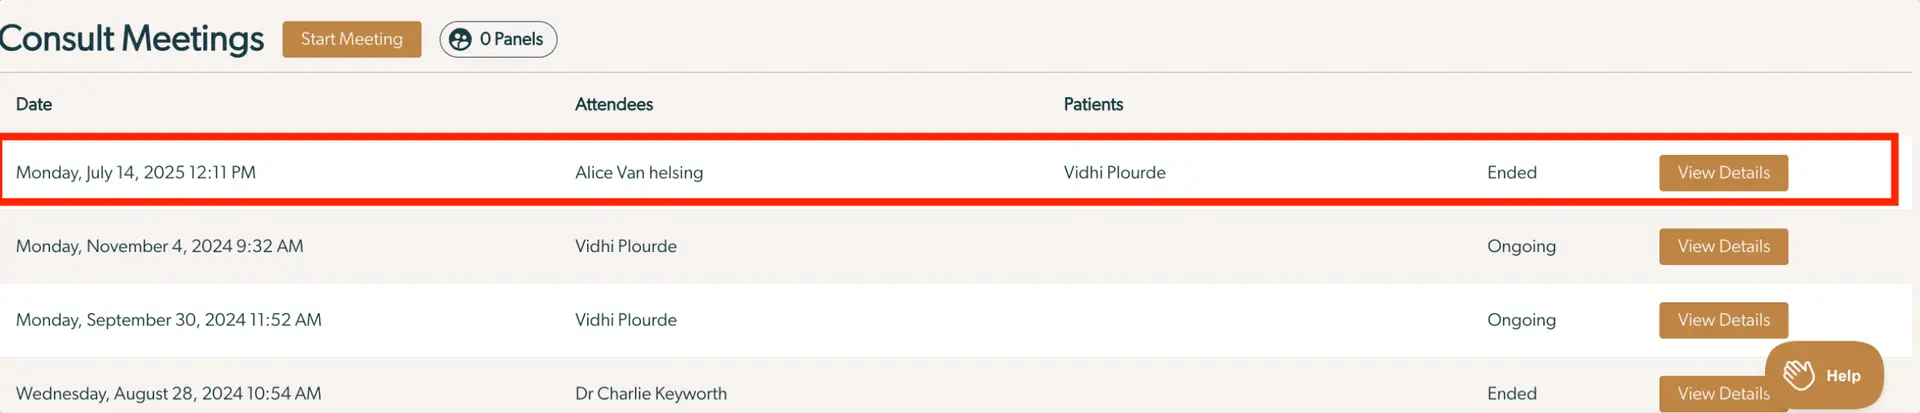
The meeting will be at the top of the list of consult meetings on the case consult page:
Any followup tasks that were created can be found in the patient's Tasks section:
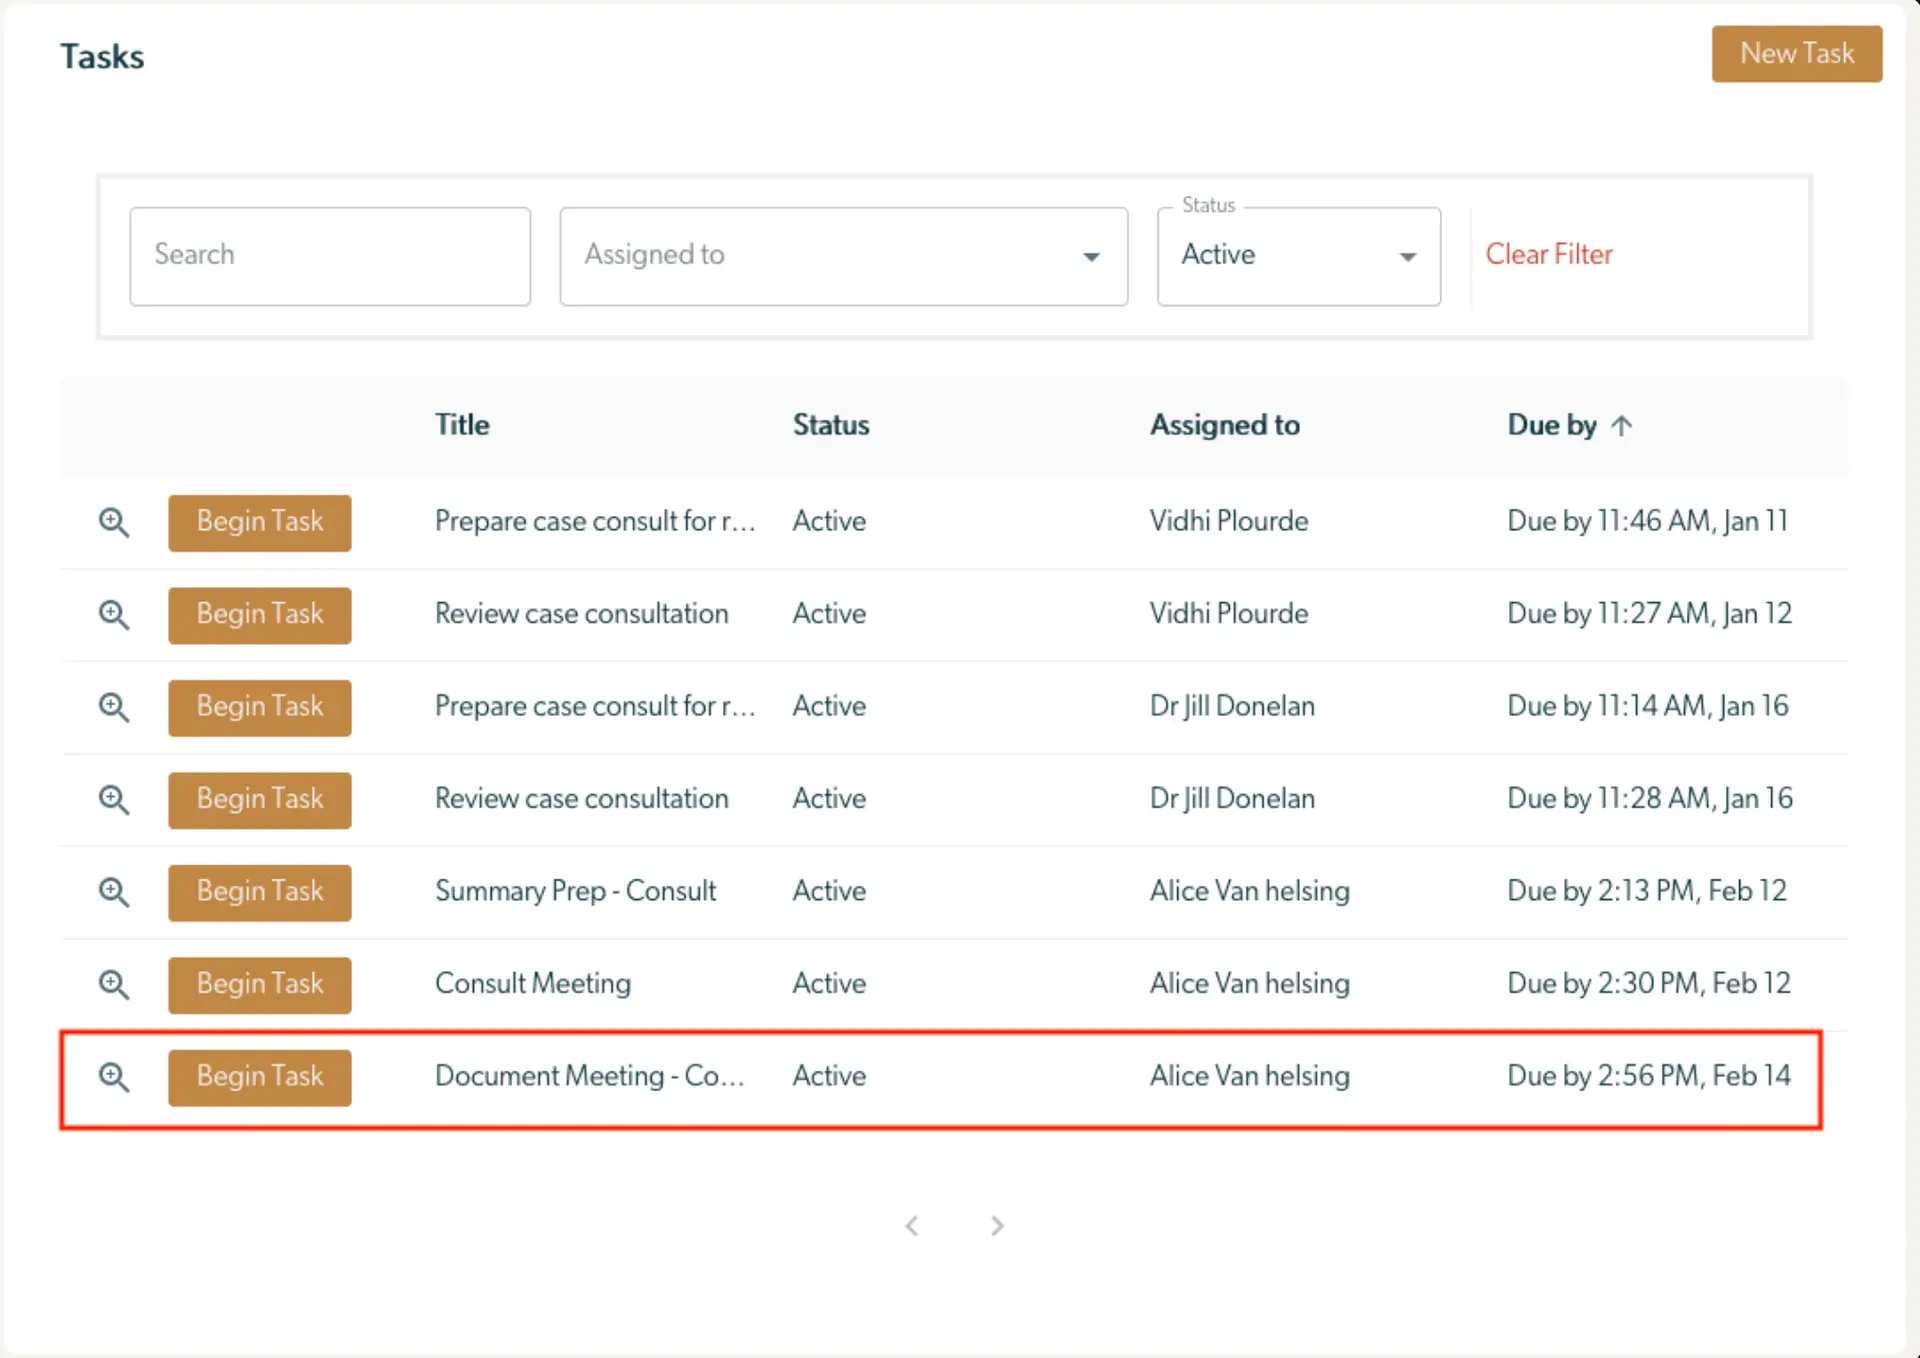
You can log and track time on these like any other task. When you've completed the follow up tasks for a case consult, mark it complete on the consult meeting page: