Patients - How to send a measure manually

Surveys will be sent to patients based on their assigned measurement bundles automatically (these are selected on intake during enrollment and can be changed at any time). However, during the program, the PCP and psychiatric consultant may want to send ad hoc measures to a patient or related people as part of the diagnosis and treatment process.

Clicking on a patient's name anywhere you see their name underlined will automatically take you to the patient's detail page. However, you can also search for a specific patient from the Patient Search page.

1.) After logging into Mirah, click on the “Patient Search” on the left of the screen

2.) Click on the Patient Name to navigate to their record. You can use the search filters to narrow the search results on the patient search page
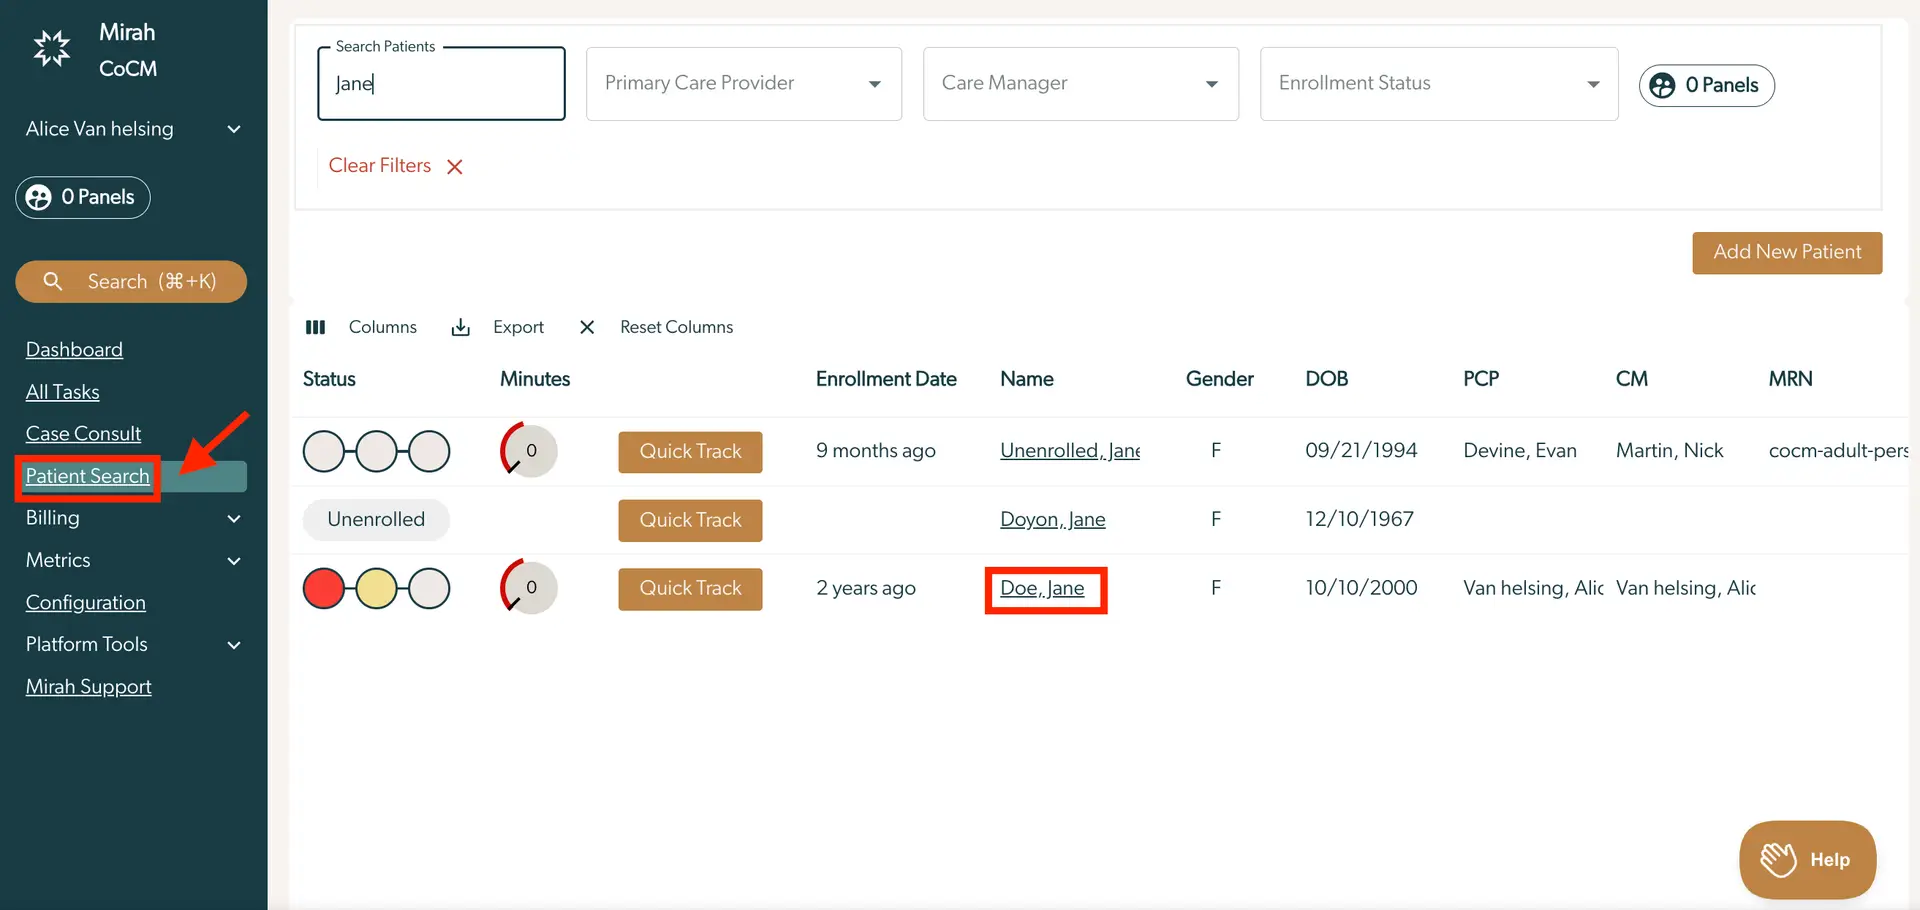
The screenshot displays the 'Patient Search' page within the Mirah Collaborative Care platform. The purpose of this screen is to allow users to search for patients using various filters such as patient name, primary care provider, care manager, and enrollment status. The search field at the top left is populated with the name 'Jane'. Below the search filters, there is a list of patients with columns for status, minutes, enrollment date, name, gender, date of birth (DOB), primary care provider (PCP), care manager (CM), and medical record number (MRN). The list includes three patients: 'Unenrolled, Jane', 'Doyon, Jane', and 'Doe, Jane', with their respective details. The 'Quick Track' button is available next to each patient for quick access to tracking features. The left sidebar contains navigation options such as Dashboard, All Tasks, Case Consult, Patient Search, Billing, Metrics, Configuration, Platform Tools, and Mirah Support. The 'Add New Patient' button is located at the top right of the patient list, and a 'Help' button is at the bottom right corner.

How to send a new measure to an enrolled patient​

*Note: Before selecting measures to send, it is useful to add related people to the patient's profile, in the case that you are sending measures to parents, caregivers, teachers, etc.

Once you are on a patient page you will have the ability to send a survey from the Measurement Administration section.

1.) Click on the “Send Measurement” button
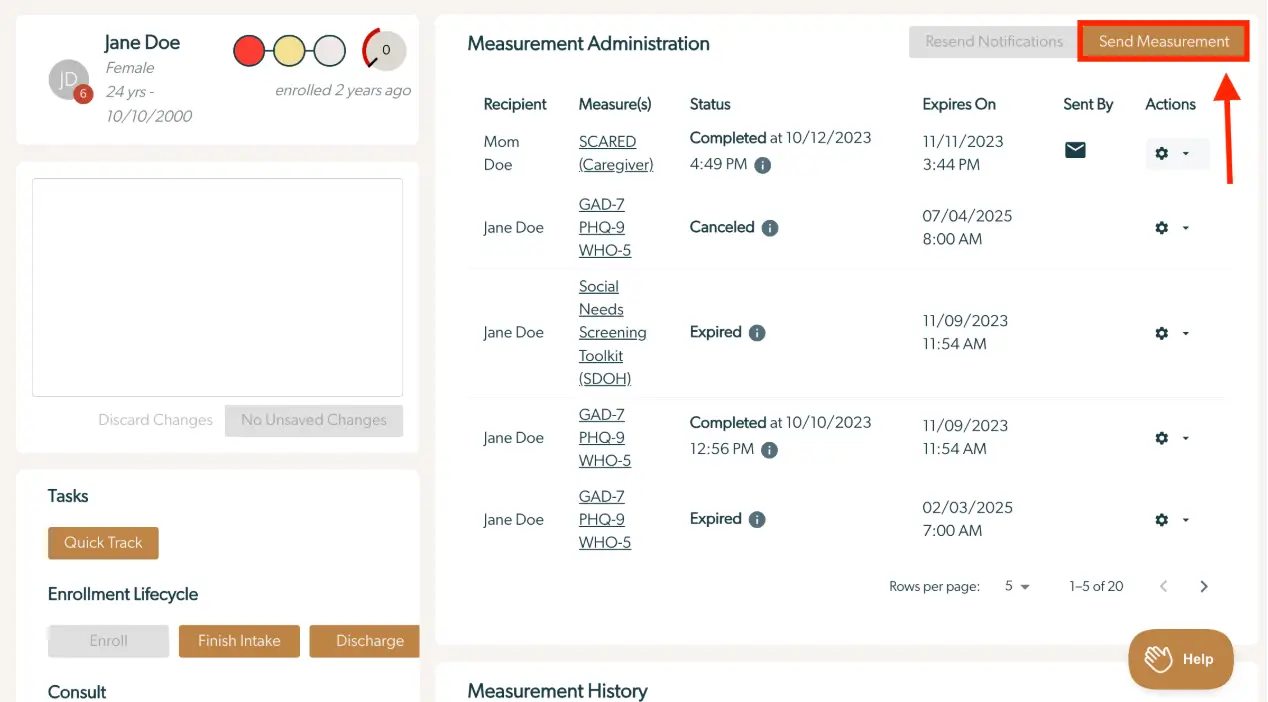
The screenshot displays the 'Measurement Administration' section of the Mirah Collaborative Care platform, focusing on a patient named Jane Doe. On the left, patient details are shown, including name, gender, age, and enrollment date, along with a visual representation of their progress. Below this, there are options for 'Tasks' with a 'Quick Track' button, and 'Enrollment Lifecycle' with 'Finish Intake' and 'Discharge' buttons. The main section lists measurements sent to the patient or caregiver, detailing the recipient, type of measure, status, expiration date, sender, and available actions. Each entry includes an information icon for more details. The 'Send Measurement' button is prominently located at the top right, allowing users to manually send a new measurement. The bottom right corner features a 'Help' button for assistance.

2.) This brings up a dialog window where you can search for a measure. In the “Measures” field, start typing the name of the measure(s) you would like to send. The drop down will populate with matching measure names as you type. *Note - you can select multiple measures
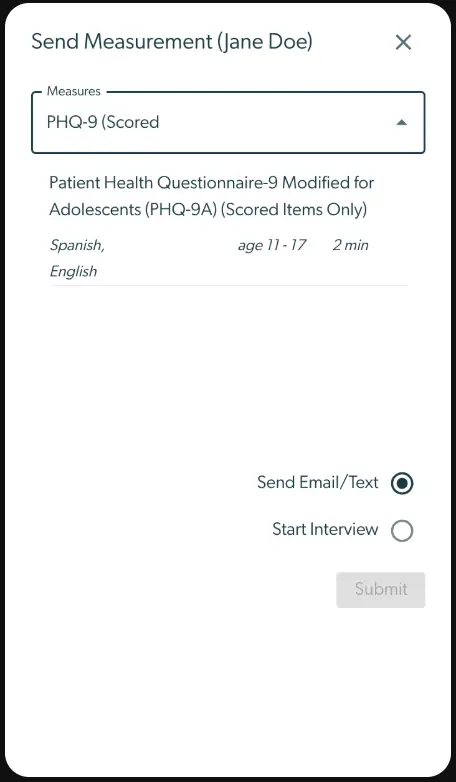
The 'Send Measurement' screen for a patient named Jane Doe allows users to manually send a measurement. At the top, there is a dropdown menu labeled 'Measures' with 'PHQ-9 (Scored)' selected. Below the dropdown, there is a description of the selected measure: 'Patient Health Questionnaire-9 Modified for Adolescents (PHQ-9A) (Scored Items Only)', available in Spanish and English, suitable for ages 11-17, and takes approximately 2 minutes to complete. Two options are available for sending the measure: 'Send Email/Text' and 'Start Interview', with 'Send Email/Text' currently selected. The 'Submit' button is located at the bottom but is currently disabled.

3.) Click “Submit”

  • If Send Email / Text (default) was selected:
    • An invitation to complete the survey will be sent to the patient based on their communication preference set in their patient details page (including selecting the correct language if available). The dialog will close immediately.
  • If Start Interview was selected:
    • The dialog will transition to another screen where you have the option to start an assessment immediately. Starting the assessment will automatically start tracking time for administering the assessment: The screenshot displays the 'Send Measurement' interface for a patient named Jane Doe. It instructs the user that clicking a button will automatically create a task and begin tracking time. The interface lists the patient's name, Jane Doe, alongside the measurement type, AUDIT-C+2. To the right, there is a button labeled 'Administer 1 Survey' highlighted in orange, which is used to initiate the survey process. The button is centrally located on the right side of the screen. A close button (X) is located at the top right corner of the interface.

4.) A history of sent notifications for each measurement in a survey is listed under Measurement Administration

  • Notifications Sent (Measurement Administration): The screenshot displays the Measurement Administration section for a patient named Jane Doe, showing a list of measures sent to recipients. The left panel provides patient details including name, gender, age, date of birth, and enrollment duration, along with a visual health status indicator. Below the patient details, there is a section for tasks with a 'Quick Track' button and an 'Enrollment Lifecycle' area. The main panel lists measures with columns for Recipient, Measure(s), Status, Expiration Date, Sent By, and Actions. Each row details the recipient's name, the measure(s) sent, the status of the measure (Completed, Canceled, Expired), the expiration date, the method of sending (email icon), and action options (gear icon and dropdown). The top right corner features buttons for 'Resend Notifications' and 'Send Measurement'.
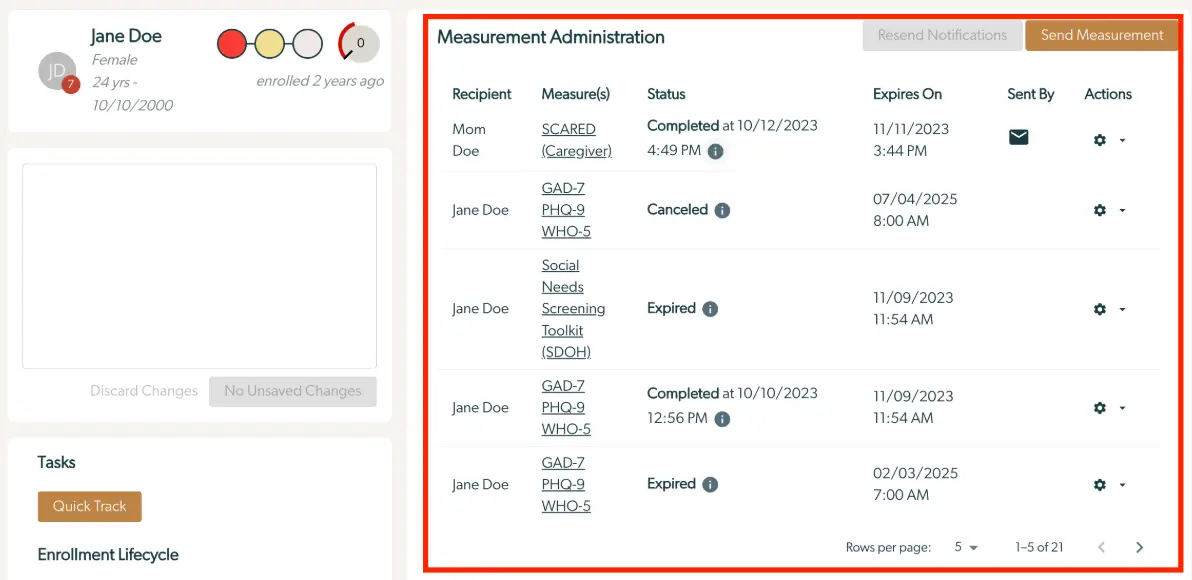
Note: A row with a status of Administration Required will never send notifications and must be administered manually (see below).

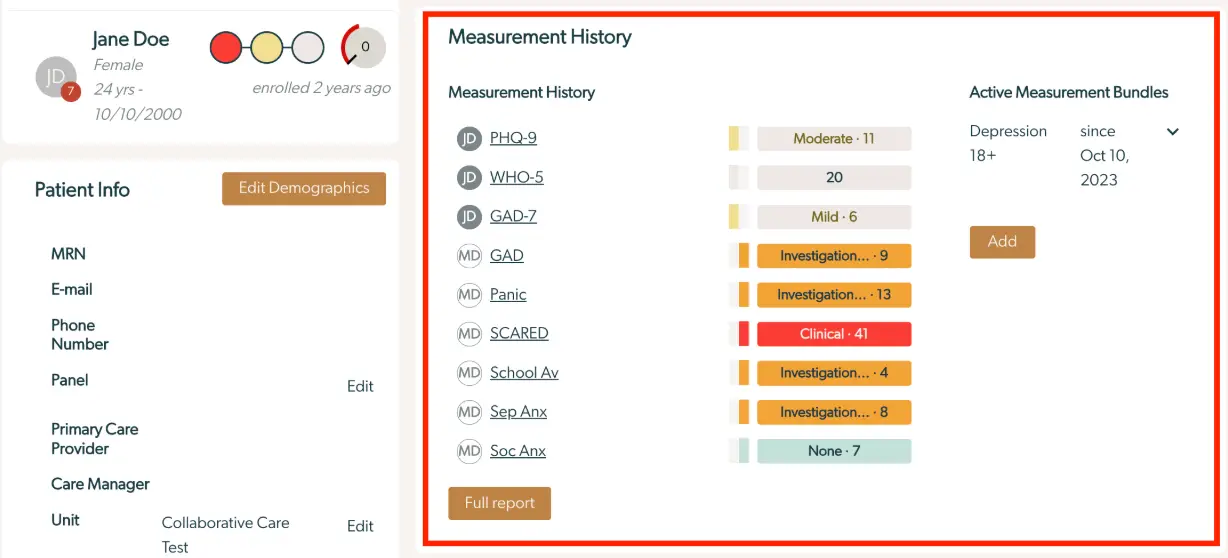
  • Summary of Responses (Measurement History): The screenshot displays the patient profile for Jane Doe, showing her demographic information and measurement history. On the left, Jane Doe's personal details are presented, including her name, gender, age, enrollment date, and a visual representation of her health status. Below this, the Patient Info section lists fields for MRN, email, phone number, panel, primary care provider, care manager, and unit, with an 'Edit' button available for updating demographics. On the right, the Measurement History section lists various assessments such as PHQ-9, WHO-5, GAD-7, and others, each with a corresponding score and status indicator. The 'Full report' button is located at the bottom of this section. The Active Measurement Bundles section shows the current bundle for Depression 18+, with a start date of October 10, 2023, and an 'Add' button for adding new bundles.
How to resend a measure to an enrolled patient or their caregivers​

Notifications for each group of measures can be sent once every calendar day.

Note: A row with a status of Administration Required will never send notifications and must be administered manually (see below).

To send all participants a notification to take their survey:

1.) Click on "Resend All Notifications"
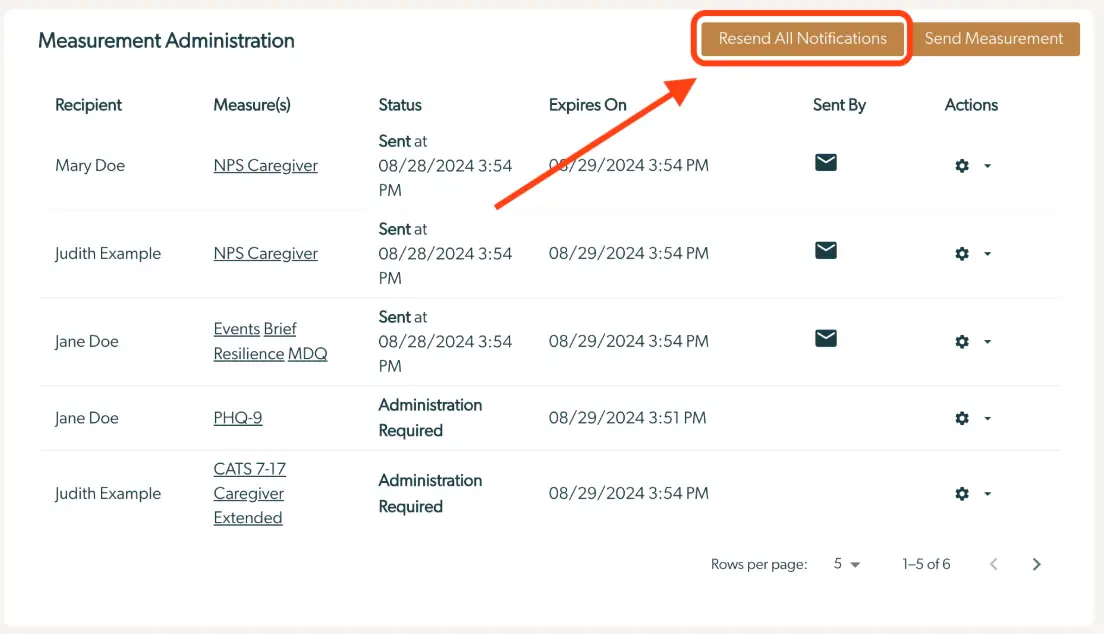
The screenshot displays the 'Measurement Administration' screen within the Mirah Collaborative Care platform, which is used for managing the administration of measures to patients. The table lists recipients with columns for 'Recipient', 'Measure(s)', 'Status', 'Expires On', 'Sent By', and 'Actions'. Each row represents a different patient or caregiver, showing the measure assigned, its current status, the expiration date, and the sender. The 'Status' column indicates whether a measure has been sent or if administration is required. The 'Sent By' column uses an envelope icon to denote the sender. The 'Actions' column contains a gear icon for additional options. At the top right corner, there are two buttons: 'Resend All Notifications', highlighted with an arrow pointing to it, and 'Send Measurement', both used for managing notifications and sending measures. The bottom of the table provides navigation controls for the number of rows displayed per page and pagination.

To send a single participant a notification to take their survey:

1.) Navigate to the row of the participant who has a measure they still need to fill out

2.) Click on the gear in that row:
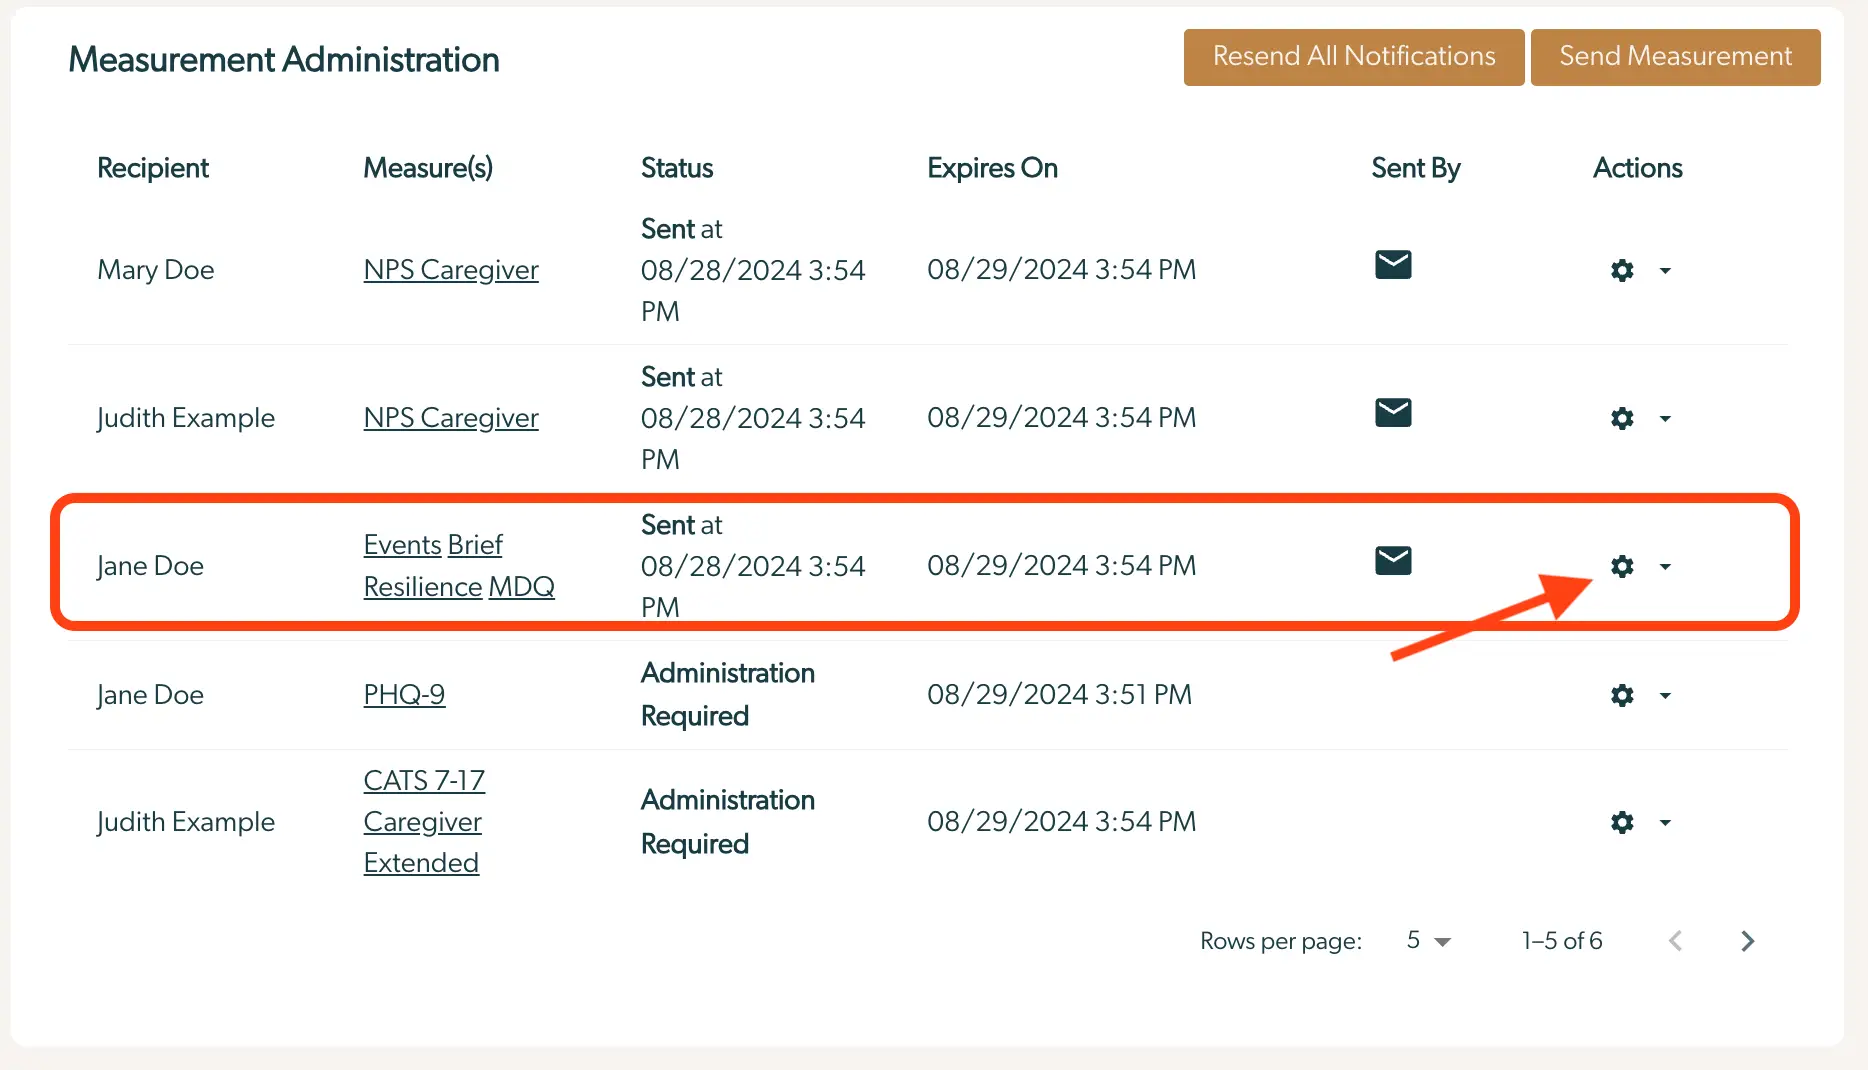
The screenshot displays the 'Measurement Administration' screen within the Mirah Collaborative Care platform, which is used for managing and sending measures to patients. The table lists recipients with columns for 'Recipient', 'Measure(s)', 'Status', 'Expires On', 'Sent By', and 'Actions'. Each row represents a different measure sent to a patient. The highlighted row shows Jane Doe as the recipient of the 'Events Brief Resilience MDQ' measure, which was sent on 08/28/2024 at 3:54 PM and expires on 08/29/2024 at 3:54 PM. The 'Sent By' column indicates the measure was sent via email, represented by an envelope icon. The 'Actions' column contains a gear icon for settings and a dropdown arrow for additional options, located on the right side of the row. At the top right of the screen, there are two buttons: 'Resend All Notifications' and 'Send Measurement', which allow users to resend notifications or send new measurements, respectively.

3.) Click on "Send Reminder" to send the patient an email or SMS to take the survey
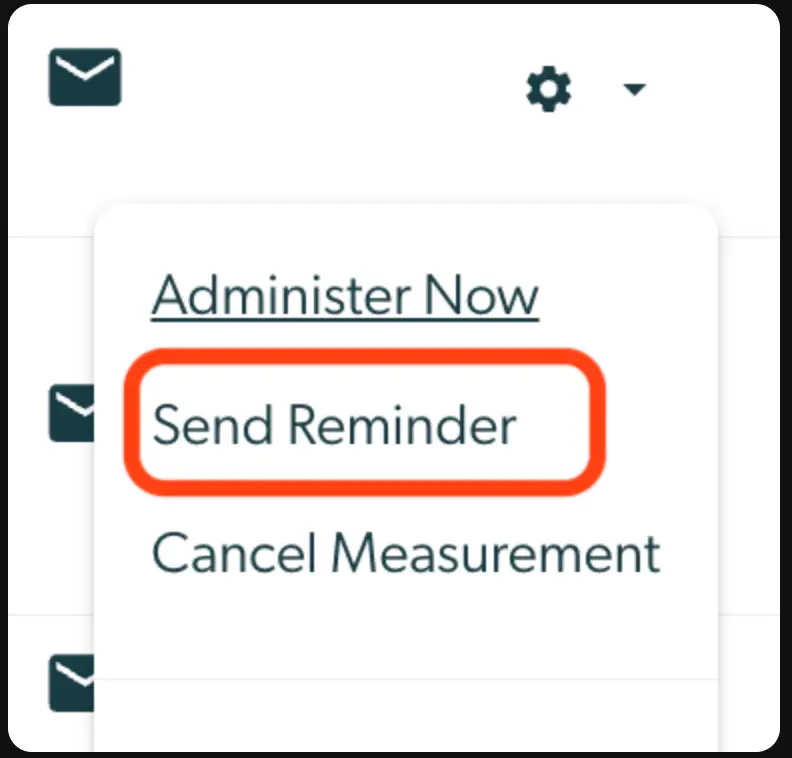
The screenshot shows a dropdown menu from the Mirah Collaborative Care platform, specifically within the Patients feature. The menu provides options for managing patient measurements. The options include 'Administer Now' for immediate action, 'Send Reminder' to prompt patients to complete a measure, and 'Cancel Measurement' to stop the process. The 'Send Reminder' option is highlighted with a red border, indicating its selection. The dropdown is accessed via an envelope icon, suggesting communication or messaging functionality, and is located near a settings gear icon, which typically provides additional configuration options.

How to Administer a Survey to a Patient​

Some measures should be completed in-session by the provider with the patient's guidance. These measures need to be part of the measurement protocol for a patient prior to the session. You can do this by amending their measurement protocol, if you organization allows it, or the occurrence of this measure could already by automated by factors sent from the electronic health records (EHR) system of your organization, if your EHR is integrated with Mirah.

To add provider-administered measures if you don't have the ability to edit measurement protocols, please ask your Mirah trainer or unit supervisor for more details. For now, we will detail how to fill these measures out once they are added to the patient's measurement protocol.

1.) Follow Steps 1-3 of "How to resend a measure to an enrolled patient or their caregivers" to navigate to a patient's measure.

2.) Instead of selecting "Send Reminder," click on "Administer Now" to give the patient an interview of the current survey.

The screenshot displays a dropdown menu from the Mirah Collaborative Care platform, specifically within the Patients feature for Collaborative Care. The menu is accessed via an envelope icon, indicating message or communication options, located at the top left of the screen. The dropdown menu contains three options: 'Administer Now', 'Send Reminder', and 'Cancel Measurement'. 'Administer Now' is highlighted, suggesting it is the primary action, and is used to manually send a measure to a patient. 'Send Reminder' allows the user to remind the patient about a pending measure, and 'Cancel Measurement' is used to cancel a scheduled measure. The settings icon next to the envelope icon suggests additional configuration options are available.

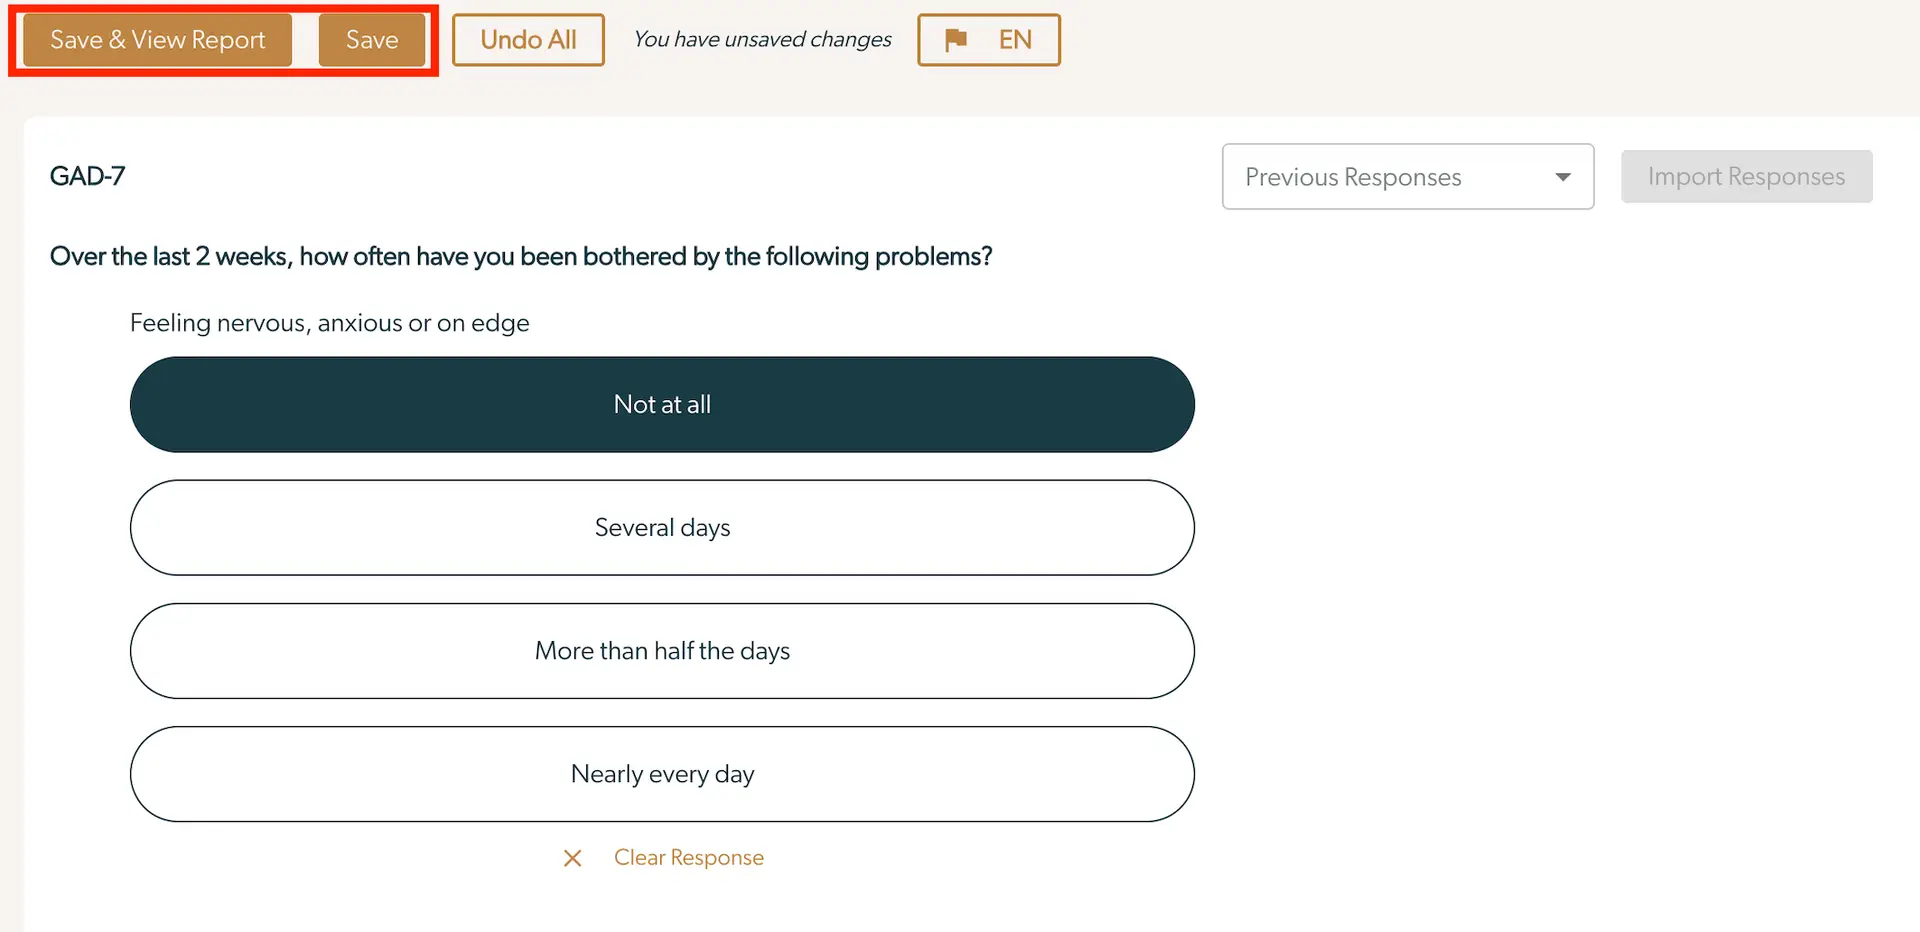
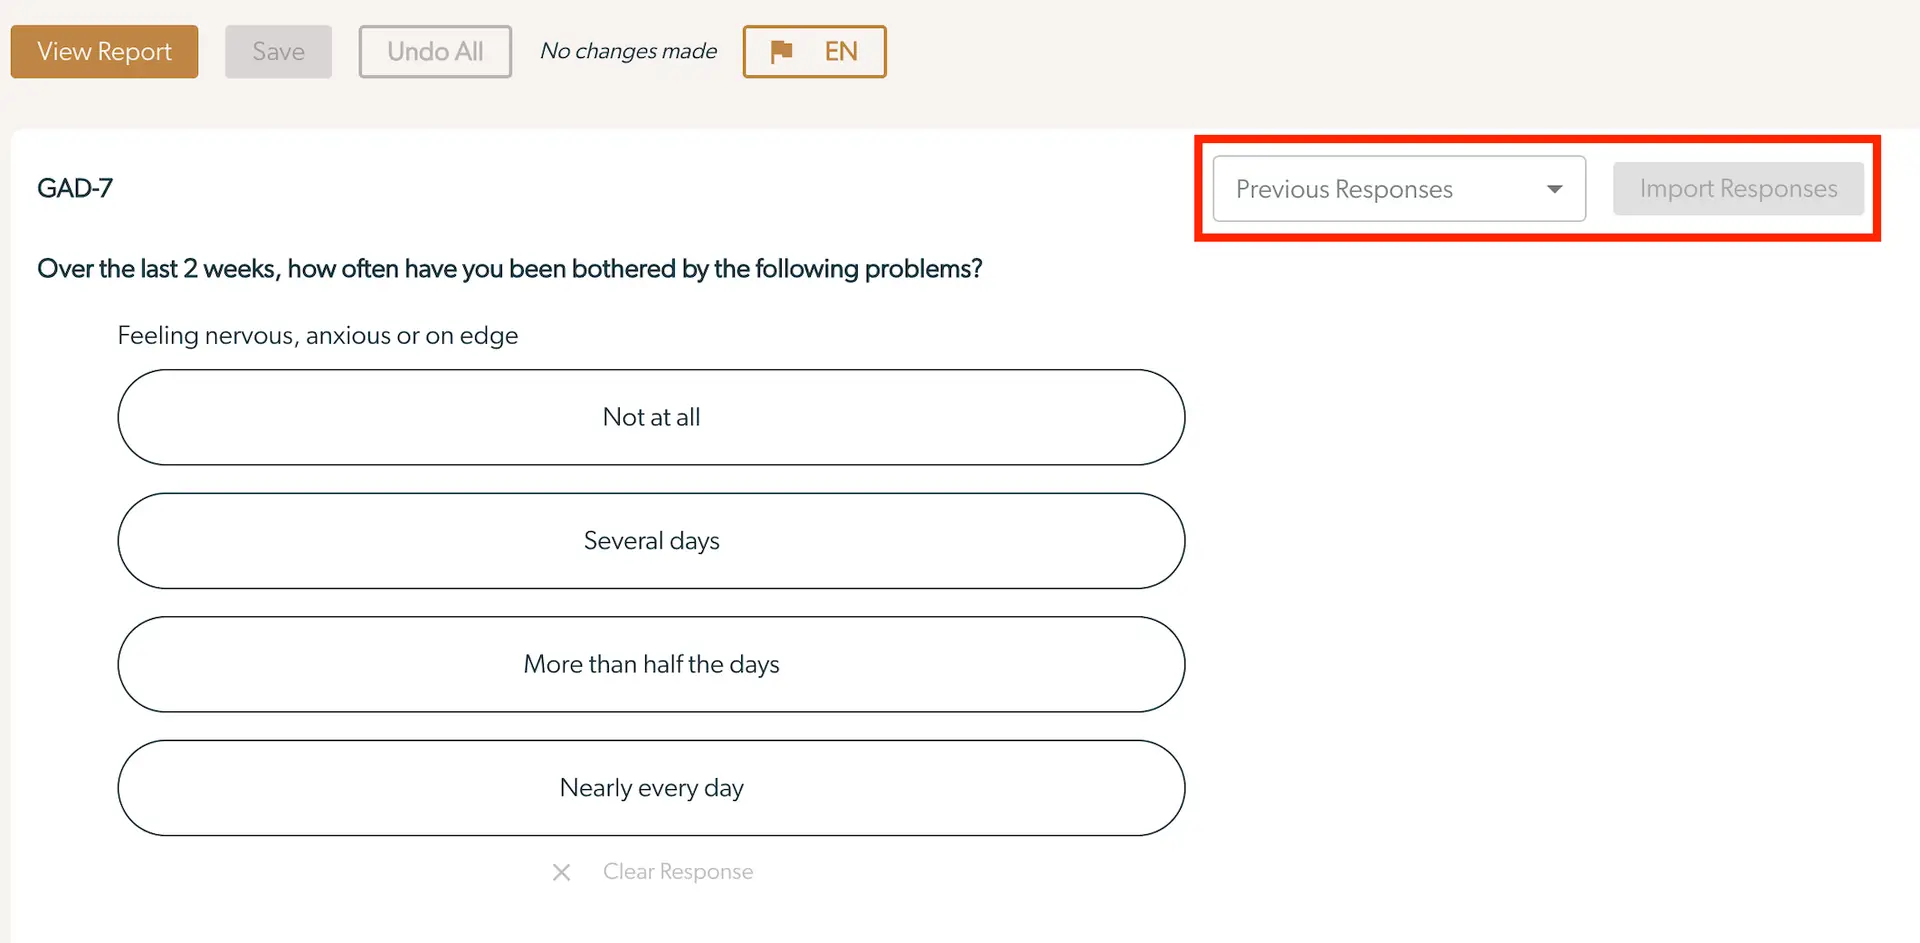
3.) When you are completing the measure as a provider, you can load previous responses by clicking the "Previous Invitations" dropdown and select a date. Once you have selected a date, click the "Import Responses" button. This will populate the responses from the previous session.

**Importing Responses from a previous administration of a measure is particularly useful for longer clinician-administered measures. This functionality allows the clinician to compare previous responses with current reported symptoms to facilitate a more comprehensive longitudinal assessment of the patient.

All previous administrations will appear in the dropdown by date, but you will only be able to select dates where that particular measure has results from the same respondent.
4.) If an answer has been selected, and you would like to remove the answer, click "Clear Response" at the bottom of the question. This is available for almost all question types. Checkboxes can be de-selected on the checkbox.
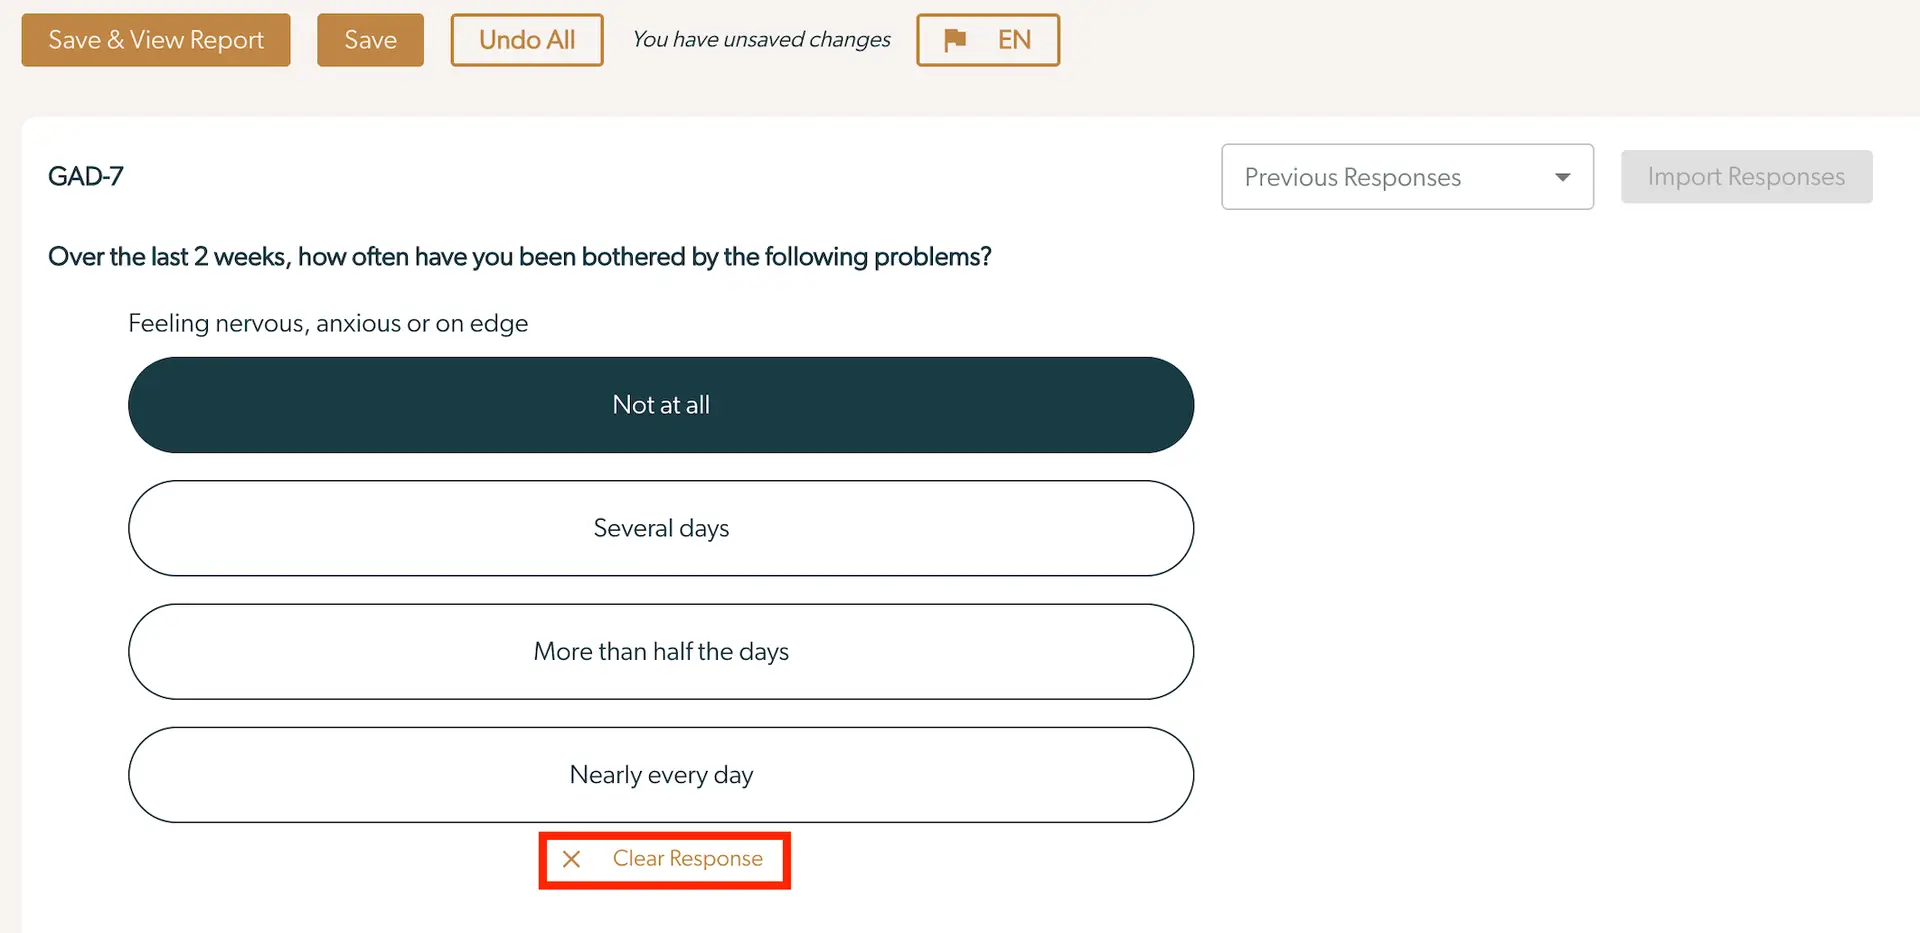
5.) Once you have completed the measurement, press "Save" or "Save & View Report" at the top of the page.