Patients - Test Patients

For testing purposes, it can be useful to create test patients in the system in order to review and test functionality.

Creating a New Test Patient​

1.) Navigate to the "Patient Search" tab.

The screenshot displays the 'Patients / Collaborative Care' interface of the Mirah Collaborative Care platform. On the left, a vertical navigation menu includes options such as Dashboard, Panels, All Tasks, Case Consult, Patient Search, Billing, Metrics, Configuration, Platform Tools, and Mirah Support. The 'Patient Search' option is highlighted. The main section is divided into two columns: 'My Tasks' on the left and 'Inbox' on the right. 'My Tasks' shows a list of tasks with patient names like Rick Enrolled and Stacy Plourde, task descriptions such as 'Unspecified Task' and 'Discharge', and creation dates. Each task has a progress indicator and two buttons: a play button to start the task and a stop button to pause it. The 'Inbox' section lists assessments needing review, with patient names like d d and Venus Flytrap. Each entry includes a description, a progress indicator, and three buttons: 'View Report', 'Create Task', and 'Dismiss'. The 'Help' button is located at the bottom right corner.

2.) On the top right corner, select "Add New Patient".
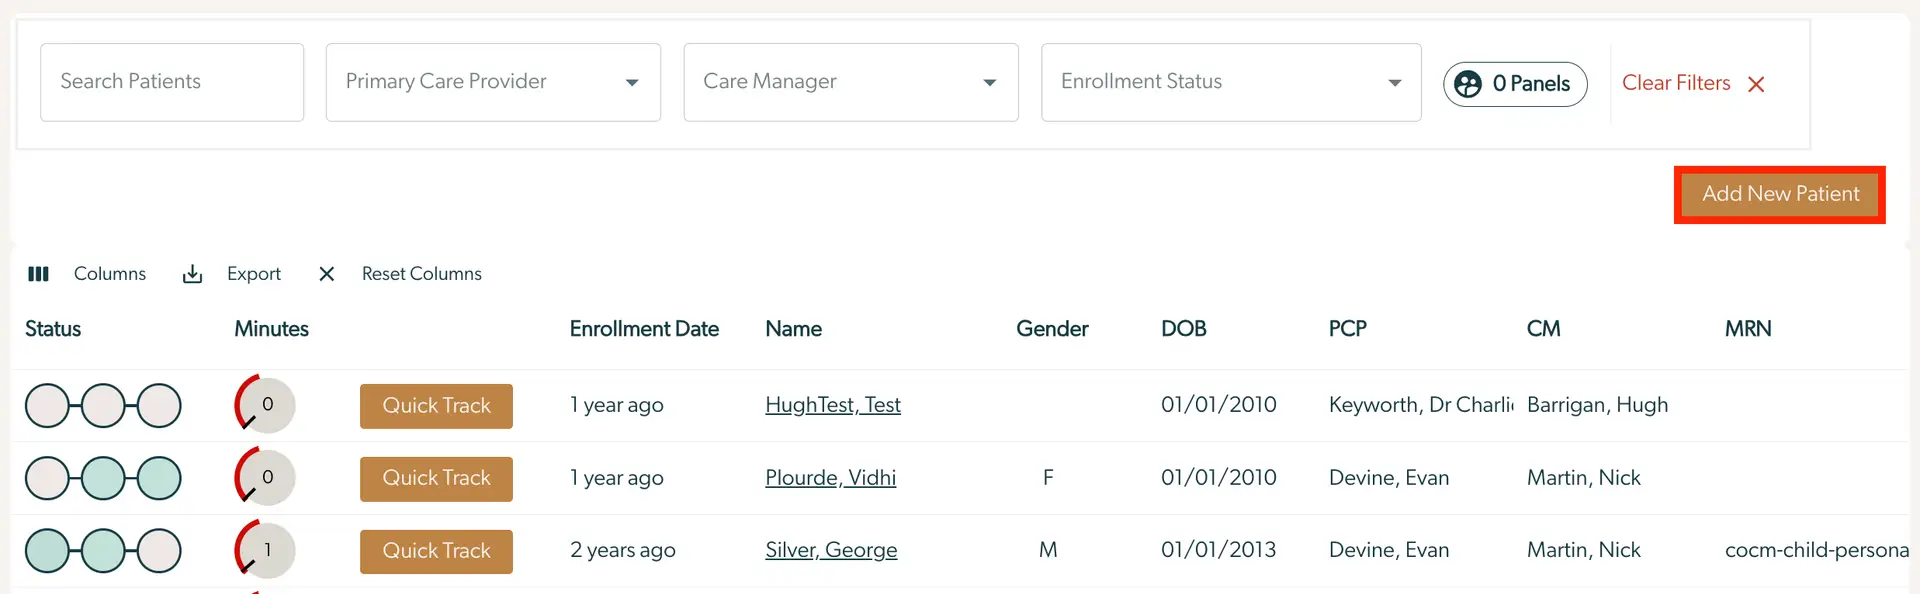
The screenshot displays the 'Patients - Test Patients' page within the Mirah Collaborative Care platform, which is used for managing patient information. At the top, there are search and filter options including 'Search Patients', 'Primary Care Provider', 'Care Manager', and 'Enrollment Status' dropdowns. A 'Clear Filters' button is located to the right of these options. Below, there is a table listing patients with columns for 'Status', 'Minutes', 'Enrollment Date', 'Name', 'Gender', 'DOB', 'PCP', 'CM', and 'MRN'. Each row provides specific details for individual patients, such as their enrollment date, name, gender, date of birth, primary care provider, care manager, and medical record number. The 'Add New Patient' button is prominently displayed in the top right corner, allowing users to add new patient information.

3.) After inputing the initial information, select the "This is a Test Patient" checkbox.
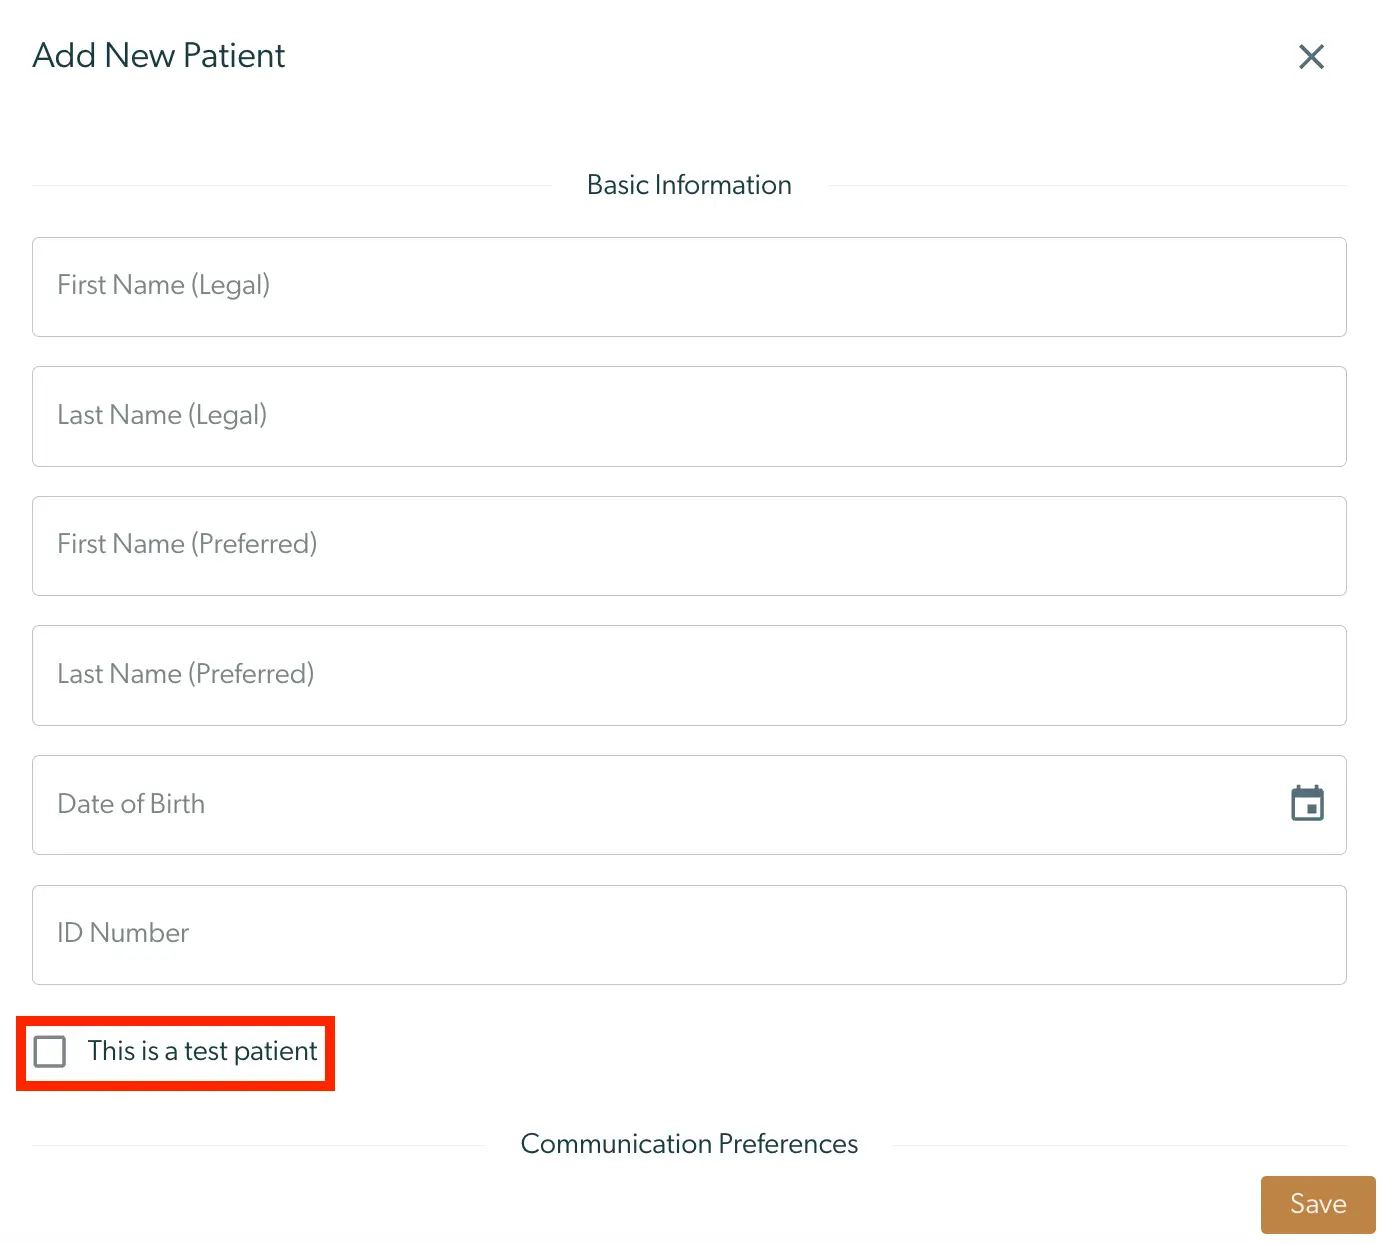
The 'Add New Patient' screen is designed for entering basic information about a new patient within the Mirah Collaborative Care system. It includes fields for First Name (Legal), Last Name (Legal), First Name (Preferred), Last Name (Preferred), Date of Birth, and ID Number. Each field is intended to capture specific patient details, with the Date of Birth field featuring a calendar icon for easy date selection. Below these fields, there is a checkbox labeled 'This is a test patient' which allows users to mark the entry as a test patient. At the bottom right corner, there is a 'Save' button to save the entered information. The screen is part of the patient management workflow, facilitating the addition of new patients to the system.

4.) Continue to add the prompted demographic information and press "Save".
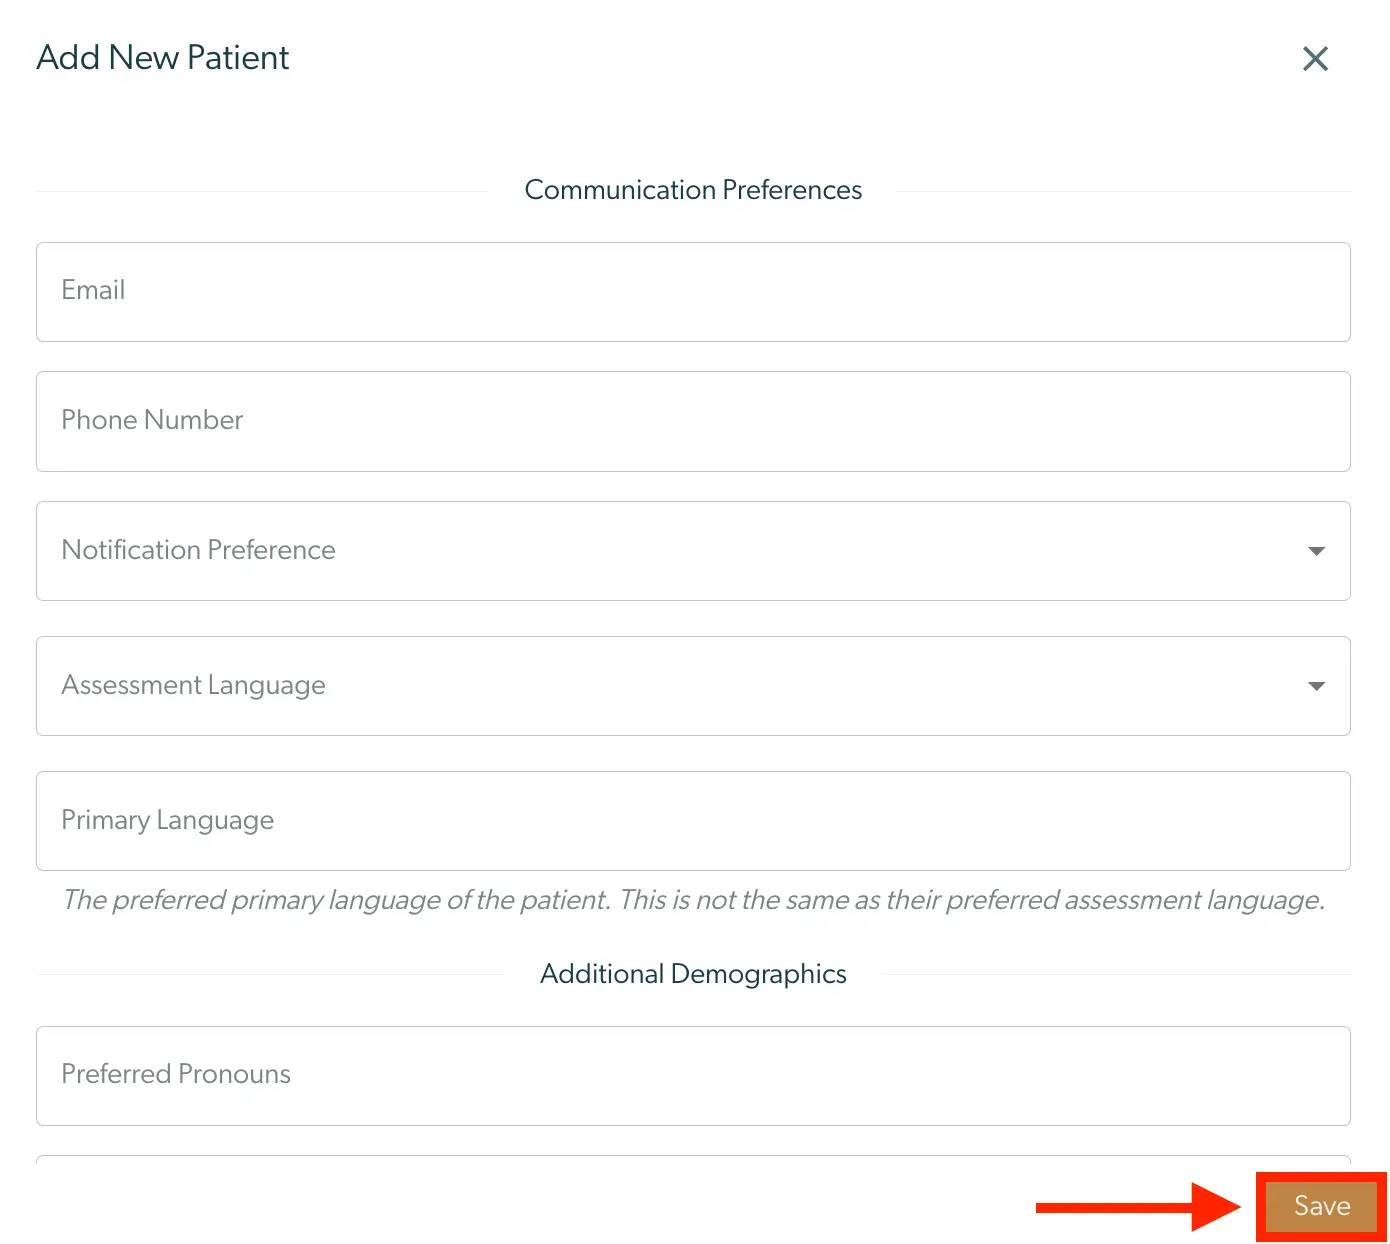
The 'Add New Patient' screen in Mirah Collaborative Care allows users to input and save patient information. The screen is divided into sections for Communication Preferences and Additional Demographics. Users can enter the patient's email and phone number, select notification and assessment language preferences from dropdown menus, and specify the primary language. A note clarifies that the primary language is different from the assessment language. Under Additional Demographics, users can input the patient's preferred pronouns. The 'Save' button, located at the bottom right corner, is used to save the entered information.

Searching for Test Patients​

If a patient does not appear in the standard "Patient Search" tab, it may be because they are marked as a test patient. Follow the steps outlined below to search for Test Patients.

1.) Click the dropdown menu to the right of the user's name.

The screenshot displays a section of the Mirah Collaborative Care interface, specifically focusing on patient management within the Collaborative Care feature. At the top, the Mirah logo is visible, followed by the text 'CoCM' indicating the Collaborative Care Model. Below this, the name 'Alice Van Helsing' is displayed, representing the selected patient. To the right of the patient's name, there is a downward-facing arrow, which likely serves as a dropdown menu to access more options related to the patient. Below the patient's name, there is a button labeled '0 Panels' with an icon of two people, indicating that there are currently no panels associated with this patient. This button is likely used to manage or view panels related to the patient. At the bottom of the screenshot, there is a search bar with a magnifying glass icon and the text 'Search (⌘+K)', which allows users to search for patients or other information within the system. The search bar is highlighted in orange, drawing attention to its functionality.

2.) Switch the "Viewing Test Patients" toggle to "On".

The screenshot displays a user interface section from the Mirah Collaborative Care platform, specifically related to patient management. At the top, the user's name, Alice Van Helsing, is shown with a dropdown arrow indicating additional options may be available. Below, there is a toggle switch labeled 'Viewing Test Patients?' which allows the user to switch between viewing test patient data and real patient data. The toggle is currently in the 'off' position, indicating that test patients are not being viewed. Below the toggle, there are two links: 'Change PII Visibility' which likely allows the user to adjust the visibility settings of personally identifiable information, and 'Log Out' which provides the option to log out of the platform. These links are positioned below the toggle switch.The screenshot displays a user interface section for managing patient visibility settings in the Mirah Collaborative Care platform. At the top, the user's name, Alice Van Helsing, is displayed with a dropdown indicator suggesting additional options may be available. Below, there is a toggle switch labeled 'Viewing Test Patients?' which allows the user to switch between viewing test patient data and actual patient data. The toggle is currently in the 'on' position, indicating that test patients are being viewed. Below the toggle, there are two links: 'Change PII Visibility' which likely allows the user to adjust the visibility of personally identifiable information, and 'Log Out' which provides an option to exit the current session. These links are located below the toggle switch.

3.) Select the "Patient Search" tab and search the desired Test Patient. In this outlook, only test patients will appear.
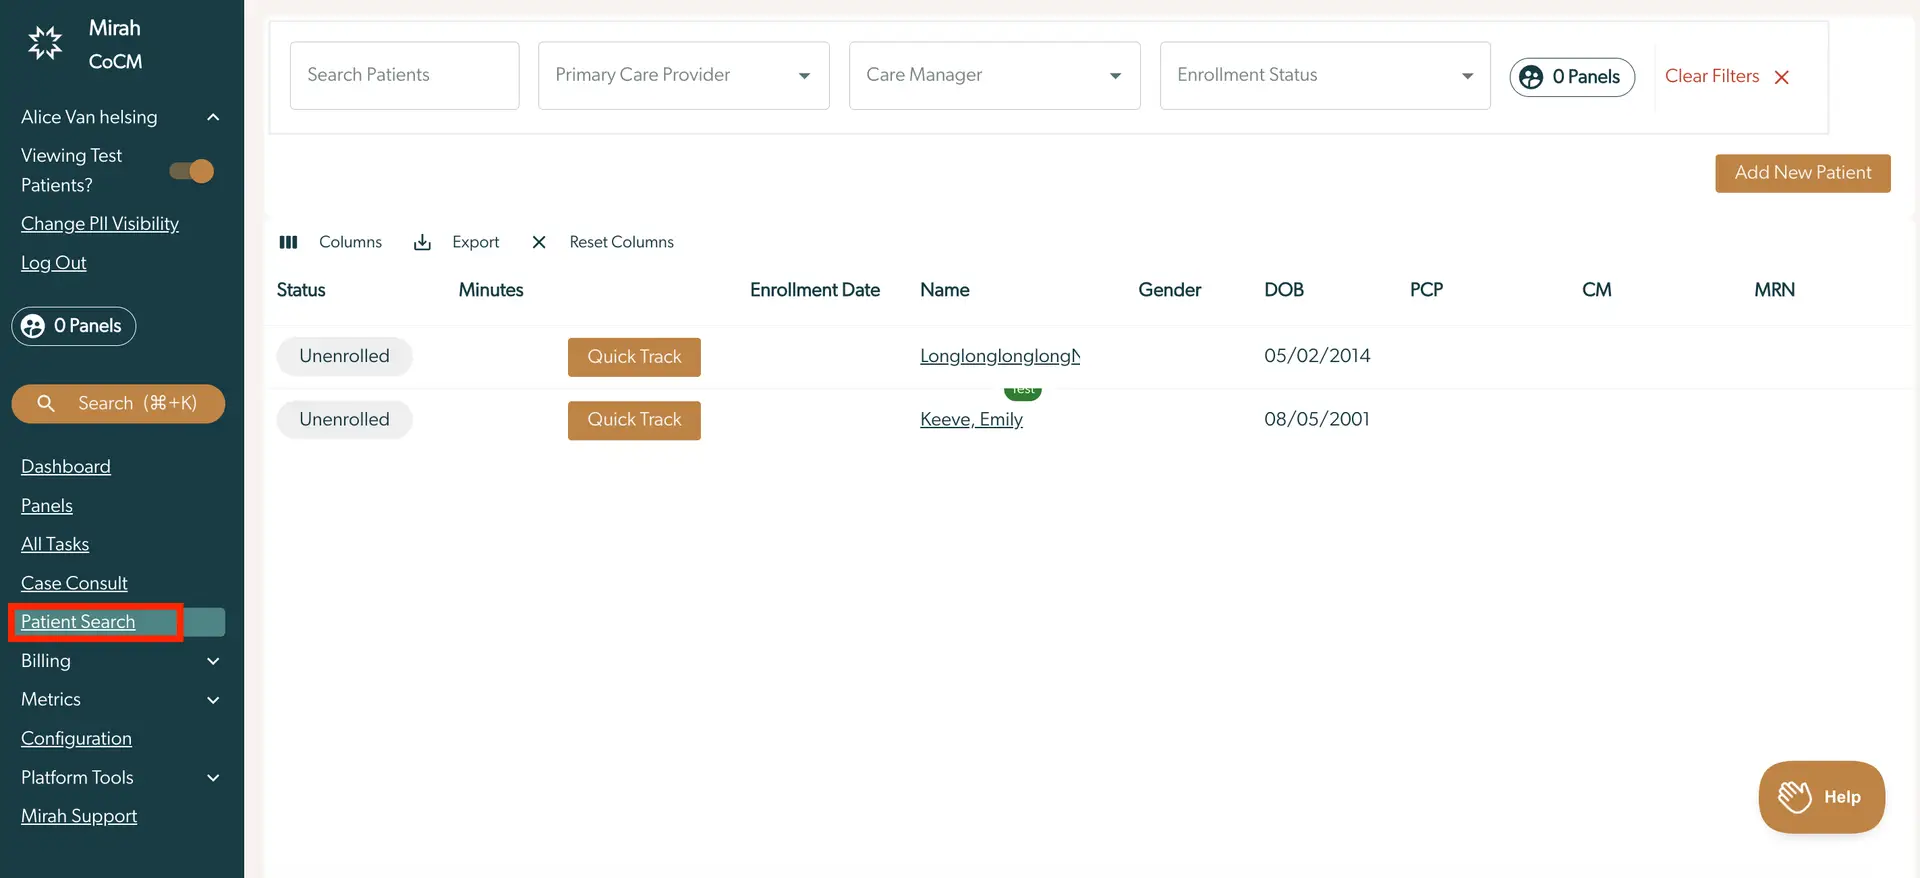
The screenshot displays the 'Patient Search' page within the Mirah Collaborative Care platform, where users can manage patient information. At the top, there are search fields for 'Search Patients', 'Primary Care Provider', 'Care Manager', and 'Enrollment Status', allowing users to filter patient data. To the right, there is a 'Clear Filters' button to reset search criteria and an 'Add New Patient' button for adding new patient records. Below, a table lists patients with columns for 'Status', 'Minutes', 'Enrollment Date', 'Name', 'Gender', 'DOB', 'PCP', 'CM', and 'MRN'. Each row provides patient details, including their enrollment status and a 'Quick Track' button for fast access to tracking features. The left sidebar includes navigation options such as 'Dashboard', 'Panels', 'All Tasks', 'Case Consult', 'Patient Search', 'Billing', 'Metrics', 'Configuration', 'Platform Tools', and 'Mirah Support'. The user is identified as Alice Van Helsing, with options to change PII visibility and log out. A 'Help' button is located at the bottom right corner.

Editing an Existing Test Patient​

1.) Click on the Test Patient you wish to edit.

The screenshot displays a section of the Mirah Collaborative Care interface related to patient management. It includes a status indicator labeled 'Unenrolled' on the left, indicating the patient's enrollment status in a care program. Next to it is a button labeled 'Quick Track' in a brown color, which likely provides a shortcut to track patient progress or data. The patient's name, 'Keeve, Emily,' is highlighted in a red-bordered box, suggesting it is the selected or active patient profile. On the far right, the date '08/05/2001' is displayed, which could represent the patient's date of birth or another relevant date. The layout is horizontal, with each element aligned in a row.

2.) Select "Edit Demographics" in the "Patients Info" panel.
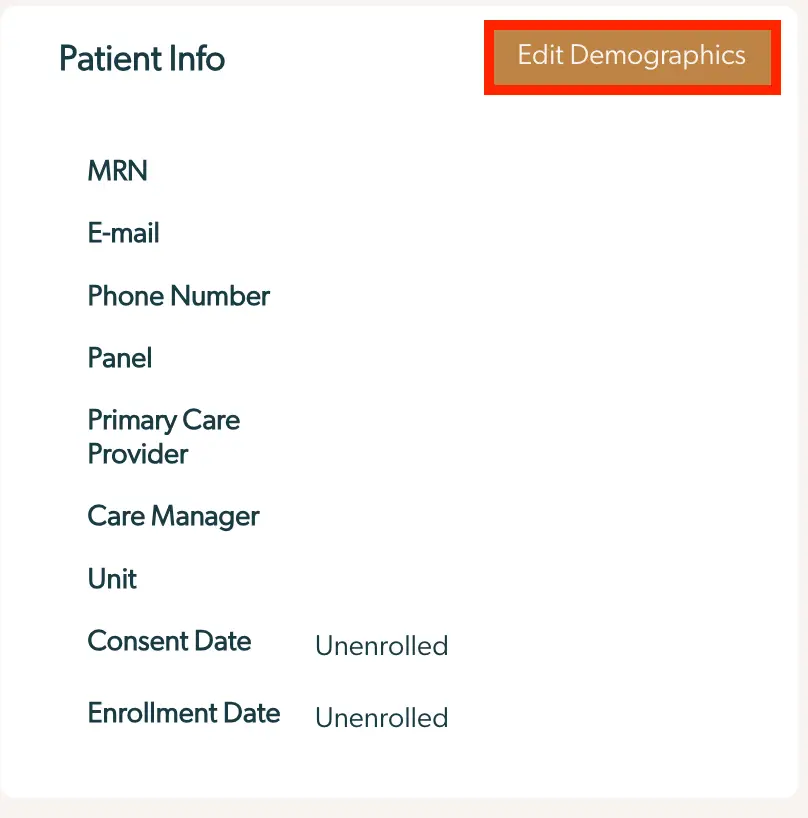
The screenshot displays the 'Patient Info' section within the Mirah Collaborative Care platform, specifically for test patients. It lists various fields related to patient demographics including MRN, E-mail, Phone Number, Panel, Primary Care Provider, Care Manager, and Unit. Additionally, it shows the Consent Date and Enrollment Date, both marked as 'Unenrolled'. At the top right corner, there is a prominent 'Edit Demographics' button, which allows users to modify the patient's demographic information.

3.) Unselect the checkbox labeled "This is a test patient".
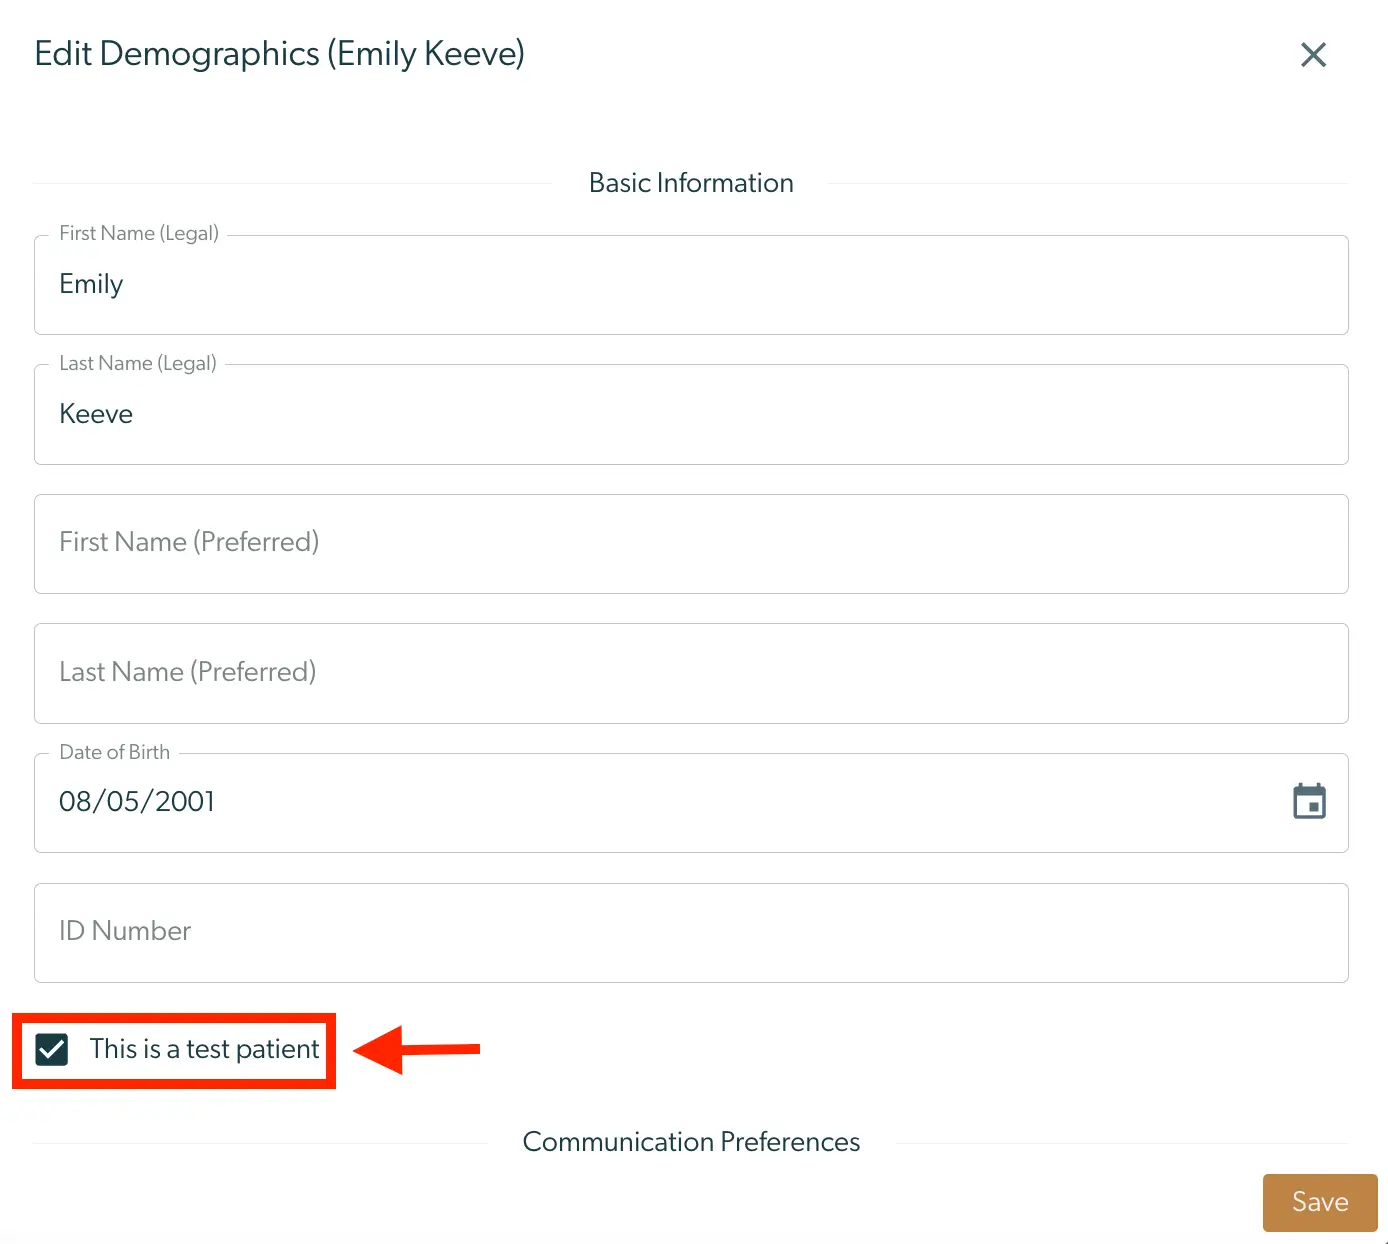
The 'Edit Demographics' screen for Emily Keeve allows users to input and update basic patient information. It includes fields for the legal first name, legal last name, preferred first name, preferred last name, date of birth, and ID number. The date of birth field has a calendar icon for easy date selection. Below these fields, there is a checkbox labeled 'This is a test patient' which is checked, indicating that the patient is a test entry. At the bottom right corner, there is a 'Save' button to confirm and save any changes made to the patient's demographic information.

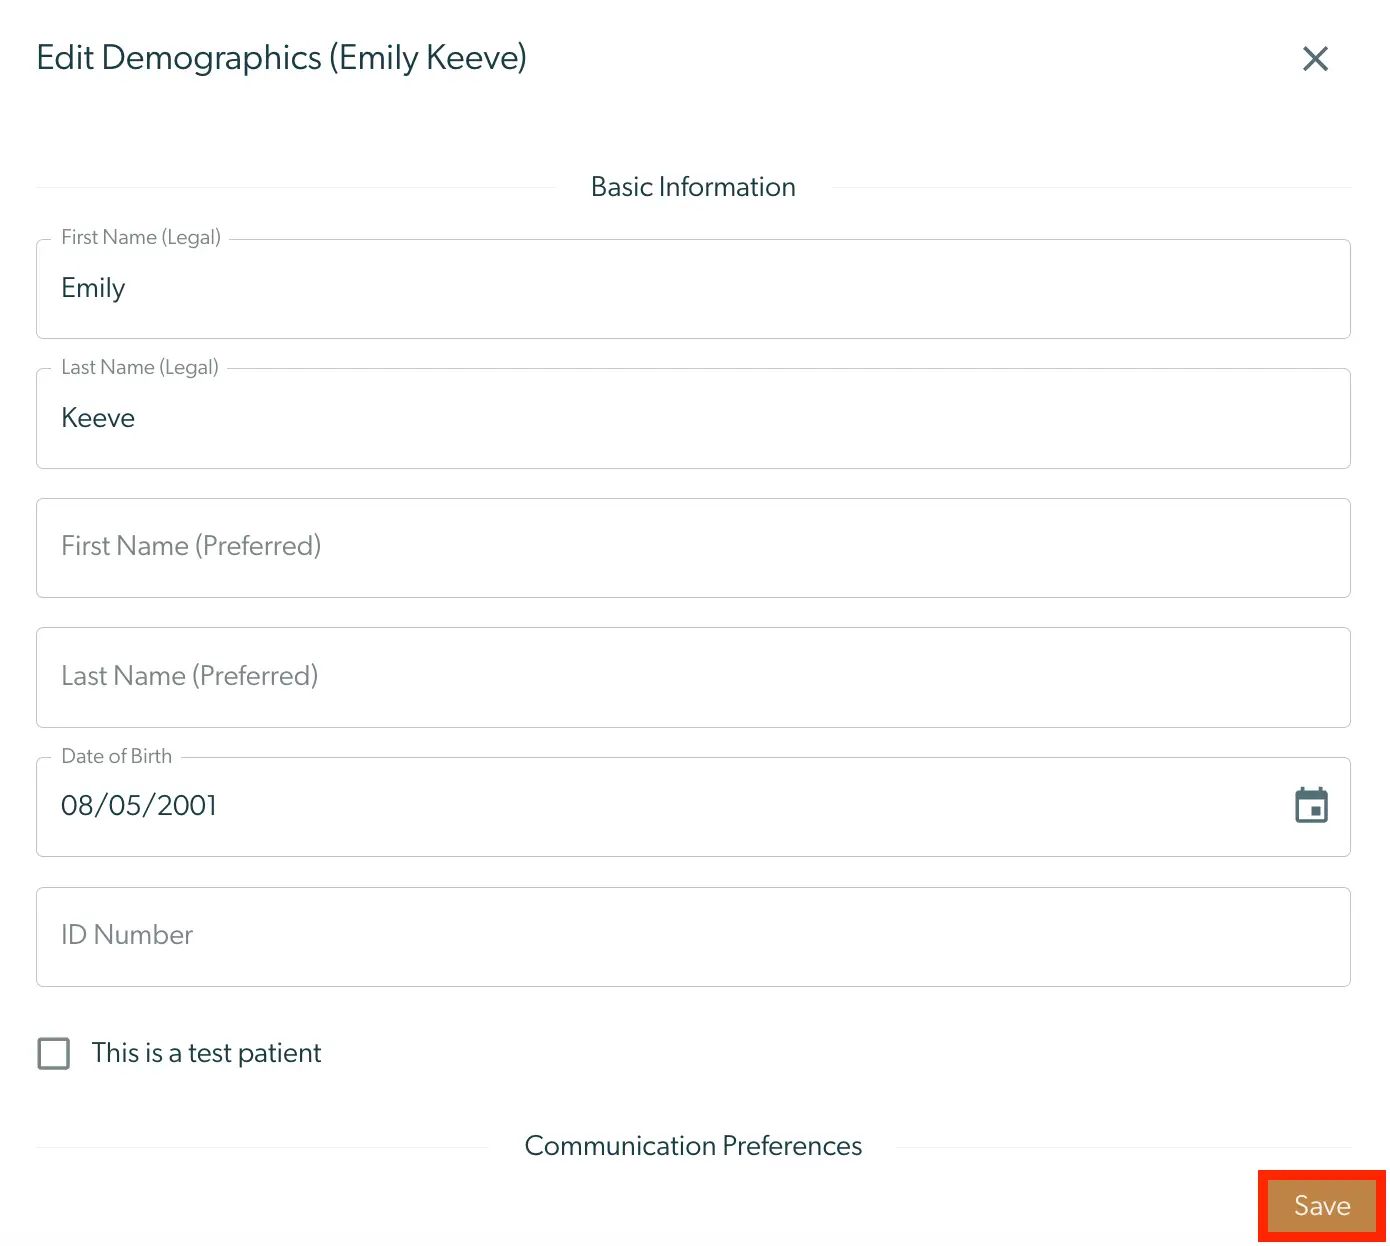
4.) Press "Save".

The 'Edit Demographics' screen for Emily Keeve allows users to update basic patient information within the Mirah Collaborative Care platform. The screen includes fields for entering the legal first name, which is pre-filled with 'Emily', and the legal last name, pre-filled with 'Keeve'. There are additional fields for the preferred first and last names, which are currently empty. The 'Date of Birth' field is filled with '08/05/2001', and a calendar icon is available for date selection. An empty 'ID Number' field is provided for entering a unique identifier. A checkbox labeled 'This is a test patient' is available for selection. At the bottom right corner, there is a 'Save' button, highlighted in red, for saving any changes made to the patient's demographic information.