
Configuring Mirah Tablets (iPad)

Mirah iPad Configuration & Provisioning Instructions

This guide includes all instructions necessary to set-up and configure your Mirah iPad tablet and the Kiosk Software.

Stage 1: Mirah URL Browser Configuration​

  • You will need to have your initial iPad setup complete, and connected to Wifi
  • Navigate to the Safari app on your iPad, and open a new browser window. The screenshot displays the home screen of an iPad, which is part of the process for configuring Mirah Tablets. The screen shows a beach-themed wallpaper with a single app icon labeled 'Settings' located at the top left corner. At the bottom of the screen, there is a dock containing four app icons: Messages, Safari, Settings, and a folder with additional apps. The Safari app icon is highlighted with a red border, indicating it is the next step in the configuration process. The status bar at the top shows the time as 5:57 PM, the date as Thursday, January 6, and the battery level at 82%.
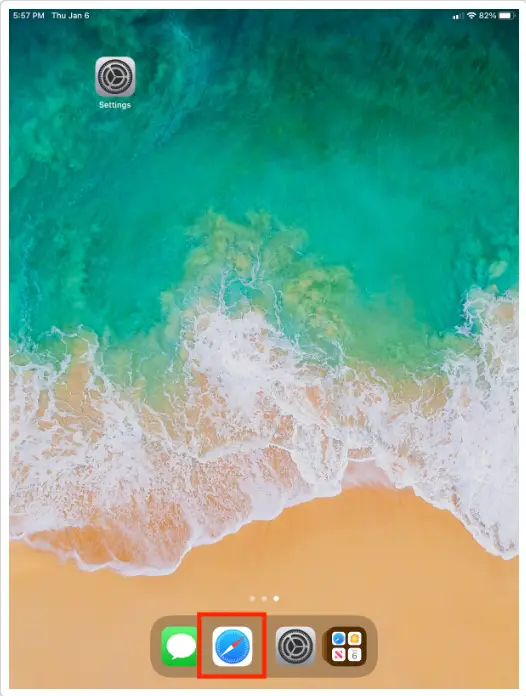
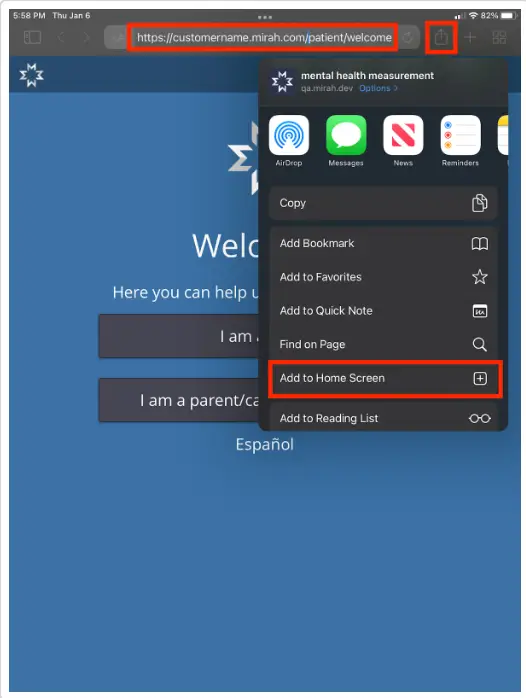
  • In the URL bar, navigate to https://[customer name].mirah.com/patient/welcome
  • Click on the Share icon, then click the option to “Add to Home Screen” The screenshot displays the Mirah Measurement-Based Care welcome page on an iPad, which is part of the process for configuring Mirah tablets. The URL bar at the top shows the address 'https://customername.mirah.com/patient/welcome', indicating the user is on the patient welcome page. Below the URL, there is a share icon highlighted in the top right corner of the screen, which when tapped, opens a menu with various options. The menu includes options such as 'Copy', 'Add Bookmark', 'Add to Favorites', 'Add to Quick Note', 'Find on Page', and 'Add to Reading List'. The 'Add to Home Screen' option is highlighted, suggesting the user can add this page as a shortcut on their iPad's home screen. The main page content includes a welcome message with two buttons: 'I am a patient' and 'I am a parent/caregiver', which are used to navigate further into the application. There is also an option to switch the language to Spanish at the bottom of the screen.
  • You will have the option to rename the home screen icon. Keep the default values, then click “Add” The screenshot displays the 'Add to Home Screen' feature on an iPad for the Mirah application. The main screen shows a blue background with a welcome message, 'Welcome to Mirah,' and two buttons below it. The first button is labeled 'I am a patient,' and the second button is labeled 'I am a parent/caregiver.' Below these buttons, there is a link labeled 'Español' for language selection. Overlaid on this screen is a pop-up window titled 'Add to Home Screen,' which includes the Mirah icon, the URL 'https://qa.mirah.dev/patient/welc...' and a description stating that an icon will be added to the Home Screen for quick access. In the top right corner of the pop-up, there is a red-highlighted 'Add' button, and in the top left corner, there is a 'Cancel' button.

Stage 2: iPad Configuration - Enable Guided Access​

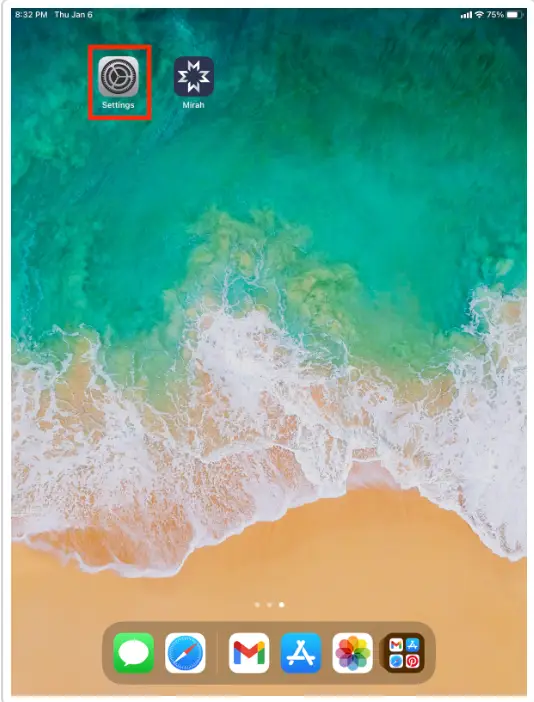
  • Navigate to the Settings app on your iPad The screenshot displays the home screen of an iPad, which is part of the process for configuring Mirah Tablets. The screen shows a beach-themed wallpaper with two app icons prominently visible in the upper section: 'Settings' on the left, which is highlighted with a red box, and 'Mirah' on the right. The 'Settings' app is used to configure device settings, while the 'Mirah' app is related to the Mirah Measurement-Based Care product. At the bottom of the screen, there is a dock with several app icons including Messages, Safari, Gmail, App Store, Photos, and others, indicating quick access to these applications. The status bar at the top shows the time as 8:32 PM, the date as Thursday, January 6, and the battery level at 75%.
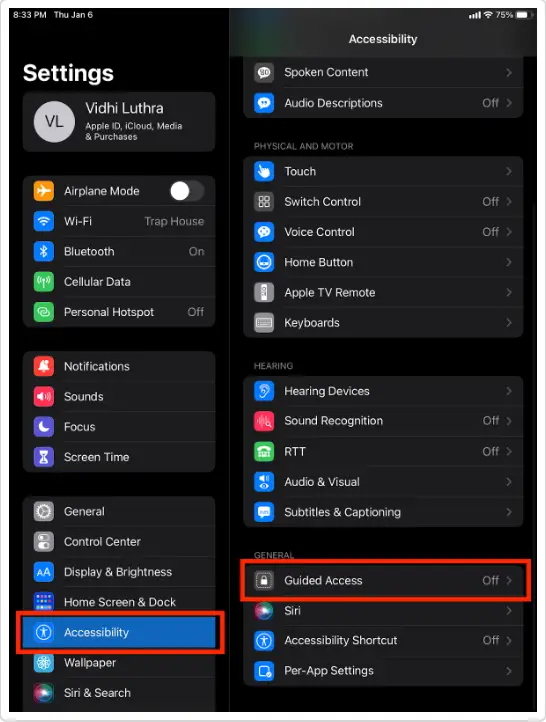
  • Select “Accessibility” in the list on the left-hand side of the screen. In the Accessibility section on the right-hand side of the screen, scroll to the bottom of the list, and select the “Guided Access” option The screenshot displays the Accessibility settings on an iPad, which is part of the process for configuring Mirah Tablets. On the left side, the main Settings menu is visible, showing options such as Airplane Mode, Wi-Fi, Bluetooth, Cellular Data, and Personal Hotspot, along with user information for Vidhi Luthra. The Accessibility option is highlighted, indicating it is selected. On the right side, the Accessibility menu is open, showing various settings categorized under Spoken Content, Physical and Motor, Hearing, and General. The General section includes options like Guided Access, Siri, Accessibility Shortcut, and Per-App Settings. Guided Access is highlighted, indicating it is the focus of the current task, and it is currently turned off. This screen is used to enable or configure accessibility features on the iPad, which is essential for setting up Mirah Tablets for measurement-based care.
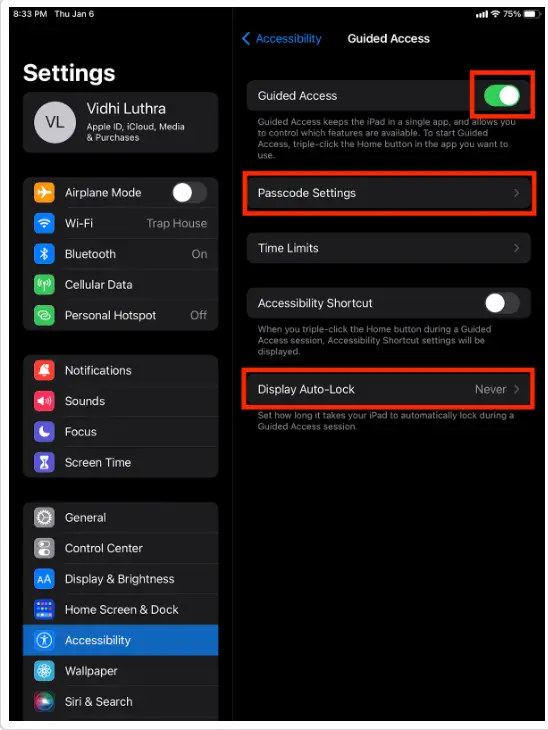
  • Turn Guided Access to “On”. In this section, you can also update “Passcode Settings” and “Display Auto-Lock”. The screenshot displays the iPad Settings interface, specifically focusing on configuring Guided Access under Accessibility settings. On the left side, the main Settings menu is visible, showing options such as Airplane Mode, Wi-Fi, Bluetooth, Cellular Data, and Personal Hotspot, with the Accessibility option highlighted. On the right side, the Guided Access settings are shown, where Guided Access is toggled on at the top. Below, there are options for Passcode Settings, Time Limits, Accessibility Shortcut, and Display Auto-Lock, with the latter set to 'Never'. These settings allow users to control how the iPad behaves during a Guided Access session, which restricts the device to a single app and limits functionality to enhance focus or security. The Guided Access toggle is located at the top right, while the Passcode Settings and Display Auto-Lock options are highlighted in red boxes for emphasis.
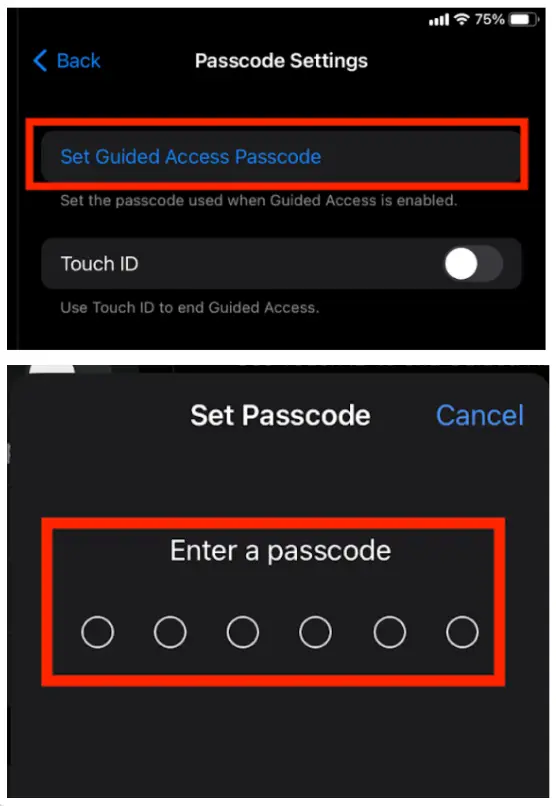
  • Setting a passcode prevents patients from disabling guided access mode. Click on the option to “Set Guided Access Passcode”. Then, enter a passcode - make sure to take a note of what the passcode is in case you need to regain access to the iPad. You will be asked to re-enter the passcode to confirm. The screenshot displays the Passcode Settings screen on an iPad, which is part of the process for configuring Mirah tablets. The top section shows the option 'Set Guided Access Passcode' highlighted, indicating where users can set the passcode used when Guided Access is enabled. Below this, there is a toggle switch for 'Touch ID', which is currently off, allowing users to use Touch ID to end Guided Access. The bottom section of the screenshot shows a pop-up titled 'Set Passcode' with a prompt to 'Enter a passcode', featuring six empty circles for passcode entry. The 'Cancel' button is located at the top right of the pop-up, allowing users to exit the passcode setting process.
  • You can also turn off the “Display Auto-Lock”. This prevents the iPad from turning off during Guided Access Mode The screenshot displays the 'Display Auto-Lock' settings screen on an iPad, which is part of the process for configuring Mirah tablets. This screen allows users to select the duration before the device automatically locks its display. Options include Default, 30 Seconds, 1 Minute, 2 Minutes, 3 Minutes, 4 Minutes, 5 Minutes, 10 Minutes, 15 Minutes, and Never. The 'Never' option is currently selected, indicated by a checkmark and highlighted with a red border. The 'Back' button is located at the top left corner, allowing users to return to the previous screen.

Stage 3: Turning on Guided Access (Kiosk) Mode​

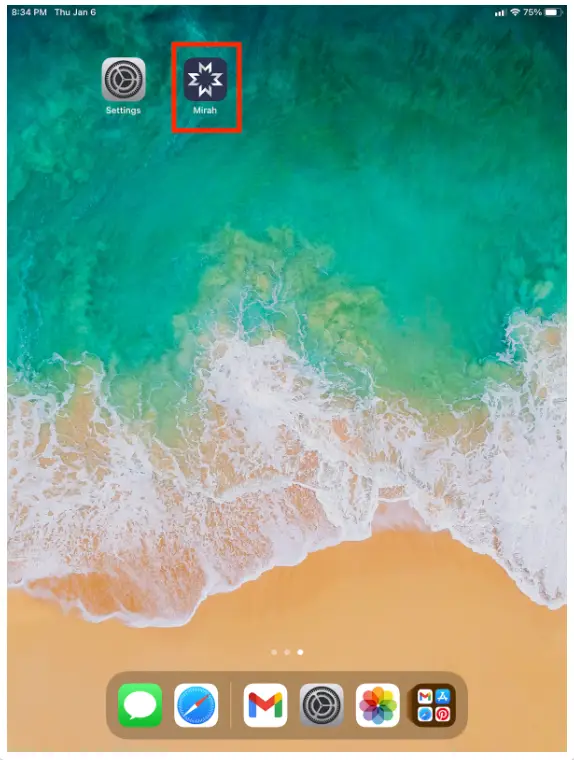
  • Navigate to the Mirah app you created in Stage 1 The screenshot displays the home screen of an iPad, showcasing the Mirah app icon prominently highlighted in red. The Mirah app is located in the top right corner of the screen, next to the Settings app icon. The purpose of this screen is to guide users in locating and accessing the Mirah app for measurement-based care and collaborative care functionalities. The bottom of the screen features a dock with commonly used apps including Messages, Safari, Gmail, Settings, Photos, and Maps, providing quick access to these applications.
  • To enable Guided Access in the Mirah app, triple click on the home button. If your iPad doesn’t have a home button, triple click on the top/side button. You should see a pop-up saying “Guided Access Enabled”. The screenshot displays the welcome screen of the Mirah application on an iPad, designed to guide users in therapy. At the top, there is a navigation bar with the time, date, and battery status on the right, and a 'Translation Available' option in the center. Below the navigation bar, the Mirah logo is prominently displayed. The main section of the screen features a welcome message that reads 'Welcome! Here you can help us guide your therapy.' Below this message, there are two buttons: the first button is labeled 'Guided Access Started' and is highlighted in red, indicating that the guided access feature is active. The second button, located below the first, is labeled 'I am a parent/guardian of a client.' At the bottom of the screen, there is an option to switch the language to Spanish, labeled 'Español.'
  • You will need to disable the URL bar at the top of the screen to prevent users from navigating away from this page. To do this, triple click on the home button again (or the top/side button if your iPad doesn’t have a home button). You will be prompted to enter your Guided Access passcode you set in Stage 2. The screenshot displays the passcode entry screen for the Mirah application on an iPad. The screen is part of the user authentication process, where users are prompted to enter a six-digit passcode to proceed. The passcode entry field is centrally located within a pop-up window, which has the title 'Enter Passcode' at the top. To the right of the title is a 'Cancel' button, allowing users to exit the passcode entry process. Below the title, there are six circular placeholders indicating where each digit of the passcode should be entered. The background of the screen is blue, featuring the Mirah logo at the top center. Below the passcode entry pop-up, there are two buttons: 'I am a therapist' and 'I am a patient', which are part of the user role selection process.
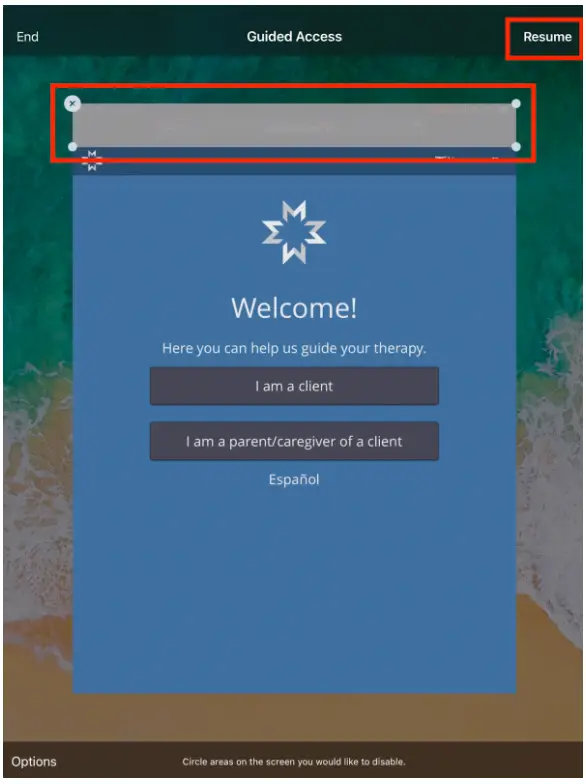
  • You will notice that there is a prompt at the bottom of the screen - “Circle areas on the screen you would like to disable”. Circle the entire gray box on the top of the screen - make sure to select the entire section to prevent users from navigating away from this URL. The screenshot displays the Mirah Measurement-Based Care application on an iPad, with Guided Access mode enabled. At the top of the screen, there is a navigation bar showing the URL 'qa.mirah.dev' with options to refresh, share, and open a new tab. Below the navigation bar, the main content area welcomes users with a message 'Welcome! Here you can help us guide your therapy.' There are two prominent buttons: 'I am a client' and 'I am a parent/caregiver of a client,' which allow users to select their role in the therapy process. Additionally, there is a link labeled 'Español' for language selection. At the bottom of the screen, there is a prompt 'Circle areas on the screen you would like to disable,' indicating the functionality of Guided Access mode. The 'End' button is located at the top left corner, and the 'Resume' button is at the top right corner, allowing users to manage the Guided Access session.
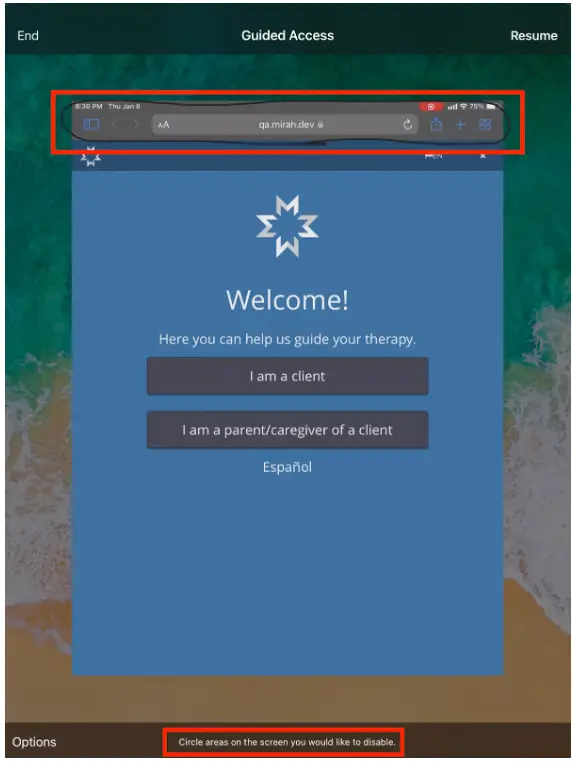
  • You will notice that the area inside the circle turns gray. You can edit and expand this area as needed to make sure the entire URL form field is covered. Once you are satisfied with the disabling, click on the “Resume” button. The screenshot displays the initial setup screen for Mirah on an iPad, where users can select their role to begin therapy guidance. The screen is titled 'Guided Access' at the top, with an 'End' button on the left and a 'Resume' button on the right. Below the title, a red box highlights a section that can be adjusted or disabled. The main section of the screen features a welcome message, 'Welcome! Here you can help us guide your therapy.' Below the message are two buttons: 'I am a client' and 'I am a parent/caregiver of a client,' which allow users to specify their role in the therapy process. There is also an option to switch the language to Spanish, indicated by the word 'Español.' At the bottom of the screen, there is a prompt to 'Circle areas on the screen you would like to disable,' with an 'Options' button located on the left side.
  • You’ve now successfully provisioned your iPad The screenshot displays the welcome screen of the Mirah Measurement-Based Care application on an iPad. The screen is designed to guide users in selecting their role for therapy guidance. At the top, there is a navigation bar with the Mirah logo on the left and a language selection option labeled 'EN' on the right. Below, the main content area features a welcoming message 'Welcome! Here you can help us guide your therapy.' There are two prominent buttons for user selection: 'I am a client' and 'I am a parent/caregiver of a client,' both centrally located. At the bottom, there is a link labeled 'Español' for switching the language to Spanish.