
Integration Onboarding Data Quality Checklist

How to Verify Your Mirah Integration​

Once your team and Mirah have worked together to set up an integration, you should take a moment to verify that the data is flowing correctly. Doing this before you roll out Mirah to your whole practice will ensure that any data issues are uncovered and fixed before they impact patients and providers.

Note that your EHR may not support all the kinds of data below, or Mirah may not be importing every field. Each EHR supports a different set of fields and data types, for a list of exactly what Mirah can import from your system, contact support. For flat file integrations, the fields and data types Mirah imports will depend on what your IT team is sending us.

For each kind of data that Mirah imports from your system, there are two checks to do:

  • Confirm that the total number of records imported to Mirah matches what you expect. This ensures that Mirah isn't skipping or failing to import records.
  • Spot check the contents of a few records. This ensures that there are no errors in processing the data from your system.

Go through each data type below that's relevant to your integration and check that the data in Mirah matches what you expect in your EHR.

Organizations​

Go to the Organizations page from the instance menu in the top right:
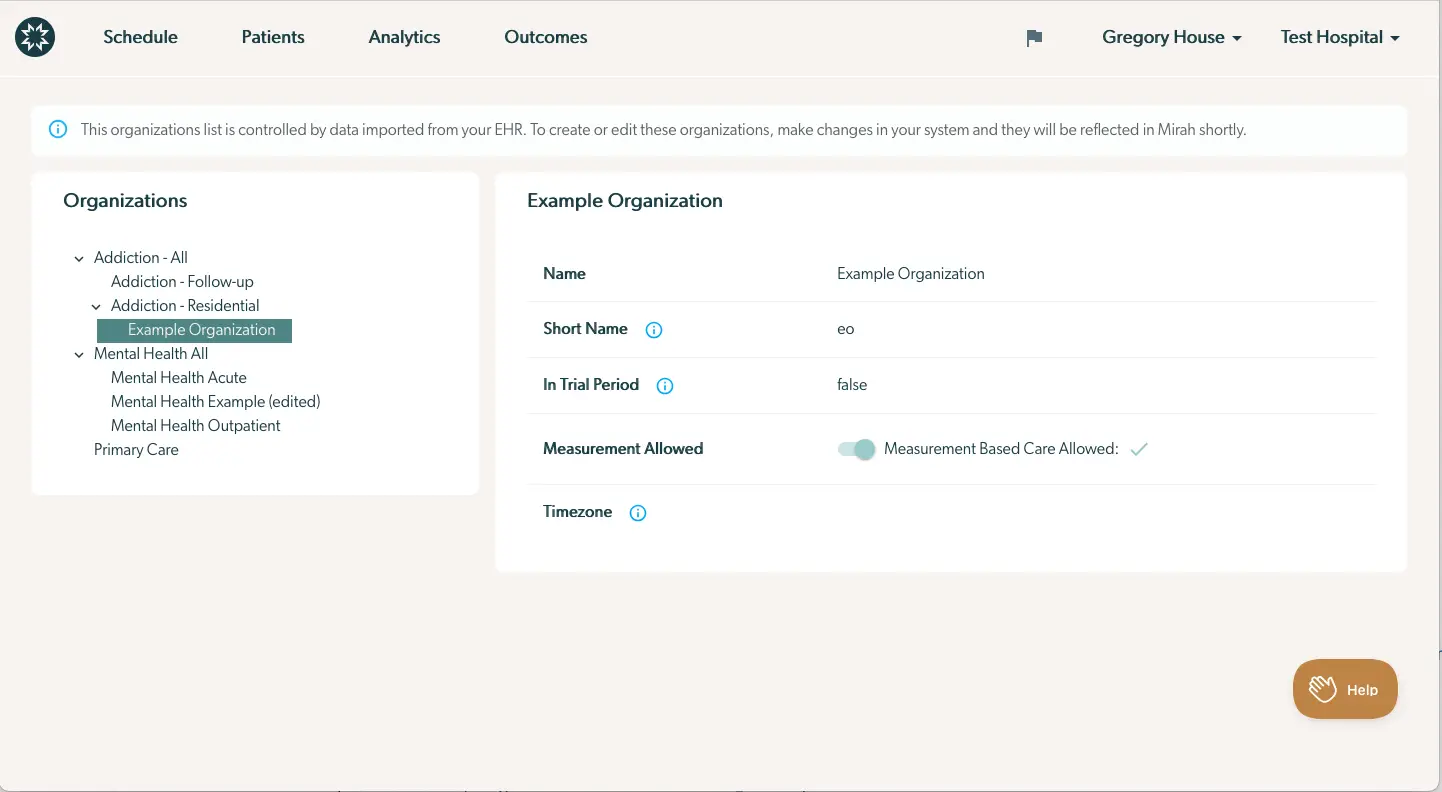
The screenshot displays the Integration Onboarding Data Quality Checklist within the Mirah Collaborative Care platform. The screen is divided into two main sections: Organizations and Example Organization. The Organizations section on the left lists various categories such as Addiction and Mental Health, with subcategories like Addiction - Residential and Mental Health Acute. The Example Organization section on the right provides detailed information about the selected organization, including fields for Name, Short Name, In Trial Period, Measurement Allowed, and Timezone. Each field has an information icon next to it for additional details. The Measurement Allowed field is a toggle switch indicating that Measurement Based Care is allowed. At the bottom right corner, there is a Help button for user assistance. The top navigation bar includes options for Schedule, Patients, Analytics, and Outcomes, along with user and organization settings labeled Gregory House and Test Hospital.

You can see the list of all organizations imported into Mirah by expanding the tree on the left. Check that the list of organizations and the hierarchy is correct. Most integrations only import the organization name, so there aren't other details to spot check here.

Providers​

Go to the Manage Users page from the instance menu in the top right. At the bottom of the table, check that the total provider count is correct:
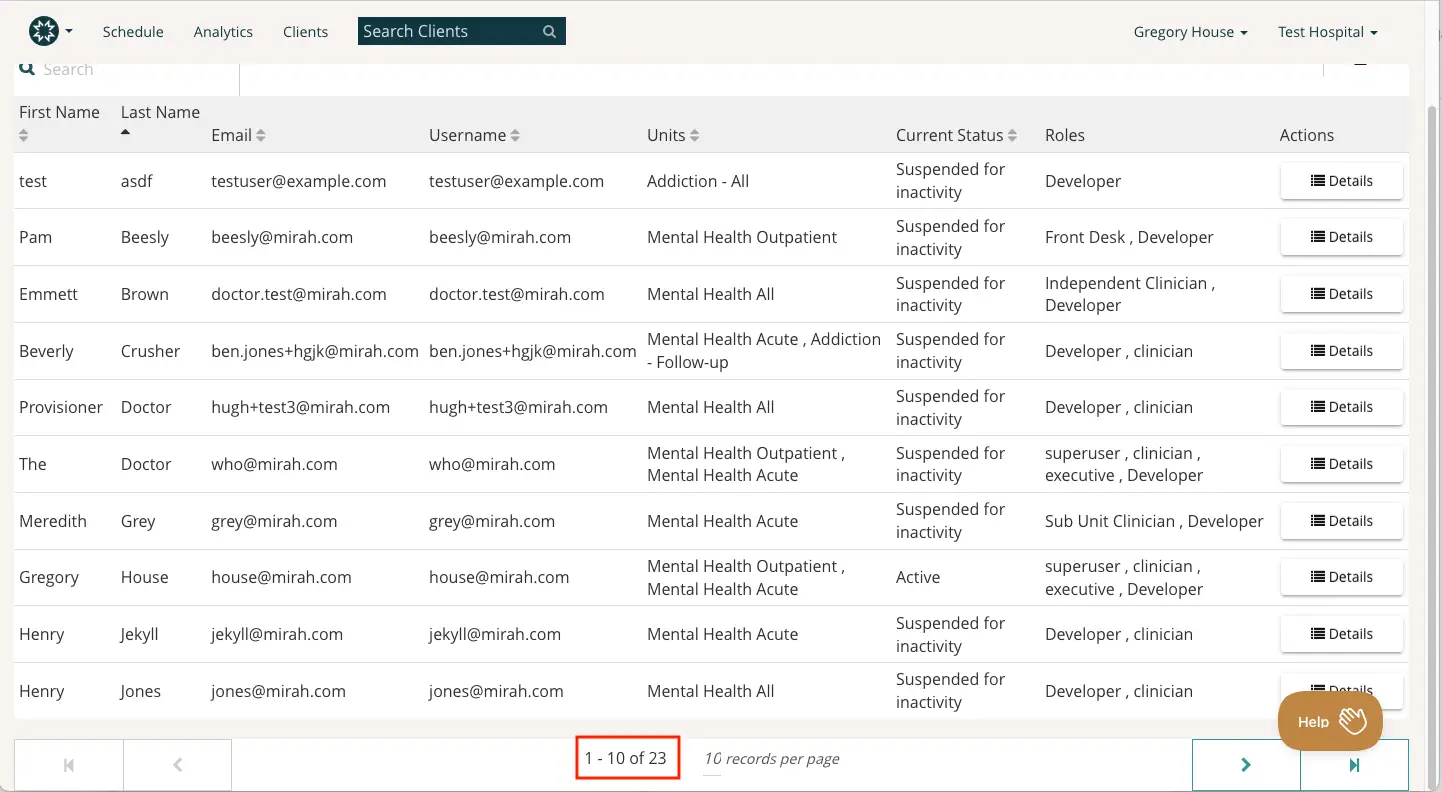
The screenshot displays a user interface for managing client data within the Mirah Collaborative Care platform. At the top, there is a navigation bar with options for Schedule, Analytics, and Clients, along with a search bar labeled 'Search Clients' for finding specific client records. Below the search bar is a table listing client information, including columns for First Name, Last Name, Email, Username, Units, Current Status, Roles, and Actions. Each row represents a client, with details such as their name, email, associated units, current status, roles, and an 'Actions' column featuring a 'Details' button for more information. The 'Details' buttons are located on the right side of each row. At the bottom of the table, pagination controls are visible, showing the current page range '1 - 10 of 23' and allowing navigation through pages with forward and backward buttons. A 'Help' button is located at the bottom right corner of the screen.

Click the "Details" button on a provider to open their record for a spot check:
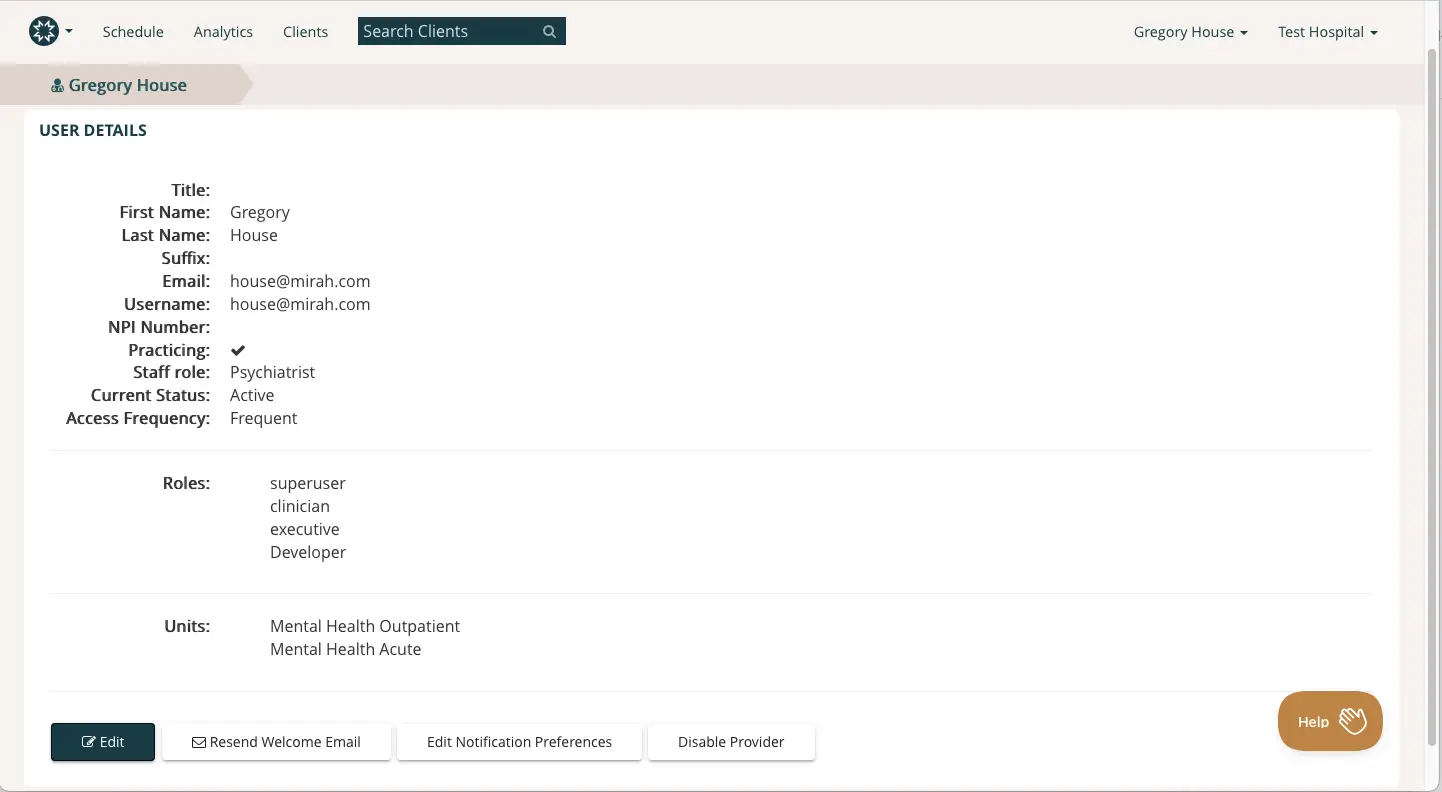
The screenshot displays the user details page for Gregory House within the Mirah Collaborative Care platform. At the top, there is a breadcrumb navigation indicating the user's name, Gregory House, followed by the section title 'USER DETAILS'. The page provides comprehensive information about the user, including their title, first name, last name, suffix, email, username, NPI number, practicing status, staff role, current status, and access frequency. Additionally, it lists the roles assigned to the user, such as superuser, clinician, executive, and developer, as well as the units they are associated with, namely Mental Health Outpatient and Mental Health Acute. At the bottom of the page, there are four buttons: 'Edit' for modifying user details, 'Resend Welcome Email' for sending the welcome email again, 'Edit Notification Preferences' for adjusting notification settings, and 'Disable Provider' for deactivating the user. The 'Help' button is located at the bottom right corner, providing assistance options.

Confirm the details shown match the information for this provider in your EHR.

Use the "Clients" link at the top of the page to see the list of patients. At the bottom of the table, check that the total patient count is correct:
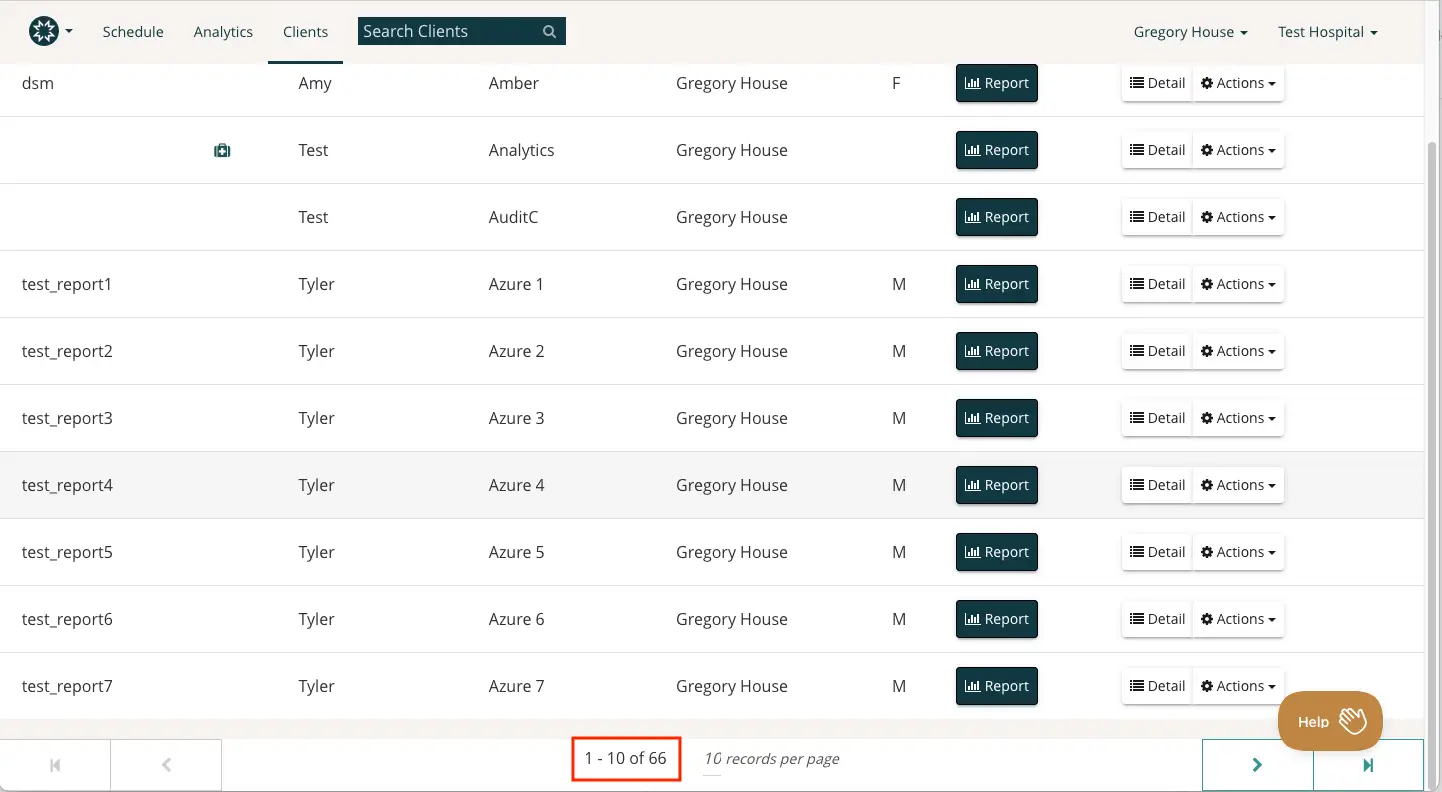
The screenshot displays the 'Clients' section of the Mirah Collaborative Care platform, which is part of the Integration Onboarding Data Quality Checklist feature. The top navigation bar includes tabs for 'Schedule', 'Analytics', and 'Clients', with the 'Clients' tab currently selected. A search bar labeled 'Search Clients' is available for finding specific client records. The main table lists client data with columns for client name, assigned staff, department, and gender. Each row includes buttons for 'Report', 'Detail', and 'Actions', located on the right side, allowing users to generate reports, view detailed information, or perform actions related to each client. The bottom of the screen shows pagination controls, indicating the current view of '1 - 10 of 66' records, with options to navigate through pages. A 'Help' button is located at the bottom right corner, providing assistance to users.

Click the "Detail" button on a patient to open their record for a spot check:
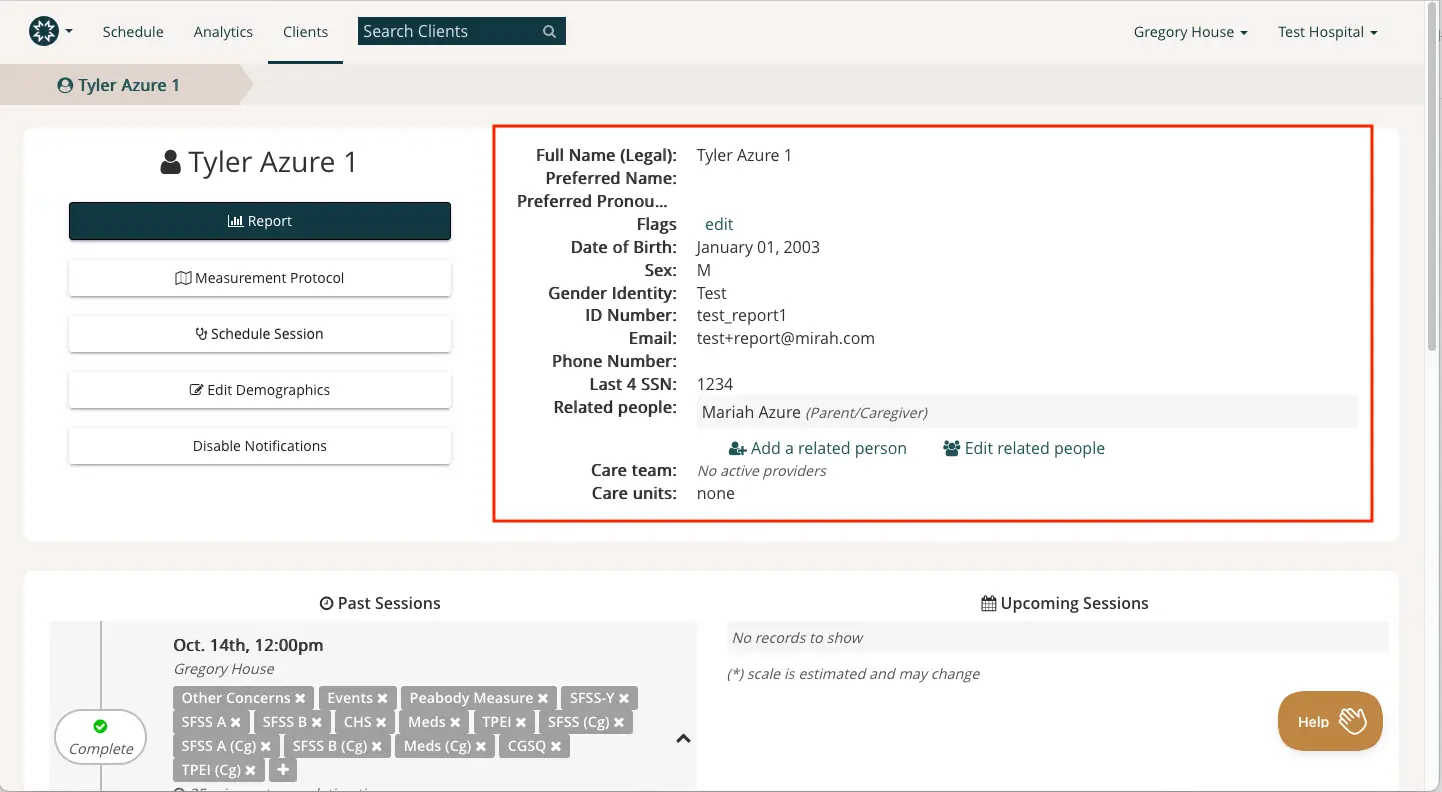
The screenshot displays the client profile page for Tyler Azure 1 within the Mirah Collaborative Care platform. At the top, the navigation bar includes options for Schedule, Analytics, and Clients, with a search bar labeled 'Search Clients'. The breadcrumb trail shows 'Tyler Azure 1', indicating the current client profile. The left section features buttons for 'Report', 'Measurement Protocol', 'Schedule Session', 'Edit Demographics', and 'Disable Notifications', each serving specific functions related to client management. The central section, highlighted in red, provides detailed client information including Full Name (Legal), Preferred Name, Preferred Pronouns, Flags, Date of Birth, Sex, Gender Identity, ID Number, Email, Phone Number, Last 4 SSN, Related people, Care team, and Care units. Options to 'Add a related person' and 'Edit related people' are available for managing relationships. Below, the 'Past Sessions' section lists previous sessions with details such as date, time, and session type, while the 'Upcoming Sessions' section indicates no records to show. A 'Help' button is located at the bottom right corner for user assistance.

Confirm that the demographic details in the top right match the information for this patient in your EHR. Find a patient with caregivers or other related people and ensure that they came through as well. These records are sometimes separate from the patient record (for example, in flat file integrations they're sent in a separate file) but are shown here on the patient page.

Appointments​

Click the "Schedule" link on the top to go to the schedule page:
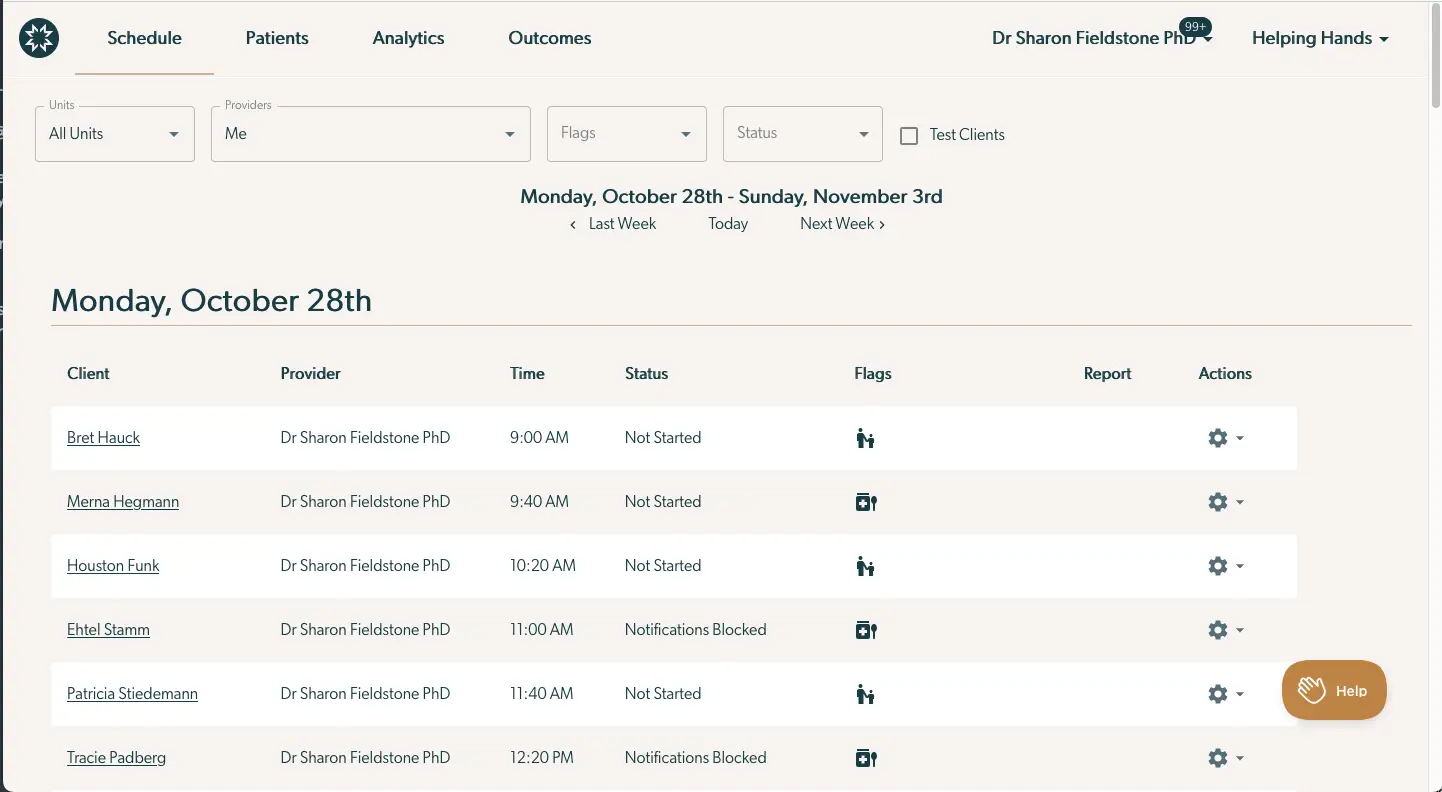
The screenshot displays the schedule interface for Mirah Collaborative Care, showing appointments for Monday, October 28th. The top navigation bar includes tabs for Schedule, Patients, Analytics, and Outcomes, with user options for Dr Sharon Fieldstone PhD and Helping Hands. Filters are available for Units, Providers, Flags, and Status, with a checkbox for Test Clients. The date range is set from Monday, October 28th to Sunday, November 3rd, with navigation options for Last Week, Today, and Next Week. The schedule lists clients with their respective providers, appointment times, status, and flags. Each row includes a client name, provider name, appointment time, status, flags, and options for report and actions, with a gear icon for actions located on the right side of each row. A Help button is located at the bottom right corner of the screen.

Use the provider filter to select a provider with upcoming appointments, and confirm that their appointments in Mirah match their appointments in your EHR. Mirah doesn't have a view that lets you see all appointments in the system, so just spot check one or two providers. Note that Mirah integrations only import appointments in a limited time range (generally a few days before the integration was enabled to a few weeks in the future), so if appointments outside that range don't appear, the integration is still working as expected.